Planet of the Ancients II: Escape from Sirius V
Level and walkthrough
by Richard Szydelko

In this walkthrough I
have purposely left out locations to medipacks, ammo etc. So Explore! Important
items are indicated here, though.
Thank you for playing
this level. Hope you enjoy it.
Uvavoo.
Clear Lake area
As you emerge from the
railway tunnel the huge ship Lucky Lucy rumbles overhead. Keep walking towards
the railway bridge in front of you. Notice the locked gate to your left. Keep
making your way across the bridge notice two tie fighters fly by overhead, keep
walking. Oh no! the tie fighters have bombed the railway tunnel, blocking your
way. You will have to find another route. Look to your left at the end of the
bridge and you will se a section of the fence missing. Climb down to the shores
of 'Clear Lake'. Make your way across to the waterfall area and notice that
part of the waterfall looks different (darker blue) make your way to this area
and walk through the water, you have found Secret No 1.
Pick up your shotgun
and ammo quickly and immediately arm yourself with it. A strange mutated lizard
beast will attack you. A couple of shots should see him off. Now enter the
water and swim around to investigate. Notice about half way along the lake to
the left you will find a small hole hidden by a water plant. Enter to find Secret
No. 2.
Enter the lake area
again but be careful, you have woken a mutant fish. Get to the bank and kill
the bugger. On entering the water again you will see a large underwater cave
opening. Swim down there and you will see two large moving propellers. I
wouldn't advise swimming through them, you need to turn off the props first. To
do this swim back to the columns supporting the railway bridge. You will notice
that some have platforms attached but you can climb out onto only one of them.
Now follows a tricky sequence to get to the other end where you will see a
switch which deactivates the propellers. Climb onto the first platform attached
to the bridge support, climb up and work way around so you are facing with your
back to the support and backflip and twist/cling. This is tricky and you have
to be on the correct rung for it to work. Work your way along the supports (the
route is fairly obvious). PICK UP the fuse object on your way. Finally,
press the switch to switch off the underwater fans.
When you have switched
the props off swim back to the propellers and carefully swim over the top of
them. You will enter a metallic chamber with stairs leading up. Follow the
stairs.
Chambers of the
Ancients
On reaching the
opening be careful, there is a long drop down. You need to make your way up the
ladder to the left of the opening. Continue along the platform towards the
locked door. Insert the FUSE into the holder on the wall to activate power to
the door and power up and old friend. A short flyby sequence follows where you
are introduced to everybody's friend R2D2. Don't shoot him, he is a friend. I
recommend SAVING here. You are in the Chamber of the Ancients which is heavily
booby trapped. You must follow the droids path exactly and more importantly you
must REMEMBER the path it takes. Be patient and slowly follow the droid as he
scans for traps and plots a safe course. When you have reached the top level
R2D2 will disappear into a door... his job done. Do not follow him through
the door, you will not be able to get out again. Instead pick up the
CROWBAR and move back along the walkway to the locked door on the far wall.
Open it using the Crowbar and make your way down the ladder. Press the switch
in the room at the bottom to open the remaining door in the top room. Make your
way out of the room via the other door. Oh no, you are at the bottom again. You
have to make your way back up to the now opened door at the top. Did you
remember the safe path?
On reaching the top
door again press the switch to open the first door we saw by the railway
tunnel. PICK UP the LS KEY. Drop down into the water and follow the
tunnel. You will have entered the Clear Lake again. Careful of the mutant fish.
Make your way back to the now opened door near the railway tunnel and despatch
the mutant. Notice that there is another door below, but it is locked. Do you
remember the little island at the center of the Lake? We need now to get on
that via a ZIPLINE. Go to the corner of the area you are in (to the right as
you walk in the gate). You can jump up here and when at the top jump over the
ridge and slide down the other side.
Make your way towards
the Zip line. SAVE before using the ZIP line as it does not reset if you bugger
it up. Jump off the zipline when you are above the island and jump into the little
hole in the centre. Press the switch which opens the locked door seen earlier.
Jump over the smaller fence back into the water and make your back to the now
open door. Drop into the hole and crawl into the cave.
Green Waterfall Cave
Beware ahead the noxious
green effluent water which will kill you on contact. Jump across the water to
the little outcrop and make your way towards the crawlspace which leads to the
waterfall and open cave area. Beware the mutant. Now climb onto the block in
the center of the room. Face back the way you came and do a running jump/cling
to the block. Then back again to the block on the left.
When at the top you
may notice that at the opposite side of the cave there is a door high up. This
is locked. Notice also the monkey swing going high up across the waterfall.
Don't go there yet instead turn around and head towards the corner. You will
have to crawl some of the way. You can find an opening here. Crawl into it and
into the room. There is flowing water to the left and right. It looks as if you
can get behind the water and into openings. The tricky bit now. Notice the
monkey swing going across the centre of the room. You need to make your way
across until you are opposite one of the openings. Face towards the opening.
Now drop, slide and jump when at the bottom of the slope and cling to the
opening ledge.
This is a tricky jump
so save is recommended here. Press the button. If you fall to the ground you
can make your way up the ladder. You did kill the mutant didn't you? Repeat the
manouever into the other opening and press the button. Secret no 3 can
be accessed by jumping from the second waterfall room (to the right as you
enter room) and over the wall. Keep as far right as possible to avoid damage.
Pressing these two
buttons opens the previously locked door. Make your way back out of this room
and towards the monkey swing which passes over the waterfall. You will need to
jump back and forth across the facing sloped surfaces. Don't go across the
monkey swing yet. Go to the other corner of the cave to find Secret No. 4.
Beware the lurking
Mutant on entering. Now back to the monkeyswing and monkeyswing across - make
your way to the now open door. In the passage you enter take care of the
crushing blocks which move left to right. It's a matter of timing. The tricky
one is the double one. You will need to carefully time a running jump to get
past these. Follow your nose and be careful of the collapsing floor which you
will cross. You will now enter a water area.
Mirrored Water Room]
This is a mirrored
room area. The reflection of the room shows the exits. The room you are
in doesn't! You have to pull two levers to open the hidden trapdoor above.As
you enter the room you will notice in the reflection there is an exit to your
right. Go to it and pull the lever. There is an airhole here so use it! Now
swim out and back towards the direction you came in and you will find another
exit. Pull the lever here and get more air in the first opening. Pick up the SG
KEY towards the front near the 'mirror'. Now swim up and through the hidden
opening. The trapdoor is now open. Get out of the water and proceed down the
passageways.
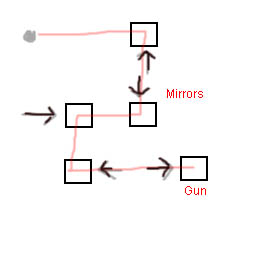
Laser Gun Room
You will eventually
reach a large chamber. The Laser Room. You will notice several doors. But one
in particular has an emblem with a crystal in it. You need to fire the laser
gun at the crystal to open the door, positioning the mirrors in the correct
places. But first you have to make the blocks retract so you can push the Mirrors
and Laser gun. It is not a good idea to get close to the crystal as it has a
self defence mechanism which will blow you up!
First thing to do is
to climb the ladder (you found it right). Make your way across the platforms
and you will notice a switch. Press the switch and you will see blocks appear
out of the wall. The blocks will retract after a time so you need to be quick!
The purpose is to get across to the Jump switch on the opposite wall. After
pulling it you will drop to the floor (so make sure you have enough health).
Enter the now open door and press the switch. A block raises on the first floor
allowing you to progress to the second floor. Make your way up to the second
floor. You have to pull two more Jump switches using similar techniques to the
first. Press the switch then make your way across to the jump switches before
they retract. Notice on one of the sequences you will see a small space high on
the wall. This gives you access to Secret No 5.
When all Jump switches
have been activated all the doors will have opened downstairs allowing you
access to the switches therein which lower the blocks on the floor allowing you
to move the laser gun and mirrors.
See picture for
correct position of movable items.
If your items are
positioned correctly you will get confirmation by a short flyby. When the
crystal explodes and opens the door, walk through. A teleport lies behind it.
Stargate room
You will be teleported
to a different secret location. Investigate and find the door which will
automatically open. Make your way through it and use the SG KEY on the object
on the wall. This will give you a nice surprise and the Stargate will be
revealed. Make your way down to the stargate, notice the step 'track' to your
left. Carefully jump through the centre of the stargate.
The Hot Planet
You will be
transported to a hot planet in a galaxy far far away! Make your way through the
gates and to the building on the left. Notice the LANDSPEEDER. You have got the
LS Keys right? Notice the switch on the wall. First move the vehicle near to
the switch then get out and press the switch. Quickly get back in the vehicle
and make your way out of the door and drive to the left and follow your nose as
fast as you can to get through the gates at the end of the track on time. Once
through the gates avoid the falling blocks and avoid driving over them they
cause damage. Get out of the vehicle.
Notice the trapdoors.
Notice the switch on the wall. This reopens the timed gates. (you may have to
press it twice). Press it and make your back along the track (either on foot or
use the vehicle if you wish). About half way along to the right climb the wall
and find the switch and press it to open the trapdoors. Make your way back and
get in your vehicle. Drive through the tunnel and stop when you get outside.
You will see a large lake area. The object of this area is to find three
switches to raise the platforms so the vehicle can cross safely to the other
side.
Walk forward across
the 'sandbank' run and jump/cling across the gap. and look to your right, you
will see the first switch. Press it the first platform rises. Okay now get your
feet wet and swim to the far corner to your left as you came in. Get out and
make your way round to the centre avoiding the steam (hot hot hot). In the
centre bit notice the switch on the far wall. Jump across and make your way to
the switch. After pressing it make your way to the smaller of the two piers.
Jump across to the block and further jump to the land ahead near the exit. Jump
into the exit and you will find a switch just inside the door. Press that and
all three platforms should have risen. Make your way back to the vehicle and
head back towards the exit. Build up speed for the jumps and you should be ok.
Now go through the
tunnel network running over the BORG troopers RESISTANCE ISN'T FUTILE. Continue
up the track but DO NOT LEAVE YOUR VEHICLE AT OR NEAR A STEEP SLOPE. If
you slide down the slope you will not be able to get back to your vehicle and
you are buggered, the vehicle can get up the slope but you can't! You will
eventually come to a 'roadblock' consisting of two raising blocks which need to
be lowered. The switch is on the wall you have just passed SAVE BEFORE
PRESSING. Press this and hurry back to your vehicle and drive onto the raising
platform beyond. This will take you up but beware the BORG. Try and get off the
platform as quickly as possible and run him over. Just follow your nose and run
over all Borg you come across. When you see the final roadblock ahead keep
going it will lower as you approach it. Keep on going. You are back at the
stargate. Stay in your vehicle and jump back through it.
Stargate room II
Back in the stargate
room you can now go up the steep track and head on out. Be careful you do not
get stuck, keep to the centre of the track. You can leave the vehicle at any
point to explore if you wish. Keep going to the end of the track and get out of
your vehicle. You will leave it behind here. Climb the ladder and drop down
into the tunnel. This is the tunnel which the Tie fighters blocked up right at
the beginning. Luckily they have also blown a hole in the side wall. Exit
through this side wall. Beware more mutants.
Level Jump
Keep going down the
path and you will come to the Ancient Temple.
You will notice that
the level loads. Instead of proceeding further, go back towards the railway
tunnel and you will find Secret No 6.
Ancient Temple
Now go back towards
the temple.On entering the temple proceed past the pool and notice the Laser
gun. Proceed towards the double gates and notice the jumpswitch. Climb the
ladder and do a backflip/twist and grab the switch. This will lower the blocks
giving you access to push the laser gun until it is opposite the crystal on the
wall. It opens the door behind you. Notice the locked door in the pool. Proceed
through the just opened door and up the ladder make your way round the building
until you reach another Laser gun. Notice you cannot push the laser gun, a
block is in the way. There is a raising platform and a jumpswitch, but you need
a key to trigger the raising platform. Make your way back the way you came and
a Borg will appear. You need to kill the Borg to get the Key off him.
The trick is to get as
close to the Borg as possible and fire as many shotgun shells as possible at
him. The Borg is stupid and can't hit you when you are near enough to him. Now
back to the Lasergun room and insert the key into the device which raises the platform,
pull the jumpswitch. Now Move the Lasergun to the other end which lines up with
the crystal on the opposite wall. This opens the door in the pool. Go back
downstairs and through the now opened door. When you emerge from the water you
are confronted by a Borg. This Borg will do you a lot of damage. Head towards
the block in the centre and push the first switch. Avoid the Borg. They are bit
stupid so you can play ring a roses around the block. When you have a clear
point sprint to the opened door. Get the GRENADE GUN. Start blasting the Borg.
If you get in close you are harder to hit. Press other switches to open the
other doors and get more grenade gun ammo and medipack. Note there is grenade
type II ammo which is far more powerful. When you have killed the Borg he will
drop a key item. Get this and proceed back out of the pool.
Go towards the door
you came in and you will see a slot for your key. Put it in and the block will
raise allowing access to the first floor. Make your way around but beware the
second Borg. You must kill him. He will drop the second 'Raising Key'. Use this
to gain access to the second floor. Again kill the Borg (it may be easier to go
anticlockwise around the balcony!) and jump into the 'grotto' . Pick up the
AUDIO DISK. The large gates below will open. Make your way down and out the
doors. As you round the corner a flyby will play. A statue of Lara...Chosen?
Whats that about? Push the statue one way and the gate opens. Push it another
way to reveal Secret No 7. when the raising block rises - climb over the
wall and there it is. Proceed through the gate and you will go through a small
cave and emerge into the Volcanic Valley.
Volcanic Valley
The flyby shows your
objectives. Notice the broken walkbridge. Proceed towards that. Careful it will
collapse as you are walking on it. When on the block do a runningjump and
cling. Press the switch. This borg is a bit more difficult to kill. Requires
tactics of tempting him towards you so you can grenade him. Then seeking cover.
When you have killed him. Proceed along the ledge you then need to jump into
the little 'indent' just below. Now you should be opposite the little island.
You now need to slide down the cliff facing backwards and do a backflip before
you enter the lava to land on the island. Proceed Anticlockwise to the switch.
Press it and climb onto the top of the block and jump across to the second
'island'. Make your way to the top and slide down the slope. Make your way
across and towards the third switch. Watch your footing all the time it is
treacherous underfoot. After pressing the third switch notice the ammo etc.
Make your way back and towards the final switch and door along the ledge.
Another borg needs to be despatched first. Avoid the Lava stream. The best way
to kill the borg is to get as close to him as fast as possible. Beware it is
treacherous underfoot though. Destroy the AutoDroid and jump to the centre
block. Further jump across and continue to make your way around to the switch.
Press the final switch and proceed through the door.
Volcanic caves
Follow the cave around
until you reach a clearing. Do not go the obvious route and slide and jump, you
can not make it. Instead you need to keep to the right and jump carefully. On
the first 'block' do a jump to the next. Then move as far back on the block as
possible and jump again (a leap of faith this one). Drop onto the next one down
and you should then be able to make the standing jump across to the exit block.
Proceed through the
cave, shoot the rocks to reveal ammo. Crawl through the revealed space and you
will enter a large area.
Large volcanic cave
To your right you will notice a switch. Suggest saving here. This is a
timed switch. In order to get Secret No 8. you have to press the switch,
notice the platform starts to raise. Make your way back to the opposite wall
around the back of the block near the entrance. Drop down and shimmy along
until you get to the opposite wall and get up and do an immediate backflip onto
the platform in front of the raising platform. Now do a running jump onto the
platform. This will raise up to the top where you will find the secret. If you
don't make it in time you can continue the level without getting the secret by
going down to the blocks below and taking the more difficult route. Or try
again! Either way you need to get to the centre section. Note as you arrive on
the centre section the second platform begins to rise. Make Haste! you must
make it in time, there is no alternative route here! Once the platform has risen
to the top do a running jump and cling to the block opposite adjacent to the
exit. Jump towards the door. Now slide backwards down the slope and cling to
the wall. Notice the Jump switch beneath you. Pull the switch and drop to the
platform below. Make our way across the platforms, then move up the steps and
jump back towards the door, it should now be open.
Plasma Tunnels
Make your way through
the 'plasma' tunnels. You will encounter a Borg, be ready. Continue through the
tunnels until you reach the Teleporter Room. You may like to Pause and go and
vomit at this point as the plasma tunnels are a bit disorientating. Notice the
pickup in the corner of the room on a raised section. This is a vital clue as
to the location of the 'Scrolls of Time'. Examine this item. Now press the
button and climb up on to the teleporter.
Devils Tower revisited
The teleporter will
transport you to an area you have visited before (if you have played Planet of
the Ancients I). Despatch the Autodroid. Don't let it get close or it will
inject you with narcotics. Proceed towards the Devils Tower and despatch the
Droid. You can climb the 'steps' to your right and over into the area beyond.
You will notice equipment on the wall. Insert the AUDIO DISK. You will hear the
'pop tones', this summons the giant UFO and your means of escaping the planet
and going to Mars. The UFO will respond. Now make your way back to the Devils
Tower. Despatch the final Borg (they really do not want you to proceed). And
climb up now accessible wall to the top of Devils Tower. Now walk into the
light to be teleported into the ship. This ends the second thrilling episode of
Planet of the Ancients II. The third installment, now in production will take
place on Mars and will be the final installment in this series.
Thanks for playing.
Hope you enjoyed playing it as much as I enjoyed building it.
Richard Szydelko
(uvavoo)