Underworld Unfinished Business 3 - The Plain of Jars
An adventure by Richard Lawther and Titia Drenth (Titak)
Authorized walkthrough by Jenni, Moonpooka and Sutekh (edited by Dutchy in 2022 due to broken links to screenshots and some other stuff)
N, S, E, W = Compass directions
(red needle)
| Quick links to: | The Plain of Jars | The Tower of Babel | Hell's Arboretum | Realm of the Water Pagans | The Custodians of Hades | Epilogue: to the Asylum |
-- General Notes --
* Items in Bold are necessary
to complete the levels or get the secrets, either by using them, picking them
up or both.
* You'll find a Combat
Strategies Section at the end of the
walkthrough and a level summary at the end of each level.
Story
The Lizard King is dead but the other Dark Souls are causing trouble - and threatening to send the whole Underworld into chaos. It is believed that the three principle Dark Souls have retreated to the lowest reaches of Lower Hell. Team Anubis were successful in summoning the Ghost Train and now Lara Croft and Demon Smalls are in pursuit of the Dark Souls.
The Ghost Train has arrived at the outer shell of Lower Hell -- an endless desert known as 'The Plain of Jars'. It is the last resting place of agnostics and virtuous pagans. Lara Croft and Demon Smalls' mission is to discover the path that will take them down into The Asylum - the true Realm of the Damned. In this set of levels Lara will receive extensive help from the ever-resourceful Demon Smalls and also from the agnostic souls she releases.
Game Objectives
Find the 4 Elements you need to activate the machinery in the nearby Asylum Gateway building so you can access The Asylum. The playable region of the desert is defined by the Totem Skulls. If you pass beyond them you will end up back in the middle. However, there is one portal (near the signpost) you can use to pass to another section of desert. There are 10 secrets in U-UB3 ...3 of them are the Expert's Medals.
The Expert's Medals:
These will be in clear view. The expert's challenge comes in figuring out how to reach them. All will be testing movement based challenges - but not the sort that relies on blind luck and the whims of the temperamental level editor ... rather the sort of moves you have to figure out and that are a genuine test of skill. The medals will be Bronze, Silver and Gold (depending on difficulty) If you are skillful enough to get all three you can then collect the Expert's Certificate. The challenges will be beyond some players and so these things are not required to complete the game - and can be easily bypassed.
The remaining 7 secrets will be the usual well-hidden pickups. There is no bonus level.
Secrets rough locations:
- The Desert levels: 1 secret
(The Expert's Certificate).
- The Tower of
Babel: 2 secrets including the Bronze Medal.
- Hell's Arboretum: 2 secrets including the Silver Medal.
- Realm of the Water Pagan: 3 secrets.
- The Custodians of Hades: 2 secrets including the Gold Medal.
NOTE: The three levels containing medal secrets cannot be returned to once the player has left them!
== Prologue: The Plain of Jars ==
The ghost train has arrived in the desert with Lara and Demon Smalls on board. Demon Smalls looks at his copy of Virgil's map... "Hmm..." he says, "what's this!?" He takes a walk... "I wonder what's round here" he mumbles, and he trundles off into the desert.
Lara can now go and explore the large desert area. There are two buildings which are redundant for now, but we will go take a look inside because there are a few pickups and also some things to note for later.
Head SW of the train and jump up into the desert sands. Beware as you travel as the small blue mushrooms release bugs. Now traveling west, nip into the left building and take a look around. Ahead there is a lock, and you will come back with the Palace Key later to open those two gates either side of the room. That is all there is to see here, so go back outside and straight ahead to enter the north building.
First go take the magic elixir from the NE corner, then run up the slope in front of the fire emitter and jump to the central ledge for some PEU ammo. Drop down and go down stairs to the lower room. At the north wall, there are two pedestals where you will be placing the Fire and Water elements later. To the south in the central alcove, is another pedestal where you will be placing the Earth element. Now go either left or right of the south plinth and judge the fire emitter to get into the passage beyond. There are two ladders back here, but you can use either to lower Lara into the room below.
Take the shotgun ammo from the SW corner and manna from heaven NE then look up at the north wall. You see three symbols; they indicate the three Medals you will have to collect on your way through the levels in order to get the final secret, the Expert's Certificate, which is located in the back north room surrounded by a gold cage. Nip through and take a look. Once you have all three medals, bring them back here and place them on the cage to retrieve your final prize.
Ok, time to move on. Make your way back up top and go back out to the desert. Head west and you will come to a sign post. If you look north you will see a windmill, and that's where you will place the Wind element later on.
But for now, you must head west and under the bridge behind the signpost, to transport Lara to her next destination.
Second Desert Area.
Just a short trip now to get into the next level, so make your way to the SW building and go inside. Go either left or right to enter the next level.
==== In this part, you should have found...
Enemies: Bugs
Watch the cut scene of the beautiful tower room, then head over to the SW corner of the room. Nip up the steps and find a floor hatch to open and go down into the passage. You will have to judge the spikes and take them on when they are up, I found this to be the best way, and you lose no health in doing so.
At the end of the passage you come to two rooms, take note in the first room of the hole in the west wall, this holds a secret which you can get later, then head through to the second room and take The Gate Key. Return to the main room now and make your way to the small building at the NE corner. Use the Gate Key in the Gate Keyhole on the N wall of the building and the gate will open to your right. Go through to the small room and use the lever on the east wall to open three gates out in the main room. The gates are numbered I, II and III and are located at the north, west and east walls.
Return to the main room now and take a right to the Magic Elixir on the corner block near to the building, then go to the central structure and nip down into the dry moat to collect the Shotgun and shotgun normal ammo from the low block W. Now it's time to tackle that first room. Climb out of the moat and go to the North gate.
Gate I
There is a pool ahead and a sleeping skeleton nearby, he won't annoy you just yet, so drop into the pool and swim through to the next room. Climb out and meet your first skeletal harpy, (you can take him out with pistols easy enough if you jump around a bit, that will save your shotgun ammo for later attacks in smaller rooms) then find the wheel on the west wall pipe and turn it once. (This is one of three wheels you will need to use to flood the moat in the main room.) Collect some more shotgun ammo from the NW corner before dropping down the ladder at the west wall to the room below.
There's some more shotgun ammo on the south side of the room, so grab that then use the skull lever in the NE corner to open a hatch near the ladder you just came down. Drop down the hatch and arrive back at the entrance pool, skeleton is now awake so shoot him into the pool, (or you can get him to disintegrate if you shoot him enough with pistols) then return to the main room.
You will be greeted by a skeletal harpy and you know what to do. Now head to gate II at the west wall and go through.
Gate II
Make your way through the passage, taking care at the corner spike trap hole, and continue on until you reach a pool room with a broken bridge type ledge and ladder to the right. (Do not go into the pool for that ammo as the current will hold Lara under, but you will be able to get that ammo later.) Jump to the ladder and head up top. As you climb onto the ledge above another skeletal harpy shows up to greet you, so gun him down then jump to the west ledge and use the wheel on the pipe before dropping back down to the bridge. You can now return to the main room and enter gate III
Gate III
Kill the skeletal harpy that's waiting for you, then take some shotgun ammo from the corner ledge to your left. There's a pool in here, so drop into the water and line up with the hole in the east wall. Now things become tricky. Through the hole are spike traps lining the tunnel, it's a touch and go passage through and I found the best way is to take the high route when the spikes are up, stop between the spikes makes it an easier view, but eventually you will get through and arrive in another water chamber.
Climb out and find the third wheel on the pipe at the east wall and use it to finally flood the moat outside. You will get a nice cut scene of this happening, and then you can return to the main room using the ladders provided on the "now dry" pool walls.
Back in the main room; you can go visit room II again and get the PEU ammo you couldn't before due to the current. You also have to get both secrets of this level before you proceed up the central structure, as you can't return for them once you have left the level.
Secret one - Bronze Medal
Go to the south wall where gate III is, look left of it for a hole in the wall and climb in (SE up on a slope under the big window). You will see "Bronze Medal" written on the wall. Go left and enter the small back room and you will see your prize on a pedestal, but it's surrounded by spike traps so don't think its easy pickings. You will notice a raised platform with a collapsible tile on the top, and also to the left and right on the ground, there is a flatter spot on the slope which allows you to stand quite close to the upper platform. I stood to the left as I found it easier but either side will do. Now jump up onto the raised platform and immediately roll, do a diagonal run jump and grab the ladder above the Bronze Medal (see screenshot), quickly climb up to avoid the spikes, then when they retract drop and nip onto the safe tile ahead. Secret #1: The Bronze Medal is now yours for the taking, so grab it then nip over the spikes when they’re down and go back out to the main room.
Secret Two - PEU
Remember the gate key room and that hole in the wall? Well you can access that now because the rooms below the hatch are flooded. Simply nip down the hatch, mind the spike traps and swim through to get your prize (from a hole in the left wall before the Key room), Secret #2: The PEU (Plasma Enhanced Uzi), and then return to the main room.
-- The Central Tower and the Four Horn Symbols --
It's now time to climb that tower, so drop into the moat and swim to the sloped block by the ladder walls (E of them). Pull up on the left side of the block so you gain height, and then back flip with a twist to grab the wall ladder behind you.
Shimmy left and go round the wall onto the second ladder. Climb up and shimmy left onto the gold bar above the slope, then Lara will drop, so grab the slope below (see screenshot CentralTower1.jpg) and pull up, slide and grab the monkey swing and go left until you are above another slope. Drop and grab the slope then jump immediately from the top to grab the next monkey swing. Swing around the route until you come up against the next wall ladder, then drop and grab it. Back flip to the ledge behind (do it now or you will lose the pick up later) and grab the Manna from Heaven. Jump back to the ladder you just came from and shimmy left round the wall twice until you are on the west side of this wall, then keep on the right side of the ladder. Go down to the water level and do a back flip onto a slope, grab the edge and shimmy right around to the ledge with the skull lever.
Use the lever and see the ladder extend on the manna from heaven ledge. Now jump with a curve around the slope to get back onto the west wall ladder. Shimmy round until the new extended ladder is behind you, then back flip and twist to catch the ladder. Now make you way up to the top.
Head east and to the end of the ledge. There is a floating collapsible tile to your right, jump to it then quickly turn to the SW and jump back to the tower so that you land on the ledge to the left of where you just came from. There is another sleeping skeleton here, so go use the lever on the north wall and see a pole appear on the tower elsewhere, and also wake the skeleton. You will have to get rid of him as you have a rather hard jump to do now to get back to where you just jumped from to the collapsible tile which involves a banana jump from the east ledge (Or hop down onto the slope next to the skull lever ledge and make your way up again as before). Face the ledge you have to get back to, and place Lara's right foot at the edge of the east ledge, jump back once with a step as well, so that you get a good run at it, then run jump with a left curve and Lara should land on the ledge. This may take a few tries.
You can now see the pole by the ladder you came up earlier, so grab it and make your way to the top, back flip off to arrive on the upper ledges, and now to get those much needed items.
First Horn Symbol
From the pole, head east to where you see a pillar to your left with shotgun ammo on top. Jump to the pillar and then run jump to the blue floating platform. Jump again so you arrive at the outer walls of the room then head east to pick up some PEU ammo. Return to the first outer wall ledge then head west and jump into the window alcove to your right. Now jump to the higher west ledge and pull up. Run jump to the next two ledges to the west and you will arrive in the NW corner of the room.
Go left and drop down one step, then grab the wall gap to your right and shimmy left until you arrive on the central ledge with a lever. Use the lever and watch as a block rises in the NW corner you just came from. Grab the shimmy gap again to get back to the corner and go up the newly risen block.
Pull up to the higher ledge to your right, and make your way east to collect the first Horn Symbol.
Go back to the risen block and nip down to the lower east ledges, then it's a simple trip back east to the blue floating platforms to get back to the tower.
Second Horn Symbol
Back on the tower you need to go back to the top of the pole, then standing at the west edge of the ledge look SE and onto the tower for an alcove to jump into. From here you can see the second Horn Symbol to the east. There are slopes either side so take a running jump up onto either side of the slopes and bounce your way to the end. Now simply drop onto the ledge and take the 2nd Horn Symbol from its resting place.
Third Horn Symbol
From the second Horn Symbol ledge, jump back to one of the slopes and bounce back to the other end, but make sure Lara is facing south, so that when she arrives at the far end she can jump onto the corner ledge (see screenshot).
There is a ladder here but don't use it just yet. Face NW and jump to the outer ledge of the tower, there is a skeleton waiting for you so quickly knock him off before he sends you crashing down. Grab up to the ladder there and climb up for the Third Horn Symbol. Climb back down the ladder now and return to the corner ledge with the ladder (SW).
Fourth Horn Symbol
Ignore that ladder again for now and look to the south. You will see the final Horn Symbol over at the outer wall of the room, and some more blue floating platforms. Jump the first floating platform, then run down east onto the lower one, from here take a running jump to the steps at the south side of the room and go to the top of the steps. Go left, jump to the ladder and go up.
Note; behind you, to the W is the Horn Symbol ledge, but you can't reach it yet as there's a timed hatch to raise first. (It's in front of the Horn Symbol ledge.) So, heading east make your way to the outer east wall and the lever to raise the hatch. Save your game and hit the lever, but immediately hit the look key to cut the scene and save time. Race back over the ledges and jump to the hatch, then pull up and nip left to take the Fourth Horn Symbol.
A skeletal harpy will attack so be quick and shoot him down before returning to the bottom of the steps.
-- The Way Out --
Jump back to the lower blue floating platform then use the pole to go up. This was really tricky for me as you have to have Lara in exactly the right place for her to back flip and land on the upper blue platform, so, shimmy up until Lara can back flip without hitting her head on the upper platform (stand against the pole facing E and don’t jump up, but just hit Ctrl, then climb up 9 grabs).
Now you can jump back to the SW corner block of the tower and head up that ladder at last.
Go to the end of the ledge, and jump left onto the E side ledge of the tower, then face the W wall and hang drop off of the ledge. You will see a crawl space in the W wall of the tower below you, so drop and grab it then crawl through to the inner room on the tower. Climb the ladder inside and make your way up to the upper room. Turn around, run to the E edge and locate the shotgun ammo to your left on a block. Run over the corner to that block or shimmy along the edge and pick it up. Return to the ladder you came up from. Find the hole in the ceiling and pull up to the top of the tower.
There are four slopes here, one is higher than the others (SW), so take that one and go stand with Lara's back to it. Now place Lara as near to it as you can get her and with her right shoulder against the wall. Take one step forwards and back flip onto the slope, jump and at the same time hit the right key without using action so that Lara lands on the upper wall of the tower.
Up top you will find the four receptacles for the Horn Symbols, and a hanging central lift. Use the Horn Symbols to activate the lift, then jump onto it and watch as it takes Lara up and out of the level.
==== In this level, you should
have found...
Enemies: Skeletal Harpies, Skeletons
Items of note: Gate Key, 4 Horns Symbols
2 Secrets including
the Bronze Medal
some Traps -
1 timed-run
== Interlude 1: The Plain of Jars ==
You're now back in the Plain of Jars, standing on the very roof of the Tower of Babel. Run ahead (NW) to the opposite corner and pick up the Air Element on the pedestal. Now go to the SW corner and notice the ladder on the structure. Jump and grab the ladder and pull up on the roof.
What you're seeing now is your first Trapped Agnostic Soul and since part of your job here is to release them, shoot the glass case and set it free. The soul helps you in return by raising a platform on the roof below, granting access to the floating platforms to the N you've probably already spotted.
Return on the roof by dropping from the N side of the Soul terrace, pull up on the newly raised platform and turn N to face the first floating one. Do a run jump and grab to pull up on it (or walk to the edge and do a stand jump and grab, your call). Turn left (W).
-- To Hell's Arboretum --
Jumping through Fire
The next floating platform looks a bit different for the very reason that it's collapsible as is the next one. Do a run jump and grab to it, pull up and do another run jump and grab to the edge of the next collapsible tile. Don't pull up. The next platform is trapped with an on/off central fire and you need time to prepare your next jump. So shimmy around the tile instead until you reach the very corner in the opposite side. Save. Pull up and immediately backflip to land on the fire trapped corner, avoiding being burnt [note: it doesn't work each time, though, and you might end up burning, hence the "save" advice]. The trick to deal with the following trapped platform is to stay in the very corner, so the fire can't burn you (aka "the corner trick").
Turn left (N), wait for the fire to turn off and do a run jump and grab to the next platform. Shimmy to the left and pull up in the corner. Turn left (W) and do a straight stand jump to land on the next platform corner. Turn right (N), wait for the fire to turn off and do a straight run jump. You'll land on the far corner of the next platform. Now turn 45° left (NW) and do a stand jump to the rocks extending from the wall ahead.
Ladders, Cracks and Monkey Swings
Turn right (NE), run a bit then climb down the stairs to the N. There's a rectangular hole on the lower level with a closed portcullis beyond. Don't jump or drop down, the floor below is riddled with deadly cactus. Go through the opening to your left (W) instead. There's a skull button there to your left (S). Push it to open the nearby portcullis.
Run through it and turn left to reach a large opening. There's a ladder ahead running up the wall. Do a run jump/grab to it and climb up until Lara's feet are on some sort of frieze on the wall. Backflip, roll in mid air and hit Action to grab the edge of a sloping roof. Shimmy to the left to the other end and pull up, backflip, roll in mid-air and hit Action again to grab the edge of a hanging platform. Pull up.
Turn left (S), stand up and grab the monkey climb above. Swing to the other end and let go. Turn around and safety drop down to the corridor entrance below. Climb down the stairs, reaching a large terrace with pillars. There's a ladder on the wall in the distance to you left (S) but ignore it for now. Run ahead to the edge and turn left (S). Stop at the second pillar to your right. There are spears going around it, meaning it's more or less grab able. Turn to face it and hit Action+Forward: you'll grab the crack marked by the spears. Shimmy around to reach a ladder and climb down to the gap below. Let go, climb up a bit until you're at the top of the ladder, let go, immediately hit Action to grab the lower edge of the gap and hit Duck to pull up through it.
Run to the other end of the red-lit corridor and climb up the ladder there. Pull up at the top. Jump up and grab the monkey climb above, swing over the lava to the other end. Let go before the last turn and go push the skull button ahead (S), extending a ladder in another part of the castle. Turn around and return under the monkey climb. It's too high to be grabbed from where you stand. Notice the slope on your left (E), turn right (W) so Lara turns her back to it, standing against the opposite wall. Backflip, jump and hit Action to grab the bars. Make your way back to the other side of the lava pit.
Once there, turn 45° jump SW over the hole you came from and go to the opening ahead. Safety drop down from it to the Pillars Terrace. Turn right (S), and run to the edge toward the ladder against the E wall. Turn 45° left (SE) and do a jump/grab to the ladder, taking off one tile away from it.
Hurrying Over the Void and Bouncing Over Lava
Climb up and pull up on the newly extended platform. Turn right (S), walk to the edge and do a stand jump/grab to the ledge above. Pull up. Run to the other end and climb up the ladder there and pull up. There's another Trapped Agnostic Soul here so free it by shooting the glass case [note: in some cases, the glass won't break. In this case try reloading a previous savegame]. This one opens a nearby grate door in return. Go through it by turning left (N) after the now broken glass case. Run off to the small alcove below and go to the switch to your left (W). Save: you're now in for a timed-run.
Activate the switch and immediately hit "Look" to interrupt the camera (which shows you two Timed platforms raising nearby). Turn 90° left, make one single running step and hop up to the terrace. Run with a hard right curve to the edge of the terrace you came from and jump onto the first Timed platform (see screenshot). Keep running and do a long run jump and grab to the next platform, hitting Action at the very last moment. Pull up, run with a right curve then jump to the flat opening in the roof with a right mid-air curve. Congrats, you've done it!
Run through the passage until you reach a lava pit lined with slopes. Don't try to shimmy along the roofs to the other side: you'll soon meet harmful sliding blades. Stand jump on either roof instead and keep bouncing from one to the other while keeping left or right pressed. You'll eventually reach the other side safely. Release Jump there to slide to a safe tile.
Climb down a ladder to a small balcony and turn around (E). In front of you is another Trapped Agnostic Soul. Shoot the glass case to free it. It will lower some cactus elsewhere in the desert. Watch the fly-by with attention: Demon Smalls comes and places a Torch where the cactus were, under a lit lamp and a sandglass, then the camera shows you a forest of cactus barring the access to an entrance in the castle. You now have to go fetch the torch, meaning finding your way back down.
Fried Cactus
Don't try to jump on the nearby sloping roofs, they're very much fire trapped. Climb the ladder to return by the lava pit above, go to the other side (you can shimmy this time, the blades won't reappear) and return to the opening in the roof overlooking the desert. Turn around (E) and side jump on either nearby roof. Slide backward, grab the edge and let go (you'll lose a bit of health in the process). Slide backward again until you reach the flat top of a pillar (or more precisely a flying buttress).
Turn right (S) and do a series of hops from pillar to pillar until you reach the last one. You're near the ladder you extended a while ago. Go to the right side of the pillar, turn left. Run jump onto that raised ladder platform, climb all the way down and then let go. Slide down the slope, grab the edge and let go again to eventually be safely back on ground level. Now time to find this torch.
Turn right (S) and run ahead, then around the corner of the castle: you'll soon spot the sandglass to your right (SE). Run to it around the pool of poisonous water and pick up the Torch. Light it on Lit Lamp nearby. Turn right (N) to face the castle, and run to its right (SE) corner then around it. Run ahead, you'll eventually find that cactus field to your left (W). Stand on the green patch close to them (but not too close, they're deadly) and toss the Torch. Most of them will catch fire and disappear after a while, granting access to the opening beyond. [note: you have to stand precisely on that green tile before tossing the Torch or else the cactus will burn alright but won't disappear, and you'll have to reload].
Go in there and turn a bit, passing through an opened portcullis on your way and very soon entering Hell's Arboretum.
==== In this part, you should have found...
Items of note: Air Element, Torch
Lots of Traps -
1 Timed-Run
Run ahead a bit and behold! Some arboretum it is, indeed. Here you'll meet the weirdest specimens of plants you've ever seen, and some of them are very much capable to move and attack, mind you. You can also see some strange little fellows bustling about gardening. There are many other interesting things here, and you'll be back more than once. For future reference, we'll call this place the Garden.
Take a good look around: there are openings to your left (S) and right (N), deadly pools of poisonous water ahead (W), and if you look up you can spot a bridge with cactus on it. There are also 3 little gardeners buzzing about. You don't really have to shoot them down, but they'll attack if you come too close and they're poisonous (probably from the sap on their hands). Another danger awaits you in the form of swarms of mosquitoes hidden in some of the giant sunflowers. Noticeably for now the fourth one on your left (NW).
Once you've cleared all this, run to the opening right of the entrance, beyond the mosquitoes sunflower. Serious business starts here.
-- Hormones are Good for You: The Pheromones --
Attack of the Killer Diana
Pick up the Magic Elixir on the pedestal to your left (NW) then cautiously go through the corridor right of the entrance (E) to enter a room with a Killer Dionea casting lighting bolts at you (granted, it might not be a dionea, but it looks very carnivorous anyway). Don't try to shoot it, your bullets won't even scratch it. What you need to do is go to the other side of the room as quickly as possible to avoid being hit too many times. Considering said other side is beyond a pool of poisonous water, it won't be that easy.
Look up and notice some lit square lamps on the ceiling. They mark safe platforms underneath, meaning the other ones are deadly (fire trapped, as a matter of fact). Do a diagonal run jump from the ledge to the first safe platform (NE) then a stand jump to the next one. Quickly turn left (NW) and do another stand jump to the last platform and from there a run jump to the ledge. Run to the left (W) in a new room where the Dionea can't reach you.
Fire and Cactus
Climb on the giant stem there and backflip at the top to land in a small square room. There's a small closed door (W), a little garden to the N and an passage to the S. Go there and run to the other end of the corridor. Turn left (E).
Ahead of you is a lava corridor with on/off flamethrowers to the left and a recess to the right between them. Above you is a monkey climb. Jump up, grab it and cautiously swing as close to the first flamethrower as you can. Wait for it to turn off and swing past it then to the recess to the right (W). Pick up the Manna from Heaven there on a pedestal. Grab the monkey climb back again, deal with the second flamethrower like you did with the first. Let go to land on safe floor at the end.
Go down the stairs to reach a ledge overlooking the Garden. Ahead of you in the opposite side (S) you can spot a pedestal with something on it (but you'll get this later). To your right (SW) is the bridge with cactus you've spotted from below. Go right (W) and run along the ledge (noticing on your way there are in fact two cactus bridges) until you find a pedestal with PEU ammo on it. Pick it up (notice the skull button ahead in the opposite side of the room). Now return to the cactus bridges.
You need to reach the other side, which means you have to cross the cactus bridges (lucky you!). There's a safe tile between each cactus so you'll do this by doing zigzag run jumps from one bridge to the other. Start on the first safe patch on the W bridge. It’s possible to do so without losing any health provided Lara's position and angle before hopping back and jumping are perfect and you never touch the cactus. Generally, walk to the edge, stand in the middle and turn to aim at the middle of the next safe tile. Hop back and do a straight run jump. If at some point you can't manage to do this without losing health, try a stand jump/grab instead, carefully pulling up on the very middle of the tile.
Once you've made it and reached the southern ledge, go left and pick up shotgun ammo. Head W to the skull button, and push it to open the door in the room above the giant stem.
Detour for Secret 3:
Go to the E end and spot a crack in the E wall, run jump/grab to the crack and shimmy left to the alcove, behind the vegetation is an opening, grab up and go get Secret #3, PEU Ammo and Flares. Go back out, hang from the alcove and shimmy right a bit. You can drop onto a little mound of dirt below.
Enter the N doorway again, do the jumps past Killer Dionea and go up the giant stem to the room above.
Head W through the small door you opened with the skull lever.
Mushrooms Bouncing.
Through the doorway take a right into a passage, go down the giant stem. You’ll arrive at the Mushroom pool. The idea is to turn the red Mushrooms so you can access 4 floor levers around the pool.
1-Run jump to the NW onto the tilted mushroom and backflip into the room (see screenshot), throw floor lever 1 to change the position of Mushrooms and open the exit gate (don’t use it now).
2-Walk to the edge of the Mush pool and spot the opening you saw in the cut scene to the right (N). Now aim for the right hand side of the Mushroom in front of you. Run jump over the top of that one onto the one behind it and then slide to the end of it, jump and jump again going right, curve sharp left so you hit the Mushroom there and now keep jumping with a bit of right curves to land in that N opening (see screenshot), throw floor lever 2 to change position of the red Mushrooms and go to the SE point of this floor.
3-Run jump onto the SE Mushroom. And keep jumping (before last jump with a sharp right curve) till you end up in the E room again (see screenshot). Now you can do the same all over and you’ll go in the W direction and then left (S), be careful, you have to keep facing forwards other wise you will not be able to correct your direction and take the left hand Mushroom where you have the choice of 2 directions, and you will end up in the S room. Throw floor lever 3 to change the direction of the red Mushrooms to the W opening (cut scene of a phial on a pedestal).
4-Walk to the NE corner of the floor and do a right curved run jump to the Mushroom around the corner (see screenshot), landing close to the right hand wall and again a sharp right curve jump (or maybe bounce from one Mushroom to the other steering right) to land on the ledge with floor lever 4, this one will change position of a Mushroom and opens the gate to the entrance passage. Go through the doorway N to where lever 1 is and stand at the edge, just left of the middle. Run jump over the first Mushroom W, slide jump to the next and then a hard left curved jump to the red Mushroom then straight, close to the W wall you’ll bounce left and at the “2 Mushrooms” at the W side where you can go left or right, take the right hand one this time and end up in the W alcove with the Phial of Plant Pheromones. The flyby shows that the plants no longer see you as an enemy as the pheromones mask your smell and the last shot is of Sentry-gun plants, also de-activated.
-- Three Precious Ingredients --
Locate the opening up ahead (N) and pull up into it. Climb the giant stem and backflip in the room above. Turn around (S) and follow the corridor to a door which will open as you approach. Go through the opening to the right (S), run into the corridor then straight past the giant stem. Continue to cross the next room then through the doorway to the left (E) to be back in the room above the first giant stem. Climb down, go E and jump over the pool where that Killer Dionea has now withered.
Go right/left to the Arboretum.
An Interesting Discovery
Head into the opening S, up the stairway. Climb up the giant stem at the top of the stairs and turn 90° left or right before backflipping into a new room. There are two openings there to the S, with a sign between them reading "Plant pheromones mask the smell of enemies". What this means is that would you have come here without getting the Pheromones first, you would have been in big trouble in the next room. Go there.
You see those lovely sunflowers which follow you with their err... stamens? They're harmless now, thanks to the Pheromones. Without them, though, they would have mercilessly fried you and/or shoot you to death, charming plants as they are. By the way, don't go too close to them. They grow on deadly lava soil.
Apart from them, there are also three openings here, each topped by a carved stone sign. You'll now have to visit all three areas beyond them in turn. Let's arbitrarily start with the left (E) one.
The Manure Ordeals.
[note: in order to solve the upcoming puzzle, make sure SFX is enabled and that the volume is loud enough ("P" - Options - SFX volume)]
Go through the left opening, run through the corridor then across the passage with small flowers growing on lava soil. You'll eventually find a pedestal to your left (NW). Pick up the scroll on it, which will allow you to Summon Demon Smalls later. Run into the next room.
Notice the closed door to your right (SE) then turn left (N) and pass the first turquoise platform. There are nine golden ones before you. Ignore them for the moment: you must step on some of them to open the closed portcullis beyond, and you have currently no way to know which ones. There's a skull button in the far left corner (NW). Go there by running along the right (E) wall then left (W) past the portcullis: the first sunflower left of the entrance (NW) is infested with mosquitoes. Push the skull button to open the small door in the opposite side of the room and go there, again running along the E wall.
Run along the corridor and use the summon scroll on the stand at the other end, de facto summoning Demon Smalls. Watch the fly-by: Demons Smalls appears, mumbling "there sure is some crazy s**t going down here" then auscultates the turquoise platform, with a very professional "Okay". Looks like he now knows which of the golden platforms are the good ones.
You can try to solve that platform puzzle by yourself, or… (see screenshot). Once the puzzle is solved, the portcullis in the N side of the room will be opened.
Go through the newly opened door and pick up the Manure Crystal on the pedestal. Your task here is now done. Return to the Moving Sunflowers Room (SW and follow through).
The Seed Ordeal
Enter the next opening: the one topped by a sun-like sign on your left (S). Run along the corridor until you reach a place riddled with flamethrowing flowers growing on lava soil. They're the on/off type, so dealing with them is mainly a matter of timing. Proceed to the other side of the red ledge. Don't go right (W), it's currently a dead end. Locate the ladder against the wall ahead and jump over the lava to grab it. Climb a bit to pull up in a hidden opening covered with foliage.
Run along the corridor then climb up/pull up onto the blocks to eventually reach a new room. You're in fact standing above it. There's a transparent floor you can walk on, but what you really need to do is go to the room below. Make sure Lara's healthy enough, turn around after the entrance and drop down from here into the room below, losing about 1/4 health in the process. You're now in the Small Garden.
Turn around (W) and take a look around. There's a closed portcullis to your right (N), two diamond doors (one blue, one yellow) near the far right corner (NW) and an opening in the far left corner (SW). If you look up and right, you'll notice a couple of sprinklers on the ceiling.
Go to the far left opening and run along the corridor to reach a small room with a small poisonous water pool and a skull button to your right (S). Push the button. A fly-by starts, showing you the sprinklers turning on in the Small Garden room. Soon, two baby sunflowers grow, quickly running through the diamond doors (Weird indeed... But you do realize that you're not in just another arboretum, don't you?).
Turn around and return in the corridor. Draw your gun to welcome 2 little gardeners running right at you (probably the sunflowers nannies) and return to the Small Garden.
Pass through either diamond door. The newly born sunflowers are here, and they have grown up a lot. Take a look around: there's a large portcullis here to your left (S). You can also see a blue square tile on its left and a yellow square tile on its right. Now take a closer look at the sunflowers. One has blue stamens, and the other yellow ones. I suppose that by now you know what to do. Both sunflowers are moveable. Simply push/pull them on their respective tile to open the large portcullis.
Pass through it and pick up the Seedpod on the pedestal. Return to the Small Garden. The portcullis in the far left corner (NE) is now opened. Pass through it and run through the short corridor to be back in the flamethrower flowers passage. Deal with them like you did the first time and return to the Moving Sunflowers Room.
The Water Ordeal
Let's now go for the third and last ingredient. Go through the opening to your left (W), topped by a water sign. Run through the corridor, soon entering a large pool room with a bridge extending across. Either do some run jump and grabs from ledge to bridge to ledge, or jump in the water and swim to reach the other side, it doesn't matter for now. Run along the corridor to enter a new room.
Alright. This one's quite different and not that inviting. First the water here is deadly and poisonous. Second, there are four swinging prickly pears, which won't help to easily reach the other side. Notice the alcove in the wall to your left (SW) beyond the second prickly pear: it's your first destination.
Hop to the platform with the 1st prickly pear and walk ahead a bit, turning slightly left to aim at the very corner of the low ledge SW. Wait for the sprickly pear to swing back and do a straight run jump. Turn to face the nearest corner of the opening in the wall and do a straight run jump up into it (see screenshot). Push the button to raise a block on the low ledge.
Turn around and walk to the edge. Turn left (NW) to the newly raised block and hop to it. Turn right (N) to face the 3rd prickly pear platform and do a run jump/grab to it. Again, don't pull up yet but shimmy to the right and around the corner until you reach the wall. Pull up and do a run jump to the safe platform ahead (W). Notice the closed portcullis beyond the fourth sprickly pear ahead as well as the ladder on your right (N) topped by a crawlspace. Turn to it, walk to the edge and do a stand jump to grab the edge. Immediately hit Duck to pull up in the crawlspace.
Crawl a bit then stand up and turn right (E). There's a lava pit ahead and a monkey climb on the ceiling. Stand up, grab the monkey climb and swing to the other side of the pit. Let go and crawl through the low crawlspace. Drop down at the other side and run through the corridor until you find a skull button. Push it to open the portcullis in the Sprickly Pears Room. Run/Crawl/Swing to the other side of the lava pit.
Get back on the ladder, climb down as much as possible then backflip to the safe platform behind. Turn left (W) to face a block with a slope on its left and do a run jump/grab to it. Walk to the wall, turn left (S) and slide down the slope to the other side of the 4th sprickly pear.
Pass the new opened portcullis, go either right or left and eventually enter a vegetation covered room. There's a pedestal to your left (S). Pick up the Water Crystal on it. You hear a watery sound in the distance. Return to the Sprickly Pears Room, stopping before the 4th sprickly pear.
The very good news is that the water is now pure and safe. Turn left or right to face either slope and stand jump up. Turn to face the pool and jump in the water. Swim E to the other side of the pool, pull up on the low immersed block then on the one ahead to exit the water and follow the corridor to the right to get back to the large pool room.
Well, all that poison needed to go somewhere, didn't it? Obviously you can't just swim to the other side now. Do run jump/grabs over to the other side. Return to the Moving Sunflowers Room.
-- Lara and The Beanstalk --
Okay. Now you have manure, water and a seedpod. All you need to grow a plant. And the best place to grow is a Garden. Return there by running through the closest opening to your left (N). Stop by the giant stem, jump and grab to the stem. Slide down and run down the stairs (N) to get back in the Garden.
Turn left (W) and run to the other side of the Garden. You'll find two dispensers there: one for water on your left (S) and one for manure on your right (N), as well as a square patch of earth in the center.
Go there, standing before the central tile facing W and place the Seedpod here (hit Action). Now go to the Water Dispenser to use the Water Crystal (mind the sunflowers beyond the SW corner of the patch, one of them hides mosquitoes). Water now flows to the patch. Cross the room and go place the Manure Crystal on the Manure Dispenser: manure now flows into the patch as well and the seed starts to grow.
And grow... and grow... and grow. That's one beanstalk you've got now! It's climbable, as all giant beanstalks go, so climb it up. Pass the second floor and continue up until you're on the third floor level, face W, climb as far as you can and 4 grabs back down, then from the right hand side one grab left is the exact spot go). Backflip, roll in mid-air and hit Action to grab the liana ahead. Swing and jump to the ledge.
There's an opening in the opposite side of the room (W), but ignore it for now. Time to collect the Silver Medal.
The Silver Medal
[The whole section is dedicated to a secret, so I won't use green here except for the secret itself. If you want to find it by yourself, skip directly to the "Leaving the Arboretum" section below.]
Run ahead (E) then around the corner and along a short corridor to enter a room with a giant dionea (Impressive, isn't it? Not the same species as its Killer cousin, though, and perfectly harmless). There's a closed portcullis to your left (W) topped by a sign reading "Silver Medal". Cross the room minding the lava soil in the center and go to the high crawlspace opposite the entrance (N). Pull up in it.
Crawl a bit, drop down, turn around and go push the skull button ahead (W), opening the nearby portcullis. Go there via the crawlspace and pass through the doorway.
You find yourself in a room bathed in poisonous water. There are some mushrooms ahead of you, a monkey climb running under collapsible platforms and a patch of deadly cactus. Ignore the mushrooms and run right (N) then W after the corner. You'll soon see two openings in the opposite wall (your destination) and a crack running along the left wall (S).
Your first task will be to reach the monkey climb and, unfortunately, you'll have to go through the cactus to do so, so make sure Lara's healthy enough (you should now be at full health, anyway). Run through the cactus, stop at the very edge, jump up, grab the monkey climb and quickly go forward to avoid losing anymore health.
Swing to the end of the monkey climb and turn around. Let go, backflip from the mushroom to the slope then immediately jump while holding Action to grab the edge of the first collapsible platform. Don't pull up. Shimmy to the right until you reach the fourth and last platform. Pull up and immediately jump up to grab another monkey climb above.
Swing straight to the wall and turn left, drop to grab the edge of the collapsible platform below and shimmy right to the crack (see screenshot). Shimmy to the right along the crack in the wall, and eventually pull up into the opening.
Pick up the Manna from Heaven ahead then run along the passage to collect your reward: Secret #4: The Silver Medal.
Drop down from the opening into the poison bathed room below and return to the ledge you landed from the liana via the giant dionea room and the corridor.
Leaving the Arboretum
Go jump along the ledges into the opening W. Run into the next room and go on the central white platform which turns out to be an elevator [be careful to stay on it, or you'll be stuck forever in the Arboretum and have to reload]. Watch the fly-by as you go up and soon find yourself back in the Plain of Jars.
==== In this level, you should have found...
Enemies: Little Gardeners, Mosquitoes, Killer
Dionea
Items of
note: Plant Pheromones, Summon Demon Smalls scroll, Manure Crystal, Seedpod,
Water Crystal
2 Secrets including
the Silver Medal
some Traps
== Interlude 2: The Plain of Jars ==
First off, turn around (E probably) and go pick up the Palace Key on the pedestal, opening a nearby portcullis as you do so. Turn around (W) then run right (N) to go through the newly opened portcullis. There's a Trapped Agnostic Soul ahead. Free it by shooting the glass case. It opens another portcullis in return.
Go back to the previous room, run ahead (S) and around the corner to go through the other portcullis. The Earth Element is waiting for you on a pedestal to your left (N). Pick it up, opening a third portcullis in the process.
Turn around (S) and walk to the edge through the opened portcullis. Turn 45° right (SW) and run off to the ledge below. Turn right (W) and hop back while holding Action to safely drop down to the terrace. Turn around (E) and run across the terrace then down the stairs to the left (N). Continue past the hole through the portcullis then around the corner (W) until you reach the edge.
Turn around and hop back while holding Action to safely drop on a flat triangular ledge below. Slide down the slope to reach ground level. Now you need to find the Palace of Elements.
Turn right (E) at the corner then right again (S) at the next one. You can spot the Arboretum entrance to your right but that's not where you're going. Turn left (SE) instead and head for the arch now visible in the distance. Run through it to be teleported in another part of the Plain of Jars, near a sign post.
Run ahead (E) past the pool of poisonous water until you reach the entrance of a large structure to your right (S): the Palace of Elements. Enter and run to the opposite wall. Use the Palace Key on the Palace Keyhole there to open two large portcullis on each side of the room. Turn around (N). The left (W) one leads to Hades, the right (E) one to the Realm of the Water Pagan. Pass either door and go on the yellow teleporter there to be immediately sent to your destination of choice. If you choose the Hades way, please refer to the "Custodians of Hades" chapter below. If you choose the Pagan way, read on!
==== In this part, you should have found...
Items of note: Palace Key, Earth Element
== Water: Realm of the Water Pagan ==
After the flyby, lightning appears in front of Lara. It explodes, and two objects appear which Demon Smalls has left for Lara: Demon Smalls explosive pee and a note of instruction: "Lara, place the flask of 'Home Brew' behind the big statue then clear out of the way. I will handle the rest. D Smalls".
The objective being to send the big statue plummeting into the pool so the volume of it displaces the water level causing it to rise slightly so Lara can swim up the water chute in the middle of the pool to access and free another spirit. But first, you'll need to gain access to the statue by collecting 4 Pagan Gems.
-- Preliminary Explorations --
Note the pools left and right of you (N and S), head to the S pool and jump in, swim over all four chequered tiles in the corners of the pool to lower a block in the N pool. Now swim to the fountain in the middle of this pool and climb out on to it, press action for Lara to take the hidden secret from the fountain for Secret #5: a magic elixir. Climb out and head over to the N pool and swim through the opening W for Secret #6: manna from heaven.
Climb out of pool and look through the large, long window on the N side - note the large gem on the golden sceptre, you'll be back to collect it later.
Now look through the window on the W side the note the skull button at the bottom of the pit and the slopes leading down to it.
Head in to the next area (W) with the large pool and a chute of water in the middle of it. Note the large statue up above behind the water chute on the W wall.
N side: Slopes.
Hop into the pool, climb out on the N side and go into the next area (yet another pool area) (note the skull button behind the gate on the left in the entrance and the window on the right showing another view of the pit with slopes).
Head to SE corner of the pool to the pit and make your way to the down using the slopes (run-jump to the smaller slope on the right, then slide down and drop to the ground). Push the skull button to see a pole appear in the window above you. Use the slopes to make your way back to the top (stand with back to bottom slope, jump back and then forward to slope above, then jump back and forward again to grab the top, long slope. Slide and grab the edge as you fall then shimmy around to the left to the opening and pull up).
Head left around into the entrance passage and left again to climb up the pole. Backflip to emerge on to ledge overlooking the pool.
(note: on the other side of the pool in the NW corner, you can spot a manna from heaven on the ledge, this is secret #7).
Note the inflated lolly floating just in front of the ledge, the two deflated lollies beyond it and the ladder monkey swing above it. You must move the monkey swing out further in order to reach it when you jump to it from the lolly, so flick the switch on the wall behind you (S) to move the monkey swing out further.
Jump to the lolly, then immediately jump again and grab the monkey swing. Turn around 180° to face the S wall and swing to the jumpswitch. Pull it on your way down to the ground (to open the gate to gain access to the button in the passage intersecting the two pool areas) sustaining a small loss of health as you fall.
Go push the skull button beyond the newly opened gate to inflate the last two lollies and use the pole to climb back to overlook the pool again. Flick the switch up which moved the monkey swing out, to move it back so it doesn't get in the way when you jump to the lollies.
Jump from lolly to lolly, jumping on the right side of them. From the last lolly, jump to the slope (W) forward and to the right curving Lara in the air as you jump, slide a little and jump to the slope on the right (S) curving Lara right in the air again. Slide backwards down the slope, grabbing the edge as you go. Pull up and backflip with a twist to grab the block behind you.
Now you have the choice: either use the zip line to get to the other side of the pool, or ignore the zip line and find another way, which will allow you to get Secret #7:
Jump towards the long window ledge on the N wall. Run along it and run jump to the ledge separating the two pools (to where the zip line ends) - be careful to avoid the checquered tile as that will cause a block to rise around the secret preventing Lara from getting it. Try to curve in the air to land on the flat part of the ledge with the checquered tile on the left of Lara. Collect the manna from heaven for Secret #7.
Face the area with fountains going in both S and W directions. If you go S, you will find a large, closed gate at the end with an alcove either side of it requiring 2 gems in each alcove (4 are needed in total).
-- The First Pagan Gem --
Head in the W direction of fountains and turn left at the corner and follow the pool all the way to the end. Climb out of the pool and go in to a smaller room with a small pool with a large fountain in the middle.
Hop into the pool and swim into a tunnel on the W side to collect a magic elixir (note the 2nd pagan gem on the golden sceptre through the window). Swim back out to the pool and climb out on the W side. Pull the moveable block out in the alcove and go behind it into a short tunnel to push a skull button there. The button lowers a block on the opposite side of the pool. So head over there (E) and take the 1st Pagan Gem.
-- The Second Pagan Gem --
Now head back out to the previous large pool area with fountains and swim back along the left side (W). Halfway along before turning right, note the pair of grey squares at the bottom of the large pool. At the 3rd set heading N (past the 2nd fountain) is a hole in the bottom. Take a deep breath, swim down it and follow the winding tunnel to emerge into a room with a stone block structure in the middle.
Head N and left in the end. Note the block (left) that needs to be raised to gain access to the upper area of the block structure. Crawl under the crawlspace S of the block. Climb the block immediately left there and jump to the next level up on the SE side. At the edge, face E and jump to the next block. The next one is topped by a bronze trigger tile which will raise the block you saw on the ground to gain access to the higher area - but only for a short time, it's a timed run. So jump to the trigger tile block facing E.
A cutscene shows the block raising, so immediately press Look to get Lara's perspective back and run forward and left (E) off the side. Immediately sprint around the corner to the left of the outside of the block structure and jump up to the the hopefully still raised block. Quickly jump/grab up to the E side before the block goes back down again.
Crawl through the crawlspace then jump across to the next block on the E side. Face S and jump up to the shimmy ledge above and shimmy left around to the other side of the block. Let go then jump up to grab the ladder and climb to the top, go left at the top and let go to land on the block. Face S and jump to the block there.
Stand at the edge, and turn around to face N and hop back grabbing the edge on the way down, shimmy left and pull up. Face SW and jump to the the block curving Lara around to the right to avoid the corner. Face W. There's an invisible crack in the wall ahead so jump up and grab it then shimmy left around to the other side of the block. Face N and jump to the block there. Stand at the NW corner of that block and jump NE to the block curving Lara around the corner to the right if needed. Jump to the block ledge on NE side. Face S and note the block in front of you is lower than those surrounding it, Lara can jump up to the top there.
There's a hole in front of Lara to the SE but don't go there yet. Turn left to notice another lower block, go there and drop down from it to collect a magic elixir. Pull up back on the top of the structure.
Drop down into the hole to the water below. Swim along the tunnel and turn left at the intersection (E). Follow the tunnel a bit more until you come to a breathing hole. Swim down to the W to a small open part of the tunnel, in the NE corner is an UW ceiling switch, so pull it to lower a block in another part of the UW tunnel, opening a way out. Go back to the breathing hole (E).
Dive back down to the W again and continue down the tunnel past the ceiling UW switch - swim to collect the 2nd Pagan Gem then swim back to the breathing hole. Make your way back out of this tunnel by swimming back along the tunnel (N), but at the intersection, continue straight through to emerge back into the block structure room. Head over to the SE corner and swim down the tunnel back to emerge into the large fountain pool room.
Climb up onto the fountain to the N of the tunnel (3rd from the end) and face the ledge to the E. Jump and grab the ledge and pull up, flick the switch on the N end of the ledge to open a gate right at the very beginning of the level. But before we go back there, we will collect the 3rd gem.
-- The Third Pagan Gem --
At the bottom of the "U" of the long fountain area (N pool), climb on to the fountain in the middle and jump/grab to the ledge on the S wall, pull up and jump up to the hole above. Follow the tunnel and climb the pole at the end, continue along and up the tunnel to emerge in an opening overlooking the E arm the fountain "U" area with the gate closed at the end. Look NE and note the hole in the other side and the zip line going to it. You want to get to the top of it which is to the N on your side, so do a running banana jump to the N to land on an invisible ledge just below the entrance to the zip line alcove. (see screenshot for bearing). Jump up to the alcove to the zip line in NW.
Use the zip line to get to the other side. Keep Action pressed and Lara will grab a ladder at the end of the zip line ride. Climb up and continue making your way up. Follow the tunnel until you come to a slope at the end. Turn around and slide down backwards grabbing the edge to ensure Lara safely drops to the ground without losing health (note the warning sound as you slide down). Immediately run to the side of the room as a minotaur with a hammer attempts to rock Lara's world!
Stay on the lower part of the ground that surrounds the room and Lara is safe (the minotaur can't get Lara here). In the SE corner is a block with a jumpswitch on the wall above it, surrounded by spikes. Head to the S wall and time your run through the spikes (they also act as a clue to indicate that the block is surrounded by a spike trap) - only the S side of the block (below the jumpswitch) is safe so stand on without fear of being spiked.
Climb on to the block and a cutscene will play:
Lara: "You got any suggestions? Anything to distract him?" (talking about the minotaur)
Demon Smalls is outside monitoring Lara's progress on his laptop "huh?" he says.
Lara: "Indispensable information as always..."
Demon Smalls confers in his "book of spells" for something to use against the Minotaur: "hmmmm, ah ha!"
He tries a fire spell on the minotaur but it has no effect...
Demon Smalls "Oh no, it's not working"
Lara: "you get used to it".
Use the jumpswitch on the wall to raise a block so you can access the manna from heaven from the block in the NW corner. Turn around, climb back on the block and turn slightly left to do a run jump over the spikes and land beyond them near the wall. Go to the NW corner, time your run past the spikes and climb up the block to get the manna from heaven.
A cutscene ensues to show Demon Smalls looking in his Book of Spells for a more effectual spell to use...
Demon Smalls: "There must be another way...... got it!"
We go back to Lara where four Anubis guardians are teleported into the area with the Minotaur. They take care of the Minotaur for you. When the minotaur is dead, collect the Hammer Key the minotaur leaves behind and use it on the keyhole near the door in the S wall. Enter the door to emerge overlooking the area of the beginning of the level, note the gem in the opposite alcove.
In front of you and to the left slightly (lined up with gem alcove) is an invisible ledge, run-jump to it (you can spot it with binoculars and light / check the screenshot). Run-jump to the ledge, then into the gem alcove pressing action so Lara angles down into the alcove. Collect the 3rd Pagan Gem and drop down the hole behind the golden sceptre where you got the gem from to land in to the pool below.
-- The Fourth Pagan Gem --
Climb out of the pool and head N to the pool opposite - go the right, to the small fountain area with the pink features in the corners of it and head through the gate you opened earlier (NW).
Head down the tunnel to collect the 4th Pagan gem from the golden sceptre in the long window. As you go near it you'll hear the gate close behind you, which means you'll have to find another way out of here. So take the gem and continue along the path.
Head up the steps and follow the path to the right, at the end of the corridor is the way out, but another hammer key is required so first turn right in to a room with spiked columns (N).
This is simply a curved run-jump series from column to column to get to the other side to collect the hammer key. Simply time your run to the columns with the spikes. I found it easiest to line Lara up on the right side of the ledge (E) so that the 2nd column is also in line. Run-jump to the first column with spikes just when the spikes are about to rise up (then by the time you get there, they have gone down again), run-jump to aim at the left side of the 2nd column and turn Lara sharp right wile running to jump to the 3rd column, quickly do another running jump to the ledge on the N side (see screenshot). This will take some practice.
Pick up the Hammer Key and swim back to the other side. Head down the passage and turn right (W) and use the key on the Keyhole there to lower the block. Follow the steps all the way up to emerge overlooking the large fountain area. Dive in to the water below and swim to the large closed gate (Swim E, then S).
Place the 4 Pagan Gems in their Receptacles in the two alcoves on either side of the gate (E&W wall) to open the gate and go through.
-- Placing Demon Smalls' Explosive Pee --
Jump into the new pool in that area and swim down the tunnel in the E wall of the pool. Follow the tunnel and go up and left where it intersects, to head in the N direction. Emerge into a small pool and pull up to find yourself in a 3-way passage. The only direction you can go is right (E) as the other two are blocked by closed gates, so head that way to push a skull button to open the gates in both the N and W passages. Take the W passage and follow it up to emerge behind the Large Statue. As per Demon Smalls' instructions, place the explosive pee behind the statue and head back down.
A cutscene will ensue where you see Demon Smalls say: "And the good Lord said: 'let there be light'" as he depresses the detonator with a big grin on his face, to explode his explosive pee and send the large statue crashing into the pool below.
The statue causes mass displacement raising the level of the pool allowing Lara to now swim up the chute. So, go down to the intersection and left to the pool. Swim up the chute, but be careful to stay within or Lara can swim out and fall back to the pool again. (If you have difficultly swimming up the chute, try swimming Lara up in a spiral to ensure she stays in the middle).
At the top of the water chute, pull up and follow the passage to the end and the level will load to show Lara rising on a platform back in The Plain of Jars on another part of the castle roof.
==== In this level, you should have found...
Enemies: Minotaur
Items of note: Demon Smalls' explosive pee,
Suggestion from Demon Smalls, 1st Pagan Gem, 2nd Pagan Gem, 1st Hammer Key,
3rd Pagan Gem, 4th Pagan gem, 2nd Hammer Key
3 Secrets
some Traps -
1 Timed-Run
== Interlude 3: The Plain of Jars ==
You're back in the Plain of Jars again, on the roof of the Palace of Elements, facing a Trapped Agnostic Soul. Run ahead, shoot at the Glass Case to set it free. It gives you the Water Element in return, summoning it on a pedestal by the entrance of the Palace, down on ground level. Time to find your way down there.
Turn right (E): there's an opening in the fence ahead. Drop down from it, grab the edge, let go and slide all the way down to ground level while pressing Action to avoid losing health when landing. Don't stand still too long, though: you've just disturbed some tiny bugs when you landed. Turn right (N) and run along the walls and around the corner heading to the Palace entrance. Quickly pick up the Water Element on the pedestal then enter the Palace (left/S). This time, go through the right hand (W) portcullis and jump on the yellow teleporter to be beamed directly into Hades.
==== In this part, you should have found...
Enemies: Bugs
Items of note: Water Element
== Fire: Custodians of Hades ==
[Important: once you've opened the way to the Gold Medal, make sure you never return on the blue teleporter (arrival) that's at the very start of the level. You would block the way to the medal again with no possibility to reopen it]
What a charming place, isn't it? Dark, gloomy and - from what you can see now - riddled with fire traps. But aren't you here to win the Fire element?
You're currently standing in a large, high-ceilinged room which is the main room of Hades (which is why we'll most creatively call it "the Main Room" from now on). Ahead of you and in the center of the room is a large pool, topped by a spiral ramp leading up and lined with flame throwing demon heads. On the edge of the pool is a Gold Chalice, which is a receptacle for one of the four Scrying Glasses you'll have to collect. You'll be heading up soon, but let's take a look around on floor level first.
First off, don't even think of jumping/falling/diving in the water: there's a strong stream there which will lead you directly on a spears trap, meaning certain painful death. With that in mind run ahead (N) to the edge of the pool, turn left (W) and run to the corner ahead to pick up shotgun normal ammo. Turn right (N) and run along the pool, noticing a second Gold Chalice there. Pick up some more shotgun normal ammo nearby.
Continue around the pool to reach the northern part of the room. There's a teleporter here, but it's inactive at the moment. You can also spot a third Gold Chalice. Go on to get to the eastern part and go pick up the PEU and some PEU ammo. Run S along the edge and stop at the fourth Chalice. Turn right (W) to face the central ramp. Time to go up.
-- The Scrying Glass in a Maze --
Do a stand jump over the water to the grey block ahead then pull up on the next slanting one. First, notice the chequered tile on your left and the brown tile next to it. You'll see this combination in three more locations on the central ramp. Walking on the chequered one would rise the brown one, closing the openings in the edge of the ramp. But it's for later so ignore them for now.
Turn right (N). There's a ladder on the wall, but it's guarded by a flame throwing demon head. Don't give up, though. Run on the gravel floor past the demon head and go on the safe tile on its left. Turn slightly right (SEE) to face the left side of the ladder and do a stand jump/grab to it (see screenshot). You should safely reach the ladder. Climb to the top and pull up on the ledge.
Fighting a Little and Opening A Way
Okay. Looks like you've got company. That familiar flapping sound is made by the skeletal harpy that's attacking you right now. Hop NE and stand with your back into one of the corners to shoot it. Once it's down, pick up the PEU ammo on the ledge and turn toward the opposite side of the room (W).
You see that jumpswitch ahead in the distance? That's your next destination. Jump to and run along the slanted ledge at the N wall and some more corner jumps will get you to the jumpswitch. It lower a block nearby, granting access to an opening in the N wall.
So, jump back over those slanted outer ledges. The (hard to see) opening is there in the middle.
Run through it and along the dark corridor (lighting a flare would be a good idea) until you reach the edge of a hole at the other end, with a pole leading down. Grab the pole and slide down to the room below.
First, run toward the NE corner to pick up a magic elixir and PEU ammo in an alcove. Run to the opposite side (W) and get some shotgun normal ammo there. Now return to the main part of the room and turn right (W) at the water column. There's an opening ahead, run through it.
The Shifting Maze Puzzle
Look through the transparent panel: you can spot a maze in the distance, but you're not going there yet: it's currently a dead end. Turn right (N) instead and run into the corner. Look up (W): there's a passage up there. Jump up, pull up in it and run along the corridor.
You'll soon find yourself walking on a transparent floor right above the maze. Run to the far left corner (SW) and look down. There's a Scrying Glass down there, but it's currently enclosed in walls. Now go to the NW corner and look down again to spot a manna from heaven, inaccessible as well. Now that you've seen what you'll soon get, run to the opposite corner (SE - right of the entrance), and locate the opening there up in the E wall.
Pull up in it and run a bit until you reach a new room with four chequered tiles and four bronze tiles. They will help you solving the Shifting Maze Puzzle. You can try to solve it by yourself or look at the quick solution…
Quick solution:
Run over the bronze tiles once and don’t hit any other Tiles, then go back and see the manna from heaven is accessible, so go back E and down from the hole you came up from and head W into that maze. Go right and get the manna from heaven. Return up to the Trigger Tile room and from the entrance go over the first chequered and bronze Tile, then the next pair and only the chequered one in the third row and the Scrying Glass is accessible. So go down and get the 1st Scrying Glass, as it is called.
You’re done here, return E to the Water Column Room and run to the pole. Turn left (N) to face the skull in flames painting, standing close to the pole. Jump up, grab it (simply hitting Action won't do in this case), climb up and backflip in the dark corridor. Run back to the Main Room.
-- The Scrying Glass Beyond Gems Holes --
Look ahead and to your right (SW) to spot the shotgun ammo waiting for you. You're now going there and beyond.
Turn right (W), run over the stone bridge to the shotgun normal ammo (SW). Go on the chequered tile to your left (S - notice the block rising as you do so. It's for later), turn 45° right (SW) and run off to a ledge below. Turn left (SE), do a stand jump to the beige bridge then get into the crawlspace S.
Crawl a bit then run through the wide passage. There's some PEU Ammo on the ledge to your left (N). Go there and pick it up (notice the shotgun ammo behind the window pane, you'll get it later). There's also a white block in the wall ahead (E). This one's for later as well. For now, run through the passage and around the corner. Turn right (E) at the wall and run on the golden platform which turns out to be an elevator [be careful to stay on it, or you'll be stuck forever and have to reload].
Antipathy for the Devil
Run along the passage, drawing your weapon of choice along the way: a Devil is waiting for you around the corner. Shoot him down, taking advantage of said corner to avoid his lighting bolts. With a bit of patience, you can win this fight using the pistols only (just quickly get real close’ duck and stay down while shooting him).
Once he's down, run ahead (W) and around the corner to locate a ladder on the W wall. Would you turn around (E) and look up, you'd see a jumpswitch there as well. Climb up the ladder to the top and pull up in the dark passage to pick up a Magic Elixir. Hop back twice with Action pressed to drop down and grab the ladder. Climb down five steps, backflip, roll and grab the jumpswitch to open a portcullis not far.
After landing turn right (S), the portcullis is over there, in the corner ahead. Run there and turn right at the corner and run down a flight of stairs and go through the portcullis. Run up the wide stairway and enter a new room.
Too Many Holes, Not Enough Gems
Ahead of you (S) are eight Gem Holes and a closed portcullis. On your right (W), you can see three Blue Gems on their stands as well as an opening in the far corner, right of the gems (NW). Don't try to guess which holes are the right ones, it would be a waste of time and reloads. Go pick up the gems. A firework ensues and a scroll appears on the middle stand. Pick it up and read it. It's an Urgent note from Demon Smalls reading "Lara, these three gems are all you need. Take care, you KNOW where to place them!! D Smalls".
Go to the N room and there’s a Crystal stand on a table, go get the SW one and pull it to the E side of that table and it will go up to be activated, then get the NW one and place it S of the one you just placed, the NE one goes SW and the E side Mirror will reflect the Gem receptacles and the place where the Gems should be placed. So take note of that…
Go back to the S room, place the Gems (#1+2 from the left and #3 from the right). The gate opens up, go to the back of the passage and a trapdoor opens up, crawl to the room with the 2nd Scrying Glass. Then turn around (N) and go to the right skull button. Push it to activate the teleporter in the northern part of the Main Room. Now go to the left skull button and push it as well, which lowers a white block in the passage where you met the Devil, opening the way back.
Back out through the crawlspace, grab up N.
Turn around. Jump and grab over the hole to the wall carpet and climb up into a crawlspace to reach Secret# 8: 2 shotgun normal ammos and a magic elixir. Drop down from the crawlspace to the ladder and climb down to back flip into the passage.
Return to the Devil Passage, NE corridor to the top of the Main Room) and run ahead (E) to reach the opening in the wall where the block moved aside. Climb in it, roll and hop back hitting Action to grab a ladder as you drop down. Climb down to the bottom. Run ahead (W) through the passage up the steps and crawl through the low crawlspace to your right (N) to eventually be back in the Main Room.
-- The Scrying Glass Under the Boulder --
Run toward the pillar and stand jump right (NE) to the edge of the ramp. Run up the ramp and stop at the first wall. Hop down right (SE) to pick up the shotgun normal ammo on the outer ledge ahead.
Return to the ramp edge, turn right (E) to face the wall, go on the highest part (left) of the floor and pull up on the high platform by hitting Action+Forward without jumping so you go a tad higher. Do a run jump to the outer ledge, turn left (N) then run along the ledge and left (W) around the corner. Stop when you've got a grey high platform to your left (S), turn to it and do a run jump.
A Race Against A Boulder
Okay. Here's the situation: the third Scrying Glass is for the moment very stuck under a boulder which you obviously need to get out of the way. The lever next to you will set the boulder in motion. However, the latter has to end its course in a very precise location: a hole at the bottom of the ramp. Considering there are openings in said ramp, you'll have to help it by raising a series of Timed blocks (four, to be accurate) to guide it to its right destination, which you'll do by going on nearby chequered tiles.
(Best have a look at the route first and Save in a new slot whenever you reached a chequered tile-see screenshot) Throw the lever and roll, run jump down to that far ledge in the SE. Turn right and stand jump onto the S side of the trench, do a run jump around the S burner and get to that blue blocked ledge at the end of that trench fast, the brown block behind you goes up and will divert the ball to the lower part of the trench. Almost immediately run off to the right and roll, run down onto the blue blocked ledge below and turn left, wait till you hear the sound of the Ball again jump onto the side of the trench and quickly go for the next blue blocked ledge NW. Turn right and hop on the brown block and while the ball bounces into this corner you can run jump down over a burner to the last part of the trench at the ladder, run down and off to the right or you will land on a burner below and go straight for the last blue checkered tile near the bottom of the trench. Wait on that tile and after an automatic reload, the elevator ledge will take you back up when the Ball lands in the correct hole at the end of the trench. Jump to the ledge with the window (E) and go left and around the corner to where you can run jump onto the trench between the burners. Get onto the Ball path near the double burners and crawl underneath to the 3rd Scrying Glass. Make your way down to the ground floor of the room, but whatever you do don’t dive into the pool!!! Just go down the same way as in the timed run.
-- The Scrying Glass in an Art Gallery --
Finally, head N and jump over the water to find yourself in the northern part of the Main Room, on floor level.
Remember the teleporter you activated a while ago? It's just there, waiting to beam you where you'll find the 4th Glass. Go to it and find yourself in a totally new area of Hades: the Art Gallery. From the teleport go left and then right around corners to find a crawlspace in the corner of the room.
Scene Changes
You’ll are in a Crypt with 4 adjacent rooms, connected by a crawlspace through the middle walls (the Scrying Glass is there, guarded by fire). Only use the crawlspaces as the passages have a trigger tile that will reset the puzzle.
- First go (crawl into) to the SW room and on the chequered tile there: it
changes the blue-eyed devil in the NE room into a weird looking angel.
- Go to the NE room via the central room and walk on the bronze tile: it
changes the little red demon into a full fledged red archdemon.
- Return to the SW room via the central room and walk on the bronze tile: it
changes the red-eyed ghost in the SE room into a spectral white-skinned woman.
- Go to the SE room via the central room and walk on the bronze tile: it
changes the fire-eyed woman in the NW room into a fire elemental.
- Now go to the NW room via the central room and walk on the bronze tile to
extinguish the fire and gain access to the 4th
Scrying Glass.
- Finally, go to the central room and pick up the glass: you get a camera shot
of a red-eyed ghost painting in the Devil Passage. This is your way out, but
you need to do one more little thing to open it.
- Walk on any of the chequered tile in the passage surrounding the central
room to reset the paintings so the spectral white-skinned woman turns back
into a red-eyed ghost.
- Go to the SE room and the E
picture is a walkthrough wall, so jump in and look up for a
Jump switch that will open the entrance to the Gold Medal challenge.
Go out and right, to the SE corner where that ladder is in the opening in the
wall, down and out of the opening, straight up the steps (you may have to
shoot a harpy there) and right through the crawlspace to the Devil Tower
again. The block that lowered is in the NE corner.
Back in the Main Room
-- The Gold Medal --
[The whole section is dedicated to a secret, so I won't use green here except for the secret itself. If you want to find it by yourself skip directly to the "Leaving Hades" section below.]
You'll soon find yourself in an opening giving onto a room bathed in poisonous water. You can spot your prize teasing you from the top of a pillar to your left (N). Your problem is to get there, and it won't be easy (it's the Gold Medal, after all).
Run jump around the left to get to the blue Tile and then jump to the brown Tile (see Map), which will raise later so you can grab the Monkey climb above (check it out). From here do a run jump to the right onto slope A and keep jumping to and fro to get to the most right hand (highest) side of the grey brick slope, then slide to the lowest point (this might take some tries) of that and jump over slope A onto slope B, slide and grab slope B, shimmy right and just around the corner so you will hang on the left side of that blue trigger Tile that will get the Timed brown block up. Better save here (F5).
Pull up, backflip/roll and curve sharp right so you will land at the end of and on the lowest part of slope B. Immediately jump and roll so you’ll land on slope A facing the brown block, slide a bit and jump with a sharp right curve onto the raised brown block, immediately jump and grab straight up. Save again hanging there and turn around, now you have to aim for the highest part of slope B and drop on the corner (just climb forward till Lara drops), jump/grab and curve right a bit so you will grab the high edge of slope A, shimmy right and time the burner to get past it, go to the end and save hanging on the slope there. Pull up and backflip. Jump/grab the Monkey climb above and go in the direction of the Medal, careful there’s a gap in the Monkey climb, as soon as you drop on the slope (just climb forward till Lara drops), slide a bit and jump/grab to the next part of the Monkey climb, now your home free, go to the pillar and grab the well earned Secret #9, the Gold Medal. See the brown block go up as a bonus.
Now you have to find your way back, you have to get to an opening SE.
Don't worry. After what you've just been through, what follows will feel like a walk in the park. Jump up and grab the Monkey climb. Swing forward (S) until Lara falls by herself and land on the flat chequered block where the whole ordeal started. Turn left and run jump onto the Brown Block.
Turn right (E), jump up and grab the Monkey climb. Swing forward to the end and turn right (little slopes below). Wait for the on/off fire trap below to extinguish then let go, slide a bit and jump with a hard left curve to the next slope. Jump from slope to slope until you reach the last one. Now do a last jump into the opening ahead, hitting Action to avoid hitting the wall. You've done it!!!
Run into the dark corridor until you spot a recess in the ceiling after the corner (look up from time to time or light a flare). Go under it, jump up and grab the short Monkey climb: it lowers the block ahead, opening an access back to the main room. Let go and go pick up some PEU ammo and a Manna from Heaven. The Gold Medal Ordeal is now officially over.
-- Leaving Hades --
You're now back in the NE corner of the main room and need to make your way down. Turn left a bit, do a stand jump to the ladder ledge. Walk ahead beyond the ladder, turn around and Safety drop down just right of the flames. Jump over to the ground floor around the pool.
You now have to use the four Scrying Glasses in their respective Gold Chalices one on each side of the pool.
When all four are placed, a camera shot shows you that the spears at the bottom of the pool have disappeared, meaning it's now safe there. Jump in the water and let the stream carry you to the bottom. You'll soon find yourself in an UW tunnel. Swim past the fan then up, and watch Lara swimming up the beautiful water column. Continue up once she has disappeared. You'll soon leave Hades and be back in the Plain of Jars for the conclusion.
==== In this level, you should have found...
Enemies: Skeletal Harpies, Devil
Items of note: 1st Scrying Glass, 3 Blue
Gems, Urgent note from Demon Smalls, 2nd Scrying Glass, 3rd Scrying Glass, 4th
Scrying Glass
2 Secrets including
the Gold Medal
some Traps -
1 Timed-Run
== Epilogue: The Plain of Jars; to the Asylum ==
Run ahead (N) and go free your last Trapped Agnostic Soul by shooting the glass case. To thank you, it summons the Fire Element on a pedestal located right of the Palace entrance. You now need to make your way back to ground level.
Locate the opening in the fence on your left (W), drop down from it and slide down on the flying buttress to the ground below, holding Action to land safely. Some bugs will come trying to nibble at your ankles. To get rid of them, turn left (N) then right (E) around the corner. Run past the Palace entrance, turn left (N) and run ahead until you spot a large square hole in the sand. Run to there (but don't fall in it, it's lava down there). Lure the bugs to fall in it by hanging down into the hole and shimmy around corners. You'll soon attract other bugs. Keep moving until all of them have fallen.
Return to the Palace entrance and pick up the Fire Element on the pedestal to the right. You know have all four elements needed.
-- A Farewell to the Plain of Jars --
Turn around (NW) and run to the left of the structure (which is the Gateway to the Asylum) to locate a windmill. Go to it and use the Air Element on the Air Pedestal so the windmill starts turning.
Turn, (SE) run to the Gateway entrance left around the corner. Enter the Gateway and run down the stairs then through the short passage to find yourself back in the room you visited at the very beginning of the adventure. The three other element pedestals are here, but don't place the elements on them yet. You now will get the prize you've earned by going through the three Medal Ordeals.
The Expert Certificate
[If you don't have all three Medals, what follow is rather useless to you, so skip directly to "Leaving for the Asylum" below]
Run left (S) to the Earth Pedestal (the one with the small cactus on it) then past it to reach a small passage. There are two ladders here on your left and right. Go to whichever you want, stand in front of it and do a stand jump over the hole to grab it. Climb down to the bottom.
You're now in a large room with a red pentacle in the center, located just below the Element Pedestals Room. Run ahead (N) to the gold cage beyond the opening topped by three medal symbols and use the Medals on their respective Medal Hole located on each accessible side of the gold cage to open the latter. And now, without further ado, seize Secret #10: the Expert's Certificate. Congratulations, you deserve it!
Make your way back to either ladder, climb up then backflip at the top to be back into the passage. Return to the Pedestals Room, careful dealing with the closest on/off flame throwing demon head on your way.
Leaving for the Asylum
First go to the Earth Pedestal (left/S from the entrance) and use the Earth Element on it. Turn around (N). There's now sand pouring in the large wood bowl in the center of the room.
Run ahead to the other side, and use the Water Element on the Water Pedestal (the leftmost one). You can now see water flowing through a pipe under the floor. Finally, go to the rightmost Fire Pedestal and use the Fire Element on it: fire now flows under the floor as well.
In the ensuing sequence, you get to see the combined four Elements opening the very Gateway to the Asylum. Demon Smalls and Ms Croft are standing on the edge, looking into the pit. "Into the Jaws of the Dragon..." Demon Smalls says, "We're screwed!" "Thanks," Lara replies, "but that thought had crossed my mind." Demon Smalls concludes: "Okay, no time to waste ... you got my stuff? ... Excellent."
They then slide down an endless slope into the bowels of Lower Hell. Demon Smalls starts a long monologue: "And into Asylum, like a great black engine roaring to eternity, ravaging the already benighted landscape with its savage, malevolent presence. And within the legions of the truly damned - insanity, shear and stark. And once in human form, now gutted and torn by eons of glutted indulgence. This is the place I have not wanted to dream of, and the dream is now the place I partly live through."
"Whatever" Lara replies before they both disappear into the Asylum.
But that will be another adventure...
==== In this part, you should have found...
Enemies: Bugs
Items of note: Fire Element
1 Secret:
the Expert's Certificate
some Traps
== LOWER HELL WHAT'S WHAT (Combat Strategies) ==
- Bugs: Lower Hell counterpart of the (oh so) familiar beetles. They'll chase you wherever you go and bite you to death if you let them do. Either find a hole where you can lure them or simply run and be fast.
- Devil: His main weapon is his lighting bolt, so he'll rarely come close. Side jump to face him, shoot then side jump the other way. Repeat until he's dead for good (Or just get real close to him, duck and shoot).
- Killer Dionea: You simply can't kill this one, it's invincible. Considering the circumstances, go around it as quickly as you can.
- Little Gardeners: Not very dangerous except for the fact that they're poisonous. Easily shot down with a few bullets.
- Minotaur: He's invincible. Period. So don't try to shoot him. He'll hurt Lara by hitting the ground with his hammer, creating a painful quake wave. The trick here is to leave the platform he's on as quick as possible: when Lara is on a different level, he can't hurt her. The Anubis Guards can sometimes take a while to get off their shots at the Minotaur - especially if he stays close to them in the middle.
You can speed up the Minotaur's demise by jumping down into the arena. And drawing him away from the guards. This allows them to get a clearer shot at him and they'll speed up their rate of fire dramatically. At no point should the player try to join in the shooting:
a/ it's pointless
b/ if you hit a helpful guard he'll turn on you instead.
- Mosquitoes: Come in swarm, doing a bit of damage then flying away. Crouch to lower the damage done and wait for them to go.
- Skeletal Harpies: Probably the most dangerous foes you'll encounter in this part of Lower Hell. They cast harmful green rays and even sometimes come close to slash you with their sharp claws. Keep moving at all costs.
- Skeletons: Against them, bullets won't do much. Your best chance is to shoot them at point blank with the shotgun and make them fall in water or off the ledge they're usually found on.
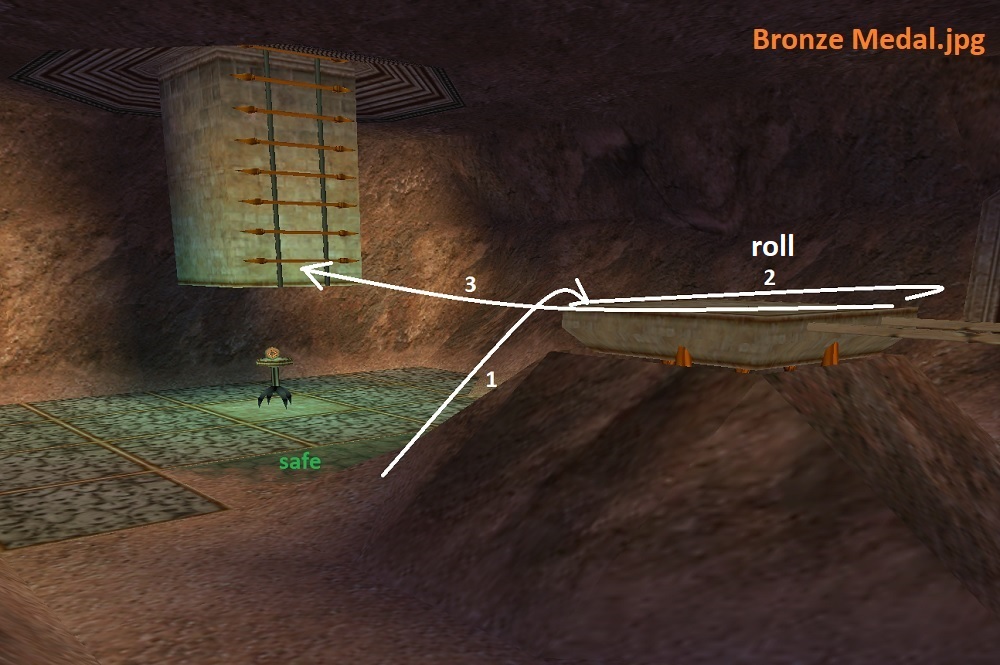
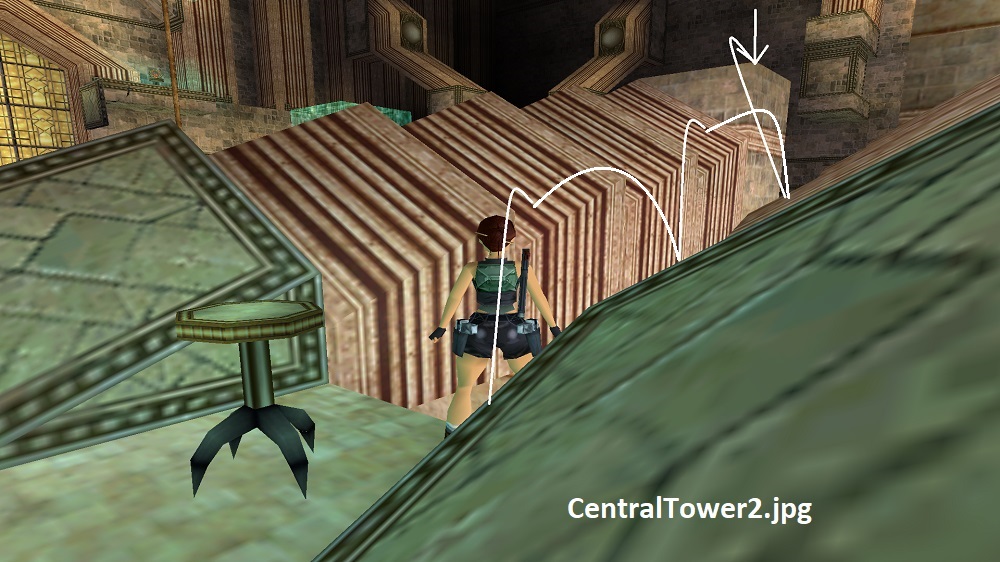
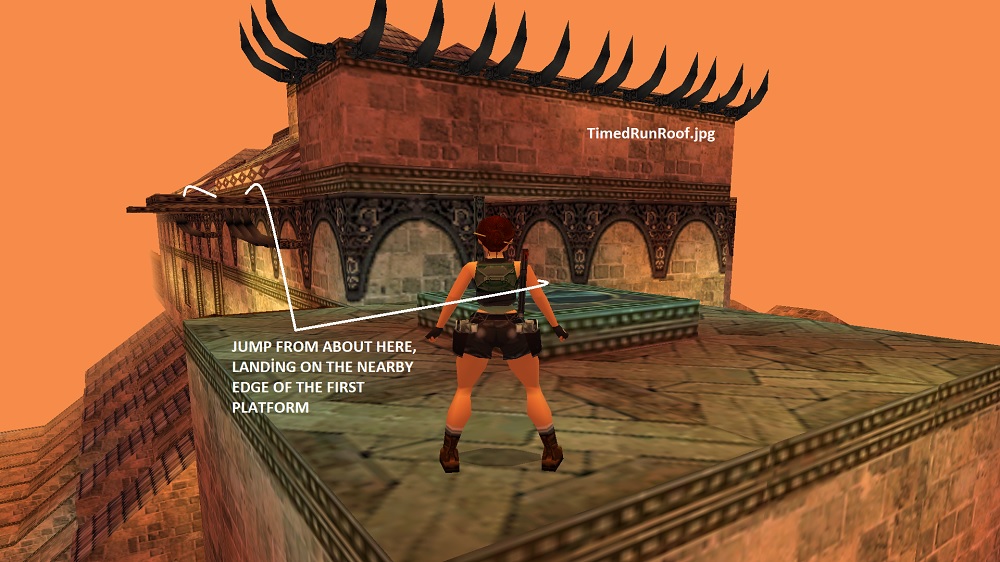
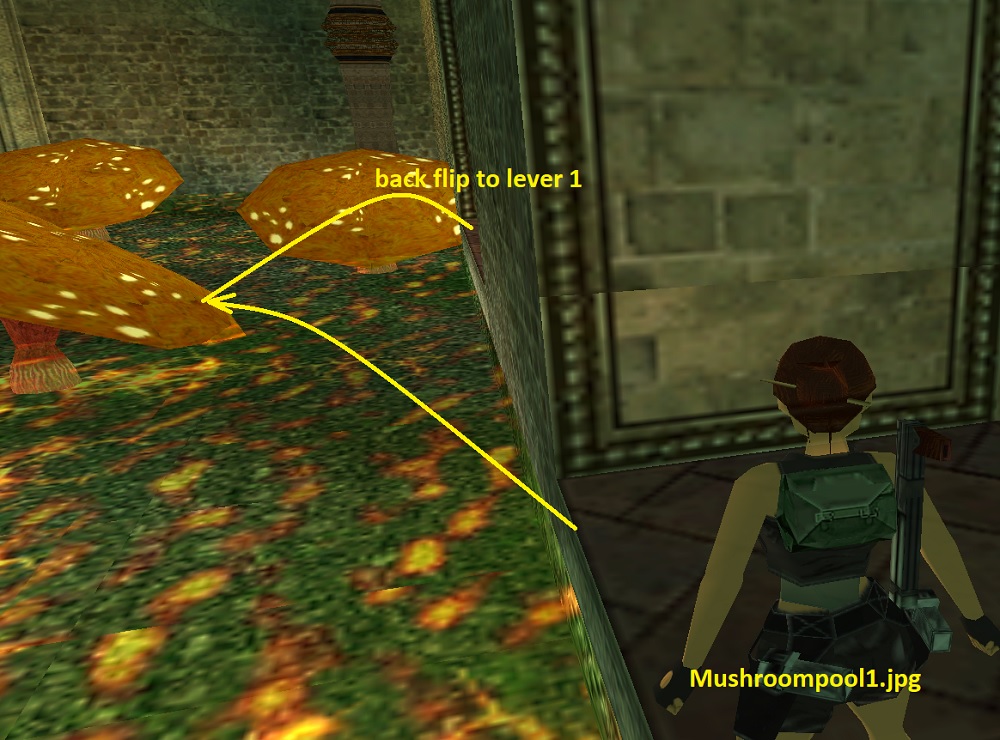
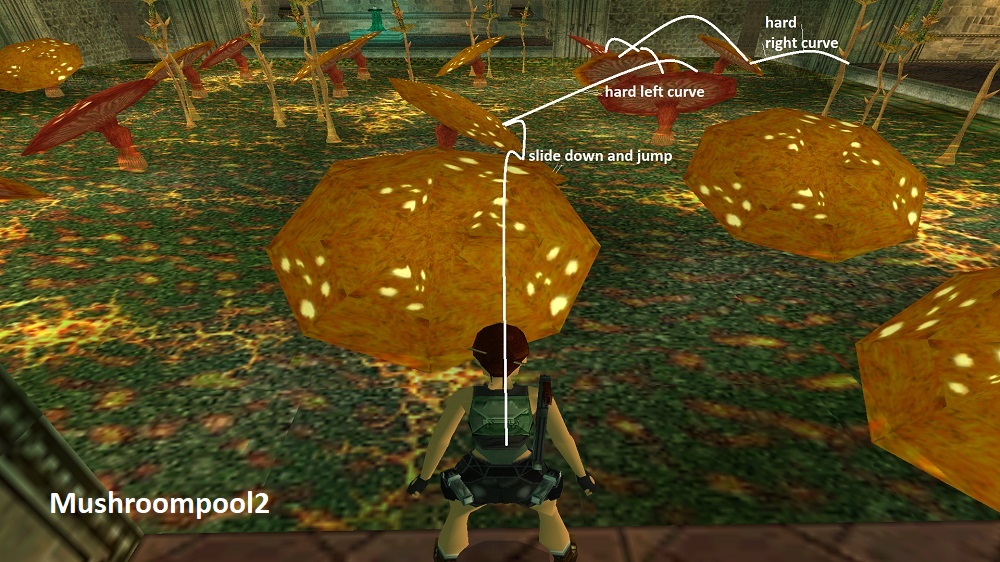
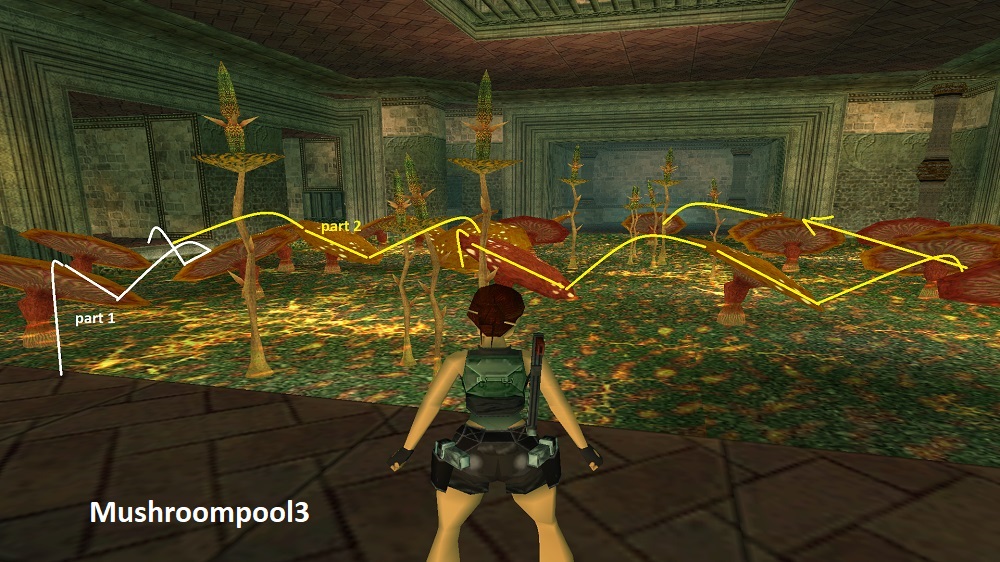
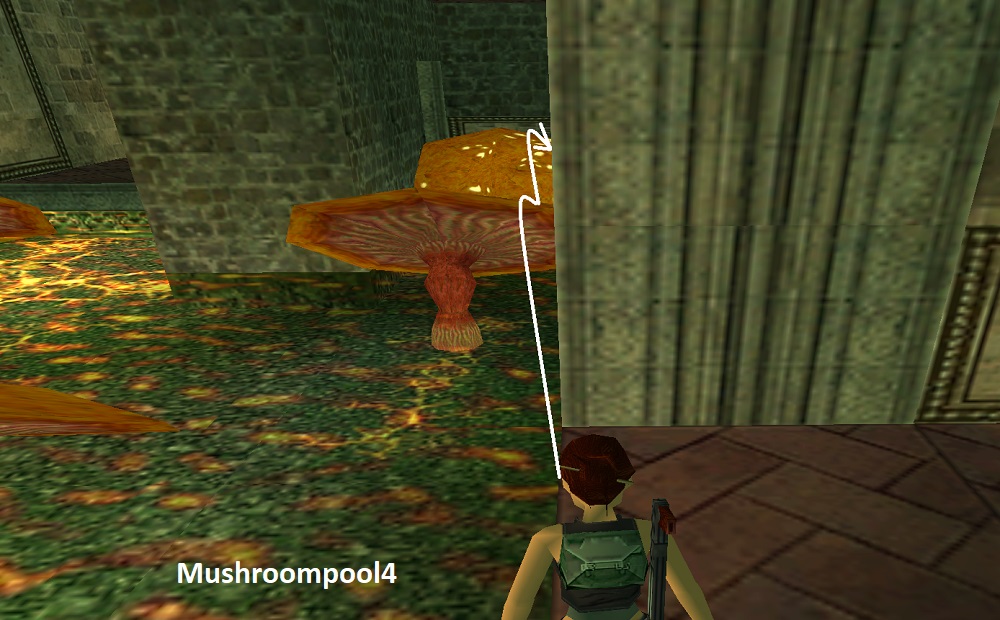
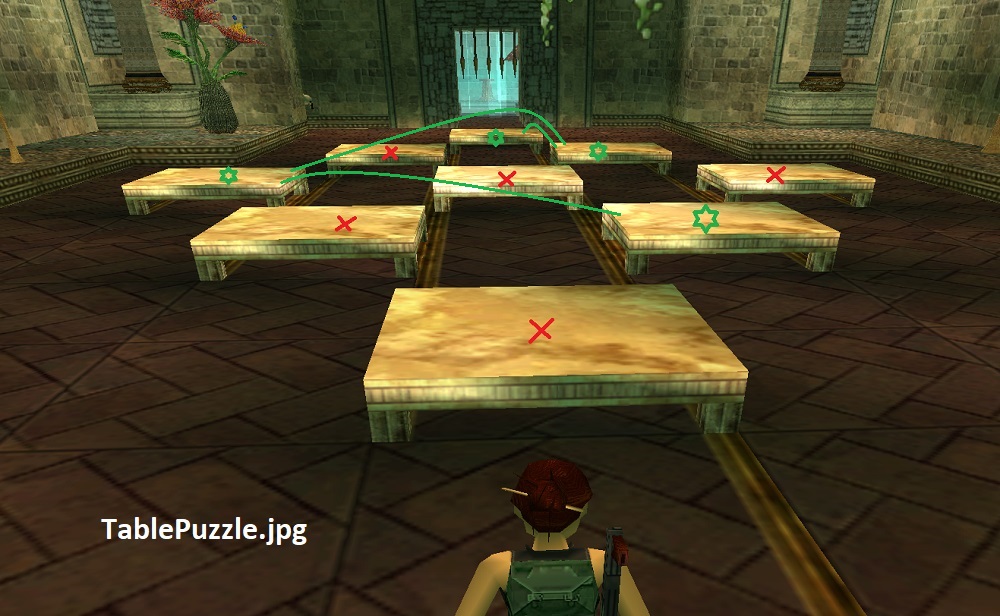
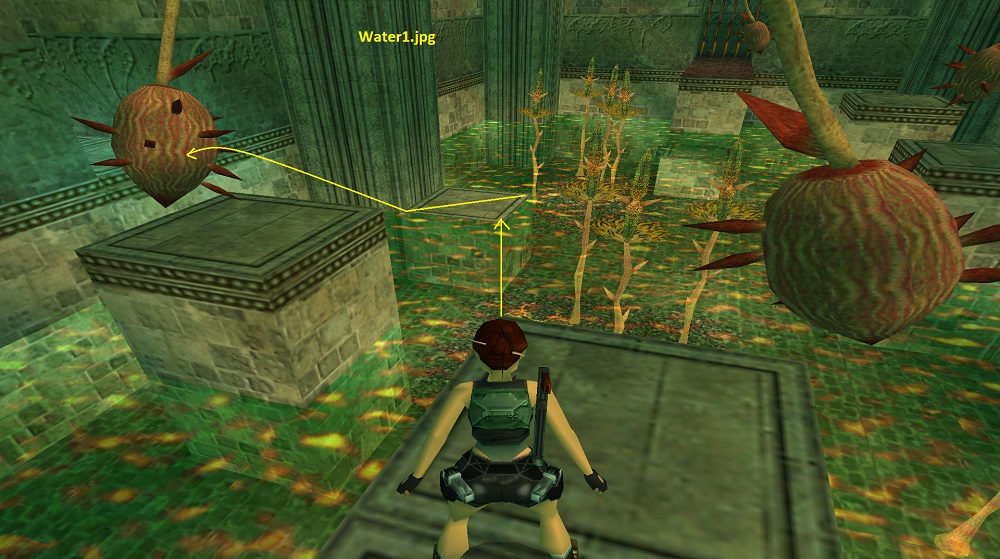
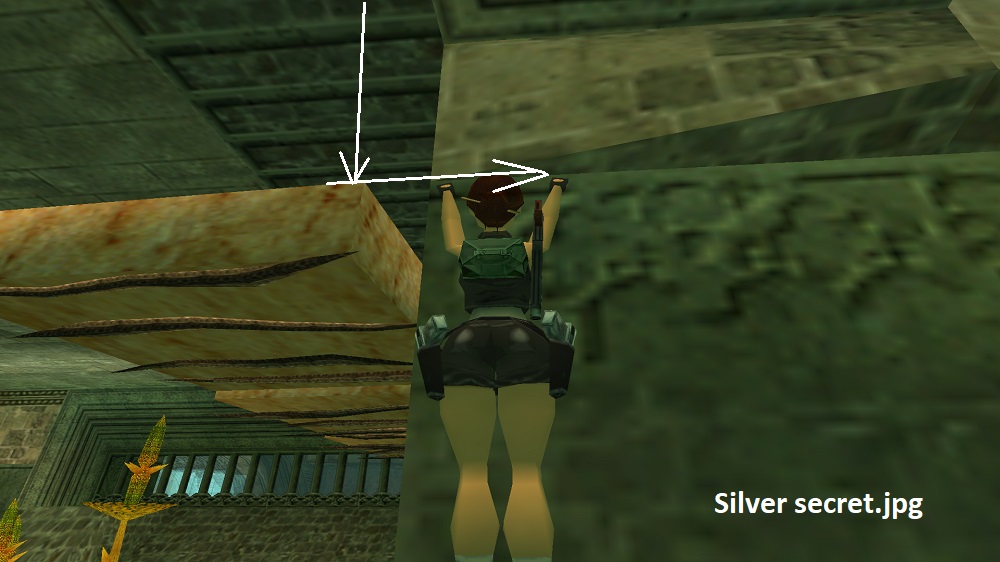
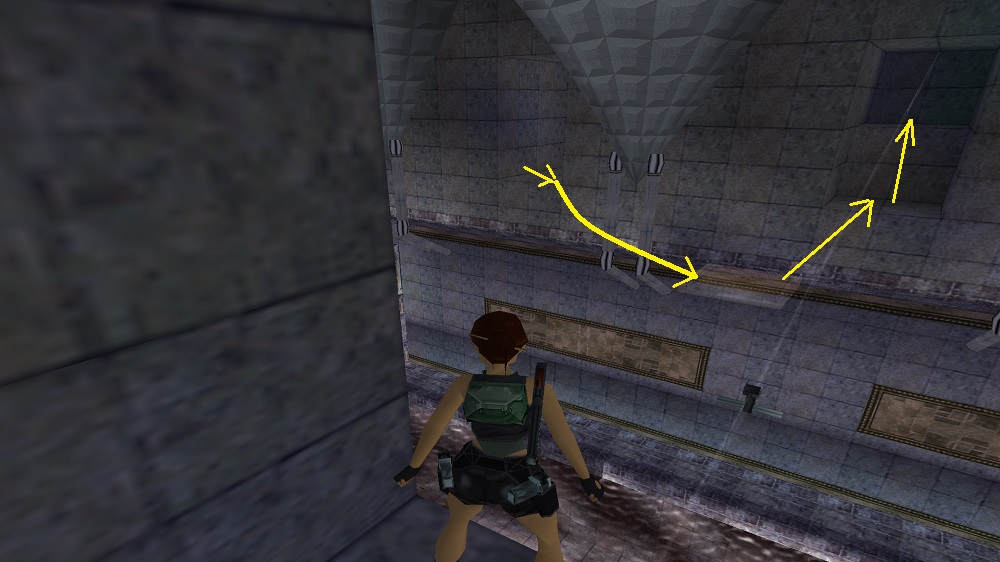
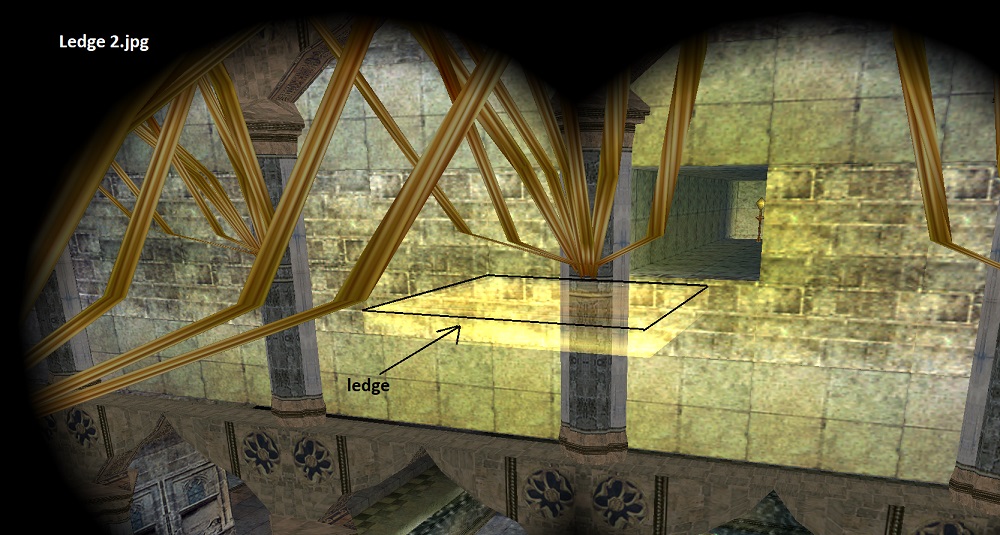
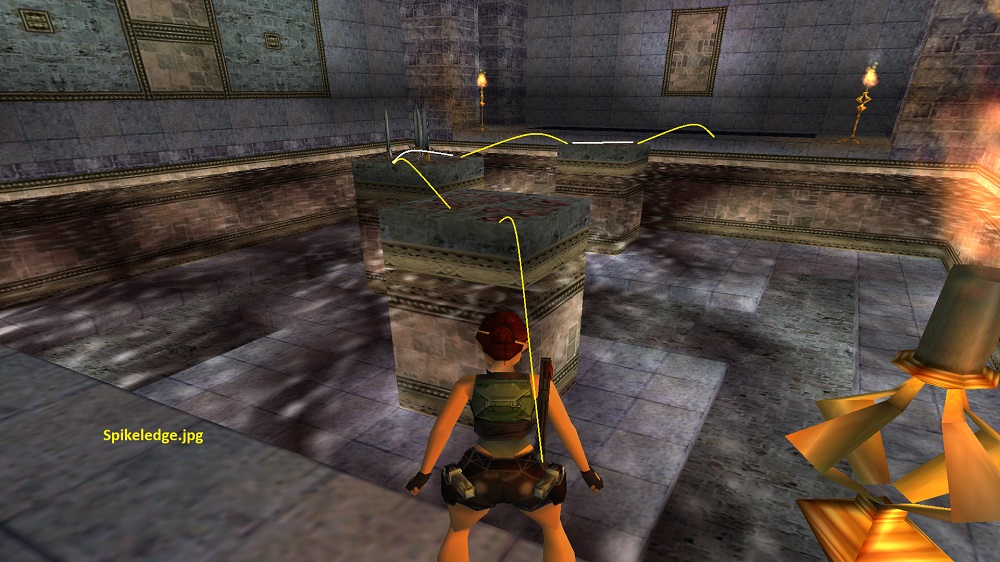
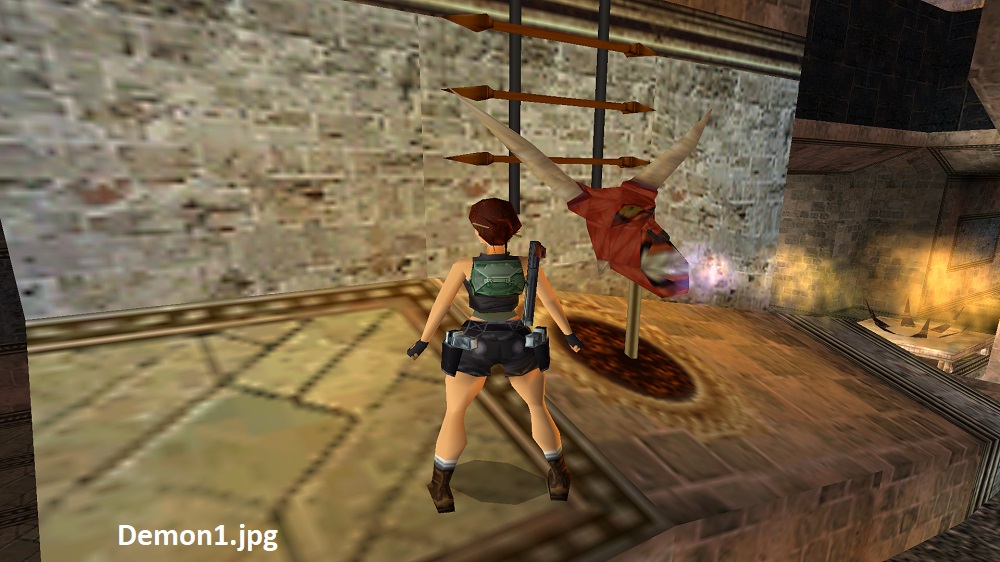
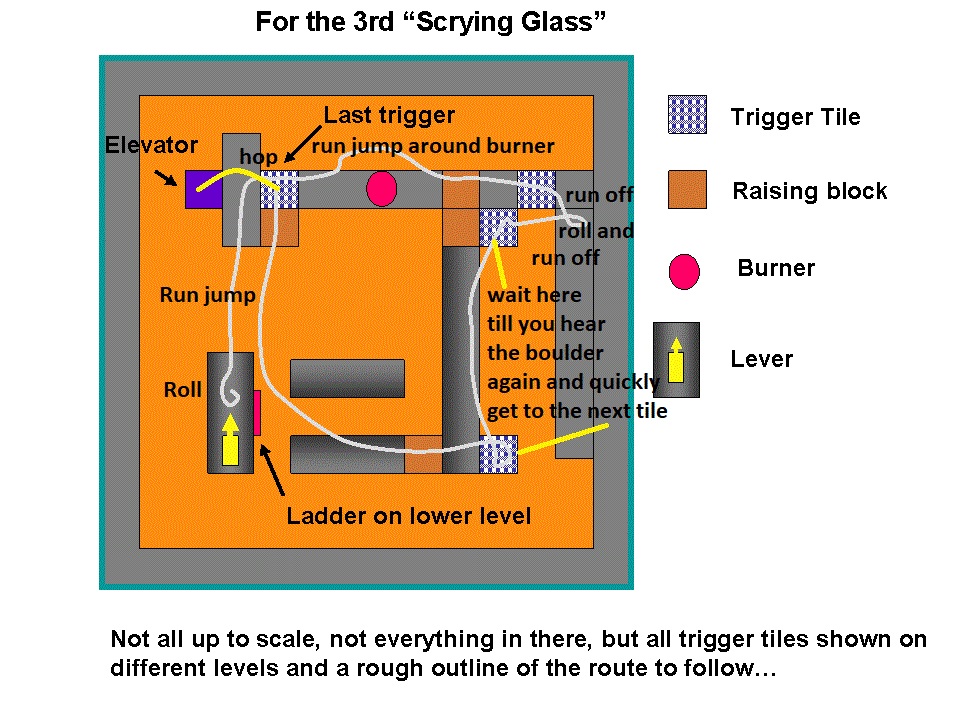
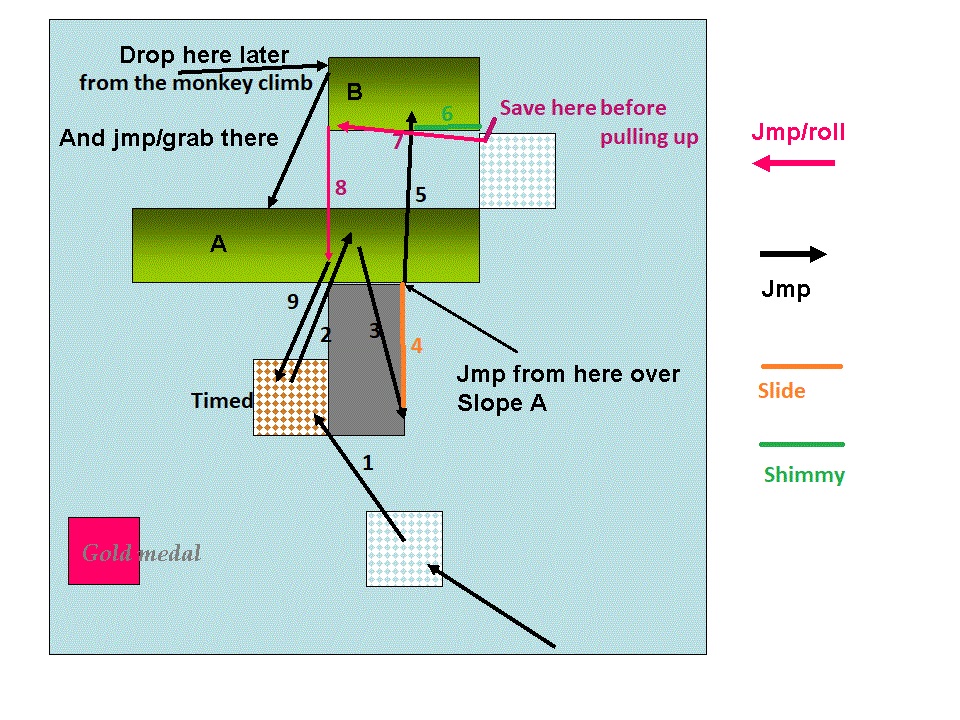