The Thing in the Cellar
Level by Atsushi
Yamakawa (Blacksheep) (June, 2007)
Walkthrough by Harry
Laudie
Drop onto the hill and pick up the flares. Go east and slide backwards down the slope
and grab the edge. Shimmy to the right and drop onto the ground and pick up revolver ammo. Dive into the water and swim to the
north-east corner. Swim through the cave and enter the moat of a castle. Swim
east and the camera view changes to annoy you. Just follow the moat and you
swim pass a large gate and see a white vase in the water at the corner. Swim
south and see a closed gate in the lower south-east corner of the moat wall.
Swim west and be careful of a guard shooting at you. Swim south and see a
closed door needing two items on the left side. Swim around the south-west
corner and pull up onto a block.
Jump around the corner and pull up onto a box. Jump
and pull up to the higher box to the north. Notice a closed gate to the west.
Jump and grab the north wall and shimmy to the left to pull up onto the
battlements. Go to the north end for flares.
Return to the south end and pull down the wall switch. You get a cut scene
showing the gate opening. Drop into the water and climb the boxes again. Hop
into the west opening and go through the open gate.
You see boxes in front of you. Enter the gateway to
the north and shoot a guard on a high north
structure. Go around the first structure in front of you and shoot another guard. Pick up a small
medipack and shoot two dogs. Climb the
first structure and jump up to the west onto a balcony. Run around to the east
side of the balcony and shoot another guard that
was in the upper south-west corner on a ledge. Now you can safely go to the
second structure and pick up red shotgun shells
dropped by the first guard. Go east and climb the ladder to the top of the
wall. Go south and pick up Uzi ammo. Then go to
the south-west corner where the last guard was located.
Save the game before you pick up the key. Pick up the key and get a cut scene of a guard running on
the ledge below. He runs into another gate and engages sentry guns and you are
basically stuck. Restore the game and try this. Face north and pick up the Trapdoor Key. Hit KEY PAD 0 (look) to stop the cut
scene. Go forward a little and jump onto the block in front of you. Run off the block and run and jump onto the
slope of the structure in front of you. Slide down and run and jump onto the
east ledge. Turn to the left and draw your pistols. You may even get to the
gate before the guard does. Anyway, follow the guard through the open gate.
Shoot the guard in the back before the guard
sets off the alarms. You can see that the sentry guns are still in the cages.
Before doing anything else, return to the ledges.
Go to the south-west corner and enter a cage. Pick up secret
#1, a Golden Rose and Uzi ammo. Now go to the south-east corner and pick up
a large medipack off the ledge. Go north and
return to the room with the sentry guns. Look for a ladder on the south wall.
Climb the ladder to the top and pull down a jump switch. You get a cut scene of
a gate opening. This jump switch also closes the gate to the secret. Go east
and pick up a large medipack. The location will
depend on where the guard died. Turn the corner and pick up a small medipack near some boxes. Go west and enter the
room that the guard was trying to reach.
To your right is the equipment for the guard. Jump
to the nearest alcove to the west. Do a banana type jump around the column to
the next alcove to the west and pick up Uzi's.
Turn around and look down to see a triangular hole in the east wall under the
entrance. In that hole is a floor lever that needs a crowbar for later. Safety
drop to the ground and go through the open gate in the west wall. Go north and
hop onto a corner block for red shotgun shells.
Go east and use the Trapdoor Key in the key lock. A trap door opens behind you.
Drop into the hole and dive into the water. Swim south to pull up onto a box.
Grab the crawl space on the west wall. Follow the crawl space to a small room
with moveable boxes.
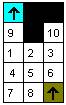
Here is a sketch of the room. You enter at the
brown lower corner. You exit at the blue upper corner. There is an item at
position #10. The boxes start at locations #1, #2, #3, and #4. It is a long
process not to get trapped. The process is broken into small sections just to
make it easier to read.
Move box from 4 to 5
Move box from 1 to 9
Move box from 5 to 4
Move box from 2 to 5
Move box from 4 to 1
Move box from 5 to 6
Move box from 1 to 4
Move box from 4 to 7
Move box from 6 to 5
Move box from 5 to 8
Move box from 3 to 2
Go into alcove at #10 and pick up Thistle Stone #1
Move box from 2 to 3
Move box from 3 to 10
Move box from 9 to 1
Move box from 1 to 2
Go into alcove at #9 and dive into the water
Follow the underwater tunnel to a small room and
exit by the large underwater tunnel in the west wall. Go through a triangular
crawl space in the north-west corner and follow the tunnel to surface in a
cave. Go to the south-east corner. Go to the east wall side of the sloped block
at the south wall. Pull up and just back flip to land on the block behind you.
Run and jump to the north-west to land on the block. Shoot a bat. Jump to a west lower block for red shotgun shells. Return to the higher block and
run and jump to grab a crevice in the west wall. Shimmy to the left to pull up
onto a block. Pull up to the next highest block and look to the east. You can
see a tunnel in the far wall.
The next maneuver is very frustrating. It can be
skipped if you do not want all the secrets. Ahead of you is a slope and above
your head you can see a fence. Run at jump at about a 45-degree angle towards
the highest part of the slope you can. Roll before you land on the slope. Press
jump and jump forward to grab the upper north ledge. Shimmy to the left as far
as possible. Pull up, back flip, and jump forward with a left curve to land on
a flat rock. Jump to a south rock to get secret #2 and
a Golden Rose. Shoot an annoying bat. I could not reach the tunnel from this area. Drop
back into the water and use the blocks and crevice to reach the highest block
again.
You can see a tunnel in the east wall. Stay in the
middle of the highest block and run and jump with no grab to the east towards
the tunnel. Keep the UP ARROW (forward) pressed but release the ALT (jump)
button. Lara will hit the far edge of the slope and bounce or stumble forward
without sliding down the slope. Quickly grab the edge of the east tunnel and
pull up. Follow the tunnel to pull up behind the fence. You get a flyby of the
area below the fence. Go west onto a corner ledge. Jump down to the south and
land on the brick pattern. The earth pattern contains land mines. Shoot a vulture that is flying towards you. Go around the land
mines and go south to pick up a shotgun from
the ground to the left of a box. Continue south into the archway. Go east and
kick open a door.
Enter the room and go left for flares. Go south to climb a box. Climb onto the
higher boxes and get a cut scene of a block rising. Go north and pick up Uzi ammo. Turn to the south-west and shoot the guard in the high corner. Jump up there for a small medipack. The fence beside him contained the
first secret. Turn around and shoot a dog. Go
east and pick up a small medipack to the left
of the boxes. Go to the east wall and see a gap in the wall. Run and jump into
the gap and land on a slope. Slide down backwards to grab the edge. Shimmy to
the right a little and pull up. Run north to the wall. You get a cut scene
showing a rock that just misses you. Jump up and down to shoot the guard on the high ledge above you.
Go east and pick up red
shotgun shells. You can see a floor lever and a motorcycle behind some
bars. Return to a ledge and run and jump into the higher ledge opening on the
south wall. Pick up Uzi ammo. Stand jump with
grab to land in the tunnel in the lower east wall. Follow the tunnel and shoot
a guard. Climb down a ladder to a lower area. To
the east are slopes that lead to a closed gate needing a key. Go north into the
room but ignore the barricades. You enter that area later. Jump into the
opening in the west wall. Grabs the ceiling bars and monkey swing across the
moat. Go through a crawl space and stand up facing a room of spikes. You may
have seen a quick camera view showing a wall switch in an alcove below you.
Turn around and drop to grab the edge of the tunnel.
Quickly shimmy to the right before Lara gets into the ladder climbing position.
Shimmy to the right in the crevice to another ladder. Then back flip, roll, and
grab another crevice. Shimmy to the right as far as possible and drop onto a
safe floor. Crawl under the blocks to reach the wall switch. Pull down the wall
switch to retract the spikes. Pick up the crowbar
from the middle of the floor. Climb the ladder back up into the entrance
tunnel. Return to the moat and dive it. Swim south and climb the boxes again to
enter the west wall tunnel. You return to the area that you have visited
earlier. In the south-west corner you can see the block that was raised by
pulling up onto the ledge.
Go north and climb the structure to get to the
second floor ledge. Go to the north-east corner and enter the area with the
sentry guns. Just follow the corridor
to the pit area. Drop down into the pit and enter the triangular opening on the
lower east wall. Use the crowbar on the broken floor lever. You get a cut scene
showing an underwater gate opening in the moat. Climb out of the pit and return
to the second floor ledges. Hop back into the room and shoot a poisonous monster that luckily gets stuck in the
doorway. Safety drop to the ground and go south to return to the moat. Swim
north and east to find the open underwater gate in the lower east wall.
Swim through the underwater tunnel and surface to
pull up onto an east ledge. Kick open the door and enter. Run up the steps and enter a small room. Go
north-east to the north side of the table. Light a flare to see in the
darkness. Crouch down and pick up the Garage Key
that is half-hidden by the table top. Go south to behind the broken table to
pick up the revolver. Turn to the west and
press the big button next to the door. You get a cut scene of a block rising in
the moat. Go down the steps to the water. Swim through the underwater tunnel to
return to the moat. Swim west and south to find the risen block.
Climb the block and go forward to another familiar
area. Go east and jump the slopes to get to the top. Go south and use the
Garage Key to open the gates. Go up the ramp to the motorcycle. You see a
closed gate and a key lock at the south wall. Use the floor lever and get a cut
scene of a gate opening near the moat. I left the motorcycle for later. Exit
the room and go down the slopes. Turn to the right to enter the room and shoot
the barricades. Run into the room to trigger a falling rock. Run out of the
room to avoid it. Then return to the room and jump onto the opening the north
wall.
Exit onto the block above the moat. Shoot a guard on the high north ledge and another guard on a higher east ledge. Climb the wall ladder
and pull up onto the top of the wall. First go to the north-east and follow the
ledges to the location of a guard. You will pass a closed gate. Pick up red shotgun shells from the floor. Go west and shoot
a vulture. Then climb the west wall ladder to
the top. Pick up revolver ammo and safety drop
into the hole. Follow the tunnel and drop into a room behind some bars. Pick up
the Nitrous Oxide Canister from the middle of
the floor. Spikes start to pop up in the exit route. When the spikes are up,
start to hop onto the ledge. The spikes go down, so quickly run to the end of
the tunnel and pull up onto the ledge. Safety drop to the east ledge.
Go east and the gate is still closed. Return to the
ledge where you climbed the ladder above the moat. This time run and jump to a
south-east ledge where you see a dark rock against the south wall. You will
climb this dark rock later with the motorcycle. Follow the corridor and slide
down into an area with fog. Notice a high slope at the west wall. Get onto the
ledge in the east wall. Go north and pick up the laser
sight. Ahead of you is a closed gate. Just drop into the water. To the
east is the place you have been before to get the revolver. Swim down the hole
in the south wall floor and swim back to the moat.
Swim west and south to get back to the risen block.
Go north to the room with the falling rock and hop back onto the ledge above
the water. Use the revolver and laser sight to shoot the white vase in the
water in the far north-east corner. Swim there to pick up the Room Key from the moat floor. Swim back to the risen
block. Go east and up the slopes back to the garage with the motorcycle.
Enter the garage and go to the north wall and use
the crowbar to pry the Valve Pipe from the
wall. Install the valve Pipe and Nitrous Oxide Canister on the motorcycle. Go
to the south wall to use the Room Key to open the gate. Save the game in front
of the wall switch for a very tight timed run. Pull down the switch and watch
the route with the flyby. You can move the motorcycle into the tunnel near the
gate and save a second or two. Pull the
switch again, roll, and run for the motorcycle. Get on the motorcycle and drive
down the slope. Loop to the left and down the next slope. Go right and drive
through the fallen rock and up the dark rock. Use the Nitrous Oxide boost
(sprint) as much as possible on the slopes. Go left and left again and stay
near the wall. Use the Nitrous Oxide boost (sprint) to get over the water and
run over two guards and
a dog as you
hopefully enter the open gates. If you miss the gates and they are
closed, drive to the east and drive over the ledge to return to the other side.
Drive down the dark rock and back up to the garage and the switch and try
again.
When you make it, the gates stay open. Get off the
motorcycle and go to the north-west alcove to pick up Thistle
Stone #2. Exit out the south wall opening and onto a familiar ledge.
Dive into the water and swim west and south. Pull up onto the ledge opposite
the boxes. Use the two Thistle Stones and the doors open. Enter and follow the
corridor to the left. You are on a ledge over a room with a deadly floor. Run
and jump to grab the bridge to the east. Pull up and you can see an item in an
upper east alcove. You cannot jump to it so jump down onto the top of the
coffin on the floor. Run and jump into the alcove to the south-west. This is a
safe tile at the corner even though half of the texture shows it to deadly.
Follow the corridor and climb some blocks into an
upper cave. Go east and you are on a ledge overlooking a pit with an unkillable spider creature. Drop into the pit and run
and jump to grab a block near the middle of the east wall. Climb up to the
higher block on the left to get out of the spider's reach. Jump north-west onto
a column and then into an alcove. Run up the north steps and shoot a dog. Follow the steps to a room and pick up a large medipack to the left of the entrance. Use the
floor lever and get a cut scene of a flooded room.
Return to the pit with the spider and see a rope
hanging from the ceiling. Return to the lower block at the east wall where you
first climbed up to avoid the spider. You can use the revolver to shoot and
stun but not kill the spider. Run south and jump the slope. Jump forward to the
west and over the top. Jump north with a left curve to grab the rope. Climb up
before the spider recovers. Swing back to the tunnel in the upper west wall. I
suppose you could climb the south block and back flip to grab the rope as well
but I could never make it. The longer route seems to work, as you have to jump
from higher up the slope.
Follow the tunnel back to the flooded cave. Swim
back to the room and pull up on the upper east ledge. Pick up the Blue Hand and get a cut scene of a helicopter as the
level ends.
18-jun-2007