The
Copacahuana Idol.
Peru level
by Raymond.
Authorized walkthrough by D&G productions.
This is the
"Normal" version of
the level, a walk for the
expert version
is done by
Lizard Queen.
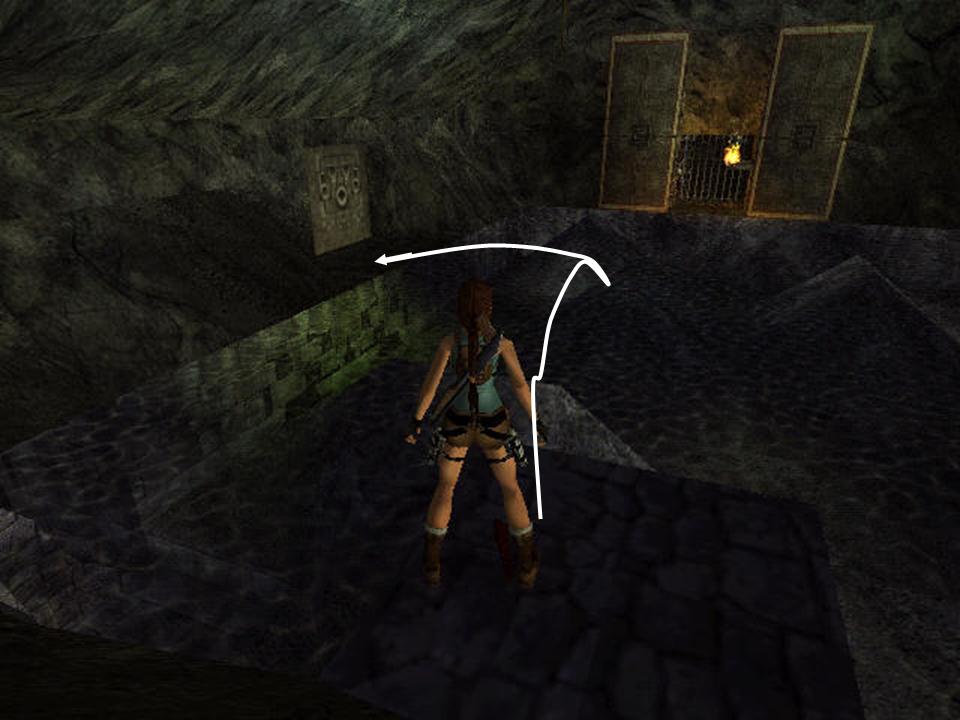
Slide
down the slope and be ready to
jump left onto the ledge with
the Flares. Look over to the
E and spot the opening in the wall where you’ll
see it is
sometimes empty or filled with
water. See the special texture in the opening, which
is a sign that the following
is for a secret as in the
rest of the
level.
Optional:
Stand near the highest point of
this triangular ledge, face down the slope and side
flip to the
right, landing on the opposite slope
a hard jump to the right to
land on another ledge, turn to the opening in the wall and jump in when there’s water
in it. Swim down and follow the
tunnel to some Spikes. Wait for the water
to return and swim as high as
possible over the Spikes,
follow all the way up to the
top of the
slope and to the right into
an alcove. Face E and stand left
to stand-jump out of the opening when
dry. You have to land on a ledge
outside, now jump straight up to the
ledge S, then over to the
Secret ledge (special texture) and get Secret#1,
a small medipack
and Uzi Ammo.
Slide
down the tunnel again and now go
N till the end of the
flat part of this waterway. Looking down you see water
columns, they are deadly.
Slide
down and jump to the side so you can
pass them. Slide and jump, curving
left or right
so to avoid the columns and at the end slide into
the water wall and go for the
underwater lever E, a boulder will come down where you are,
so immediately roll and swim
away.
Now you can
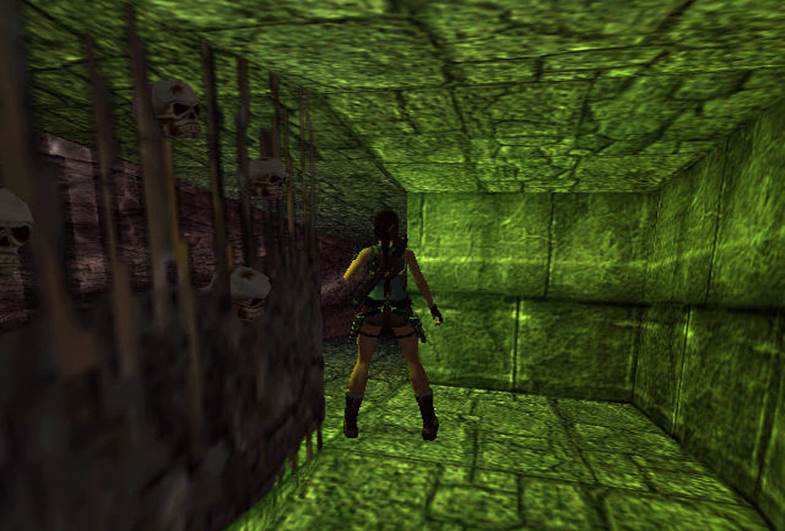
swim through the wall N and land in a pool, climb out E and get the Flares. Lara will look onto the
passage where you can see
a Skull on spikes you need later.
The Main Cave.
(Try to stay
away from that water column
with the 2 Skeletons, that one is
for later.)
Head
N and a flyby will start.
First thing you have to do is
go to the
lever right, on the block on the
hill. Two wraiths are set
free. Flip the lever and see a block being lowered,
run NE and then to the right
around that rock and into that
red opening, jump up into the
tunnel where the block lowered
and get through the water blocks,
run left around the corner
and wait at the Skull on the spikes till
the Wraiths are gone.
Behind
the skulls are Flares. There is also a lever on the wall, (a trapdoor
opens).
Go
W to get a small medipack, but don’t get into
the water there, just go back through the tunnel
N you came from and jump out over the pit to
the Main cave.
The Revolver.
Go
up to the
NE corner and face W standing against the N wall, back flip and jump to grab the ladder
in the opening above, climb up
to the passage
above and climb off left. Follow the passage through the Spike trap to another hole in the floor. Climb
all the way down and go into a room
with the Revolver on a pedestal and get a cut scene. Go back the way you
came, back flip from the ladder
into that passage above and go through the
Spike trap. Go down the ladder to the
Main Cave.
The Laser Sight.
Go
to the far
SW corner, crawl into a crawlspace and get the Revolver
Ammo there. Now head N from
there and up to a ledge at the
side of the
structure, get the Flares
(N) and face E, take a running jump/grab up to the wall
and pull up to pick up the
Laser Sight.
Walk
a bit further and then look SW, jump to the opening
in the wall W and from there to
the ledge SE, grab the Medipack and drop from the wall,
when you go into the
house 2
Natives will attack.
Go
S and look back to the building, up
between the pillars is a Gong. Shoot that and see a door open up (Entrance to the Pyramid
for later).
Water Column Room,
turn off the Lightning.
Head
for that water column with
the Skeletons now. Just
jump in and end up in the top of that
column (don’t go for the
cog, you’ll be squashed by
a boulder. The cog is for much
later!), face W and swim up high, save and swim
straight out so you will land in a column in the room.
If
you happen to land in the bottom
part of this
room you could easily go
down and into a small column and drop dead on the Main Cave floor. Avoid that
small column for now and swim
into the opening E, up and try again. You
can get air
on top of the columns if
you need.
Go
up high again and swim left or
right into the next one.
Now swim straight out to the W wall and hit
"grab" to land into the open W tunnel. Swim down and use the underwater
lever near the window where
you can see
the Pyramid well visit later.
The water columns are now free
of lightning and the doors in front
of the south
and north tunnel open. Swim back and go straight out, swimming up high to get
back in the water column.
The Crowbar.
Swim into the one NE and face N, swim out N just above the Jump switch. Don’t touch the
jump switch yet but and hold Ctrl
to land in the passage below
that switch, go in and jump
over the pit to get
the Crowbar there.
Entrance to the Pyramid.
Jump
out into the water column and go up high facing
N once more. Swim out N to grab the Jump switch this time. After using the Jump switch you’ll see the
Spikes in a pit below have retracted (Entrance to the Pyramid).
Now you will land in the lower
section of the room. Carefully
swim (after saving) to that low
column in the bottom, try to
swim upwards into it and surface,
now dive down and you should land
in the pit below, the fall will be broken. Follow the tunnel and get a flyby of
the Pyramid.
The Pyramid,
the Inca Magic Stone.
Jump
over to grab the bridge and go into the
Pyramid where you can see
the Copacahuana Idol in the display. Find the opening in the floor next
to it and go down to the
lower section. In the NE corner is
a pit, drop in and get the Inca Magic Stone from the
S wall. Go back up to the floor above
and go out E, run-jump and
grab from the bridge to land
back in the open door. Climb back up to
the Main Cave and get into the water
column with the skeleton.
Water Column Room,
opening S.
Get into the water column
and if you want you can
go over to
the one SE to get the
Uzi Ammo without falling down. Swim back up and over in the water
column SW is a Medipack. Now make your
way up into
the opening in the S wall, climb the block and place
the Inca Magic Stone to the left of
the door that is still closed.
Ball Challenges, the Metal Key.
Go
left and up to where the
Boulder starts rolling, face the Boulder, wait for it
to roll away and follow
down, stop one square away from
the lowest point and wait for the Ball to
approach, then stand jump over the Ball and run for the
Jump switch, jump up and if
all goes well you are hanging
up there while the Ball touches the wall.
The door in the middle section of the room
opens. When you drop, do a roll, run down the slope
and jump back over the
Ball, quickly run to safety.
Head
W and up to the next Ball, look S and spot the vase in an alcove, shoot it and jump over the Ball to
get some Uzi Ammo. Go back
E to where the other Ball rolls but before you reach the
boulder find the opening in the fence, go into
the middle section and over to the SW corner,
where that gate opened up
(S wall). Go left through a
watery wall, spot the opening up
in the ceiling and follow up to a gate
that opens, walk slowly till
you see the
Boulder starts moving, hop back a bit and just wait… Scary wasn’t it?
Now sprint down the slope and wait
between the water textures, the Boulder will cause the water column
to appear and you’ll be lifted
up above the Boulder. You can turn E and line up for the
underwater lever, save and use it when
the Boulder rolled back, so
while you use the lever
the ball will be below. You’ll drop
back in the passage, follow
up and look for a ladder to
the right. Go down the ladder and pick up the
Metal Key from
the pedestal.
Climb back up and back flip to the
passage, go down to the Ball and run/sprint behind
the Ball, into the re-opened gate
to the right.
This time dive into the water of
the low room
and swim to the SE corner to
get the small medipack. All around you see
Boulder traps, this is for later..
Climb back up to the room
above (grab up to the lowest
point of the floor) and leave through the
gap in the fence NE, go left
and out N to the Water Column Room.
Get back down to the Main Cave using the low water
column and head over to the
keyhole N at the end of the
brook. Using the Key will retract the Spike trap. Enter the new passage
and dive into the water swim
left and through the narrow gap
W to come to the Water
Room.
The Water
Room, Torch Puzzle.
This room will continually
fill and drain (in four stages), so be careful when swimming
all the way up; when the
water drains you may drop
dead on the floor. You can
always grab one of the slanted
ledges to hang there waiting for
the room to fill up
again.
The Torch.
First
objective is to get a Torch. That can be
found in the opening S. Grab one and when the room
is dry, sprint over to the
NW corner and leave the Torch on the floor so you can
get it later
(NOT under the trapdoor). You could decide to
bring them both over to that
passage while you’re at it.
Open Doors.
Now go for
that Jump switch up S, get to the
slanted ledge above it and hang there till you
expect the water to reappear
in the lower section when you
land after using the Jump switch. Otherwise you’ll end up in the Spike pit. Up N door opened, get
in there and use the underwater lever to open a door up in a hole in the ceiling, W side of the
room. Find that open door and swim up
to a block in the Jump Pool.
The Jump Pool.
Get the Arrows NW and then swim SW to
an opening to a cave in the W wall. Follow in and find a Jump switch over some shallow
water to the left. A flyby
of a trapdoor opening up and a water filled shaft
up to the
Jump Pool. Go back to the
pool and swim back through the open door NE (NOT in the N wall), wait for the room
to fill up
and get down to the floor, into
the passage NW.
Pick up a Torch and head to the
end of the
passage, face S standing against the trapdoor and jump up… You’ll end up on top of
the shaft and the Torch will float onto the ledge,
climb out and use the switch on the W wall, the block under
the Torch will rise so you can now
pick it up.
Jump
to that block
in the pool left of the passage,
then hop back…
…
and a running jump onto the slanted rock
in the pool, the one in front of
that door E (so you’ll slide left,
then jump up to the door
E). Stand on the SW tip and
run-jump to the rock just to
the left of the entrance
S, slide and jump with a left curve to
land in that entrance. Light your Torch and run-jump out to a rock NW, slide/jump and slide/jump once more to
get with the Torch into the opening W, go in and to the
dragonhead and light it.
The Heavy Silver Key.
Optional:
Walk back to the pool with the Torch and stand left in the opening,
take a step back and then a hop back, now run-jump to
the left side of the
rock in front, slide/jump 3 times to get across
the pool to the now open door
E, go in and light the dragonhead, jump on the block where the
Spikes retracted and get Secret#2,
the Uzis. On the other block are
some Flares. Leave the Torch here.
Get across the pool to the
open door E, get the Flares from the block.
Dive
into the passage N and swim around the corner
to a pedestal with the Heavy Silver
Key. Swim back and down into
a now open trapdoor, careful you’re back in the Water Room. Wait for the
room to fill
up and swim straight out along the ceiling to
get back up through the door
to the Jump Pool. There is one
more pick up, near the
door S. See those bubbles in the water? Go there and pick up the
Uzi Ammo. Climb out
S and use the Key to open the gate.
The Golden Plate.
Inside
is that pit
you jumped over when you
got the Crowbar,
a block lowered in the left corner
so you can reach a wall lever to operate the
blade. Stop it, look at the screen to see if
it is in the correct position,
should be against one of
the ladders. Otherwise reuse the switch until it’s in the right
position. DO NOT stand on the
tile right of the lever
as this turns
the blade on again. Then climb down the pit, avoid
contact with the Blade and quickly get the Golden Plate, hop until Lara’s
back is against the wall and jump up forward to
grab the ladder again before the
trapdoor below opens up.
Back to
the Main Cave.
Now you can
decide what to do; Go down the ladder as far
as possible, hang from a corner and drop down next to the
campfire...
Or climb the ladder, go
S and go back down to the Main Cave through the water column.
In the Main cave are those 2 blocks with the fire
on top, go to the E side block
and place the Golden Plate
in the receptacle. Step left or
right and climb the corner of
the block, turn around and jump straight up to grab the
ladder.
More
Boulder Traps.
Climb up to
a sloped passage with a boulder, go to the
boulder and run jump with a sharp left curve around the
boulder. Go up to the next
nice surprise… Two boulders happily rolling around. Stand against the right
hand wall and run down after the Ball to the wooden
floor. Stand here…
…
and wait for the right moment
to run in the direction of
the deadly water wall; curve right around the
Flame and sprint up the slope to
safety. There was a Medipack on the slopes, you can
try and get it, but I didn’t dare… (You can
go back later on to get it. The balls stop, once
you reach the cave room after
the balls.). Go around the corner
and another Ball started to roll, face into
the passage…
…
and wait for the Ball to get
next to you,
then run in and sprint to the
other side of the slope
(there’s a safety alcove to the
right but I didn’t have to use
it). Follow the passage to where
you hear a door open up at a hole in the ceiling. Climb
up and save.
Wheel
Switches
Run
in straight to that gate; turn right around the
wall while you see several
enemies wake up. Now run
straight S and jump over the slanted rock
S; roll and throw the
switch. A boulder will be released and if all goes well, all enemies should be crushed by
that boulder (also the flame in front
of the wheel
switch stopped and a raising
block went down in the NE corner of
the cave room). Jump back
out of the hole and go left
to get the
Shotgun Ammo in the dark corner (W). Head back
to the main
area, jump around the Ball and go N there, there are
wooden floor tiles. The second tile will trigger Spikes over a Jump switch on the wall. Face the slanted rock opposite
the switch, time the
Spikes and stand-jump with a roll, then jump and grab the switch
(jump when the Spikes are just coming up). As soon as
you land another roll and you should be in a safe alcove.

Run
out around the corner and go to
the middle of the room.
N is the opened door, E a close gate, SW a Wheel Switch. That’s for a Secret.
Optional: Turn the wheel 5 times,
roll turning right and sprint with a right
curve to the gate, hit
"Alt" to roll through
at the last moment, hop over the
pit, go into
the next room to get
Secret#3, Revolver Ammo.
Use the Wheel there, turn 5
times, back flip/roll and sprint, just before the pit hit
"Alt" to get over the pit
and run to the gate, when
up against the gate hit
"roll" and you will end back up in the cave.
Go
to the open door N and come to the Block Puzzle.
The
Block Puzzle.
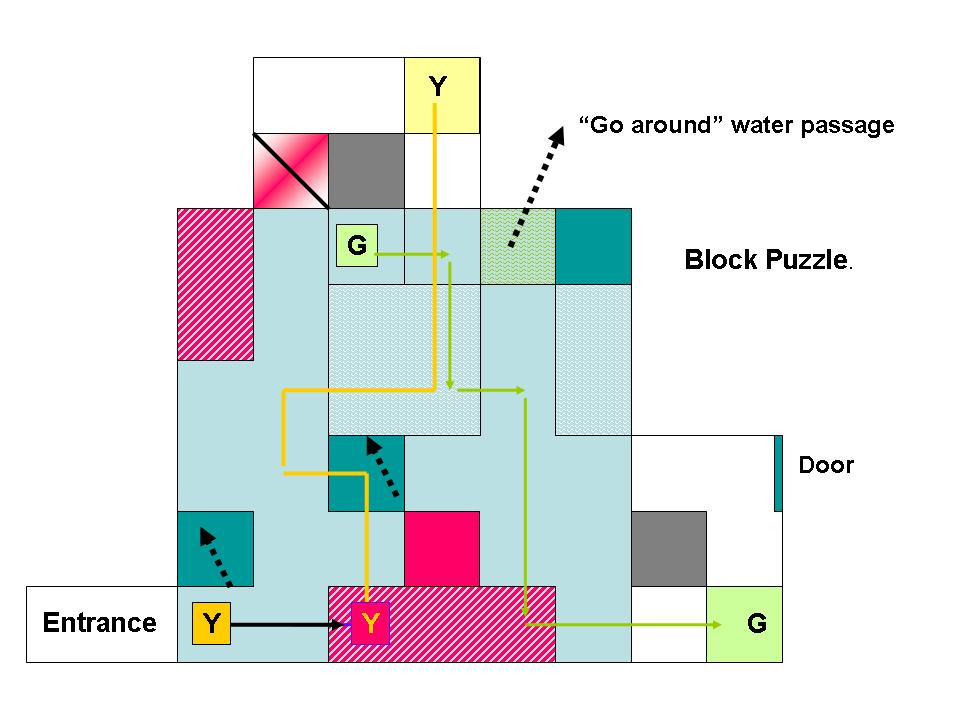
In this block
puzzle are a few things you should
know before you start, a little
bug can sometimes
occur and a block won’t be movable
anymore, this can occur when
you hold Ctrl till the end
of an underwater push. So
don't do it! Should it happen anyway, go to
the other block and move it once/twice
(that time the other block could
also move from it’s place), go
back to the block you’re working
on and it should move again.
You
can push a block through a water column more than
one square, as long as
you keep holding down "Ctrl",
but release Ctrl when Lara does the last move,
otherwise it would be possible the block won’t
be pushable anymore (as said
above). There’s another pass through if you should
need it, it is the
corner between the red death
column and the water column, walk
through diagonally.
Push
the first block ("yellow") in twice, it will end up in a water column.
Turn left and go through the passage
to the next
block ("green")
push it N once, go into the
passage W and grab the Flares,
in the passage is the "yellow"
tile, go on to the "green"
block and save before pushing
it E through the water column
without releasing Ctrl, while in the second push, release Ctrl. At the end
of the push Lara will be swimming, find the hole in the
ceiling SE, go up and W, down and S, climb out there and go to
the "green" block
again, pull it N once, swim W, down and left under the
wall to climb
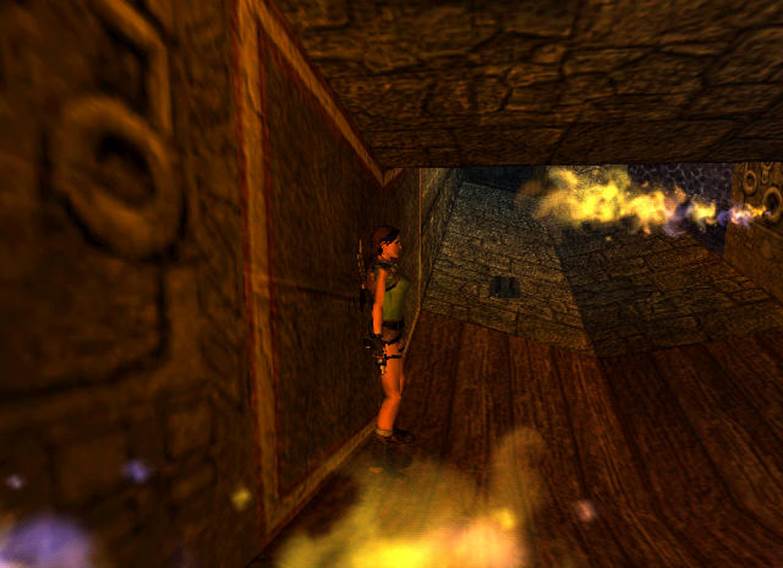
out. Now push the block all the way
E and move it onto the green
tile in the passage with the
door (screenshot of that door).
Go
to the "yellow" block, pull it W once, swim to
where you can climb out of
the water and go to the
block again. Pull it S once and use
the passage to get out off the water again.
Then pull it W once, push it N once and W once. Swim out of the
water. Push it N once again, again
swim out of the water. Jump over the waterhole
(NE) and push it W once again. Swim back again and now pull the block twice
W. Run around and finally
push the block W onto the yellow
floor tile.
The
door opens N, so jump over the waterhole
NE and go out and follow the
passage over the hole, through
the Spikes, jump another
hole and come to an opened gate. Follow through (don’t get into the
water), pass 2 Swinging Spike Blocks and at the closed door
you can walk
left into the water column,
swim to the
S wall and use the underwater lever to open a gate (I got a secret chime
here). Turn left, swim into the
next water-part and the current will take you back to
the passage. Go W past the Spike Block and out of the room
you have visited before while going for
the Key.
Go
out to the pool and cross it to
the opening W, go to the
opened gate in there on the ledge
W. Follow through and turn right
where a flyby of the new
area starts.
The
Waterwheel Area.
Doing the tasks
here you should notice, that the task
in each corner room below is
connected with the opening of
the door in front of the
room above it. And you should connect the trap used
in both of the two rooms
with the texture tile above
the front door of the upper
room! This’ll help for a trap
puzzle later on!
You can do the tasks in a different order. This is how we did
it!
Ground
Floor.
A
Secret.
Pass
the waterwheel and a fly by starts.
Go stand in the water at the waterwheel, facing S, hit Ctrl
and Lara will climb it, wait long before
you jump and grab the Jump
switch. Spikes will now have
retracted in a pit with the next
Secret.
A
Vase, gate 1.
Go
into the room SW and in the back of the room
left is Revolver Ammo, slowly step on that square
and hop back. After the Knives retracted you can get
the Ammo. Go into the passage
and look up W to spot a deadly
crawlspace. There’s a vase in there you
have to shoot, I went back out of the passage and found a spot from
where I could just see that vase
and shoot it. The gate above
on the first level opens.
A
Ball, gate 2.
Go
out and over to the room SE, on the S wall is a switch, save and throw it immediately
side flip away, the Boulder crushes the opposite
block and another the gate above
on the first level opens.
A
Statue, gate 3.
Go
out and to the NW room and find some statues, careful there are 2 Spike traps
(different textures). Move the
statue standing S to the SE corner
(symmetry), this takes some back and fro pushing as
you can push the statue on the
spike tile but Lara can’t stand on it. Another gate above on the
first level opens.
A
Fireplace, gate 4.
Go
over to the
room NE and walk slowly into the
fireplace, right around the corner,
use the switch there and the last gate above on the
first level opens.
Go
out and left and just past the ramp to
the first level is a crowbar
door (E wall, under the wooden bridge),
open it and find Uzi Ammo
under the Skeleton (pull it away). In the
back of the room is the
pit with Secret#4, Uzi Ammo
and a Crossbow.
First
Floor.
A
Vase.
Go
up the ramp
to the first
level and over the bridge to
the SW room, in the SW corner is
an Uzi Ammo pickup, careful..
You first have to deactivate
the Knife trap, climb on and hop back.
In
the NE corner is a small gap.
There is a vase behind it. Go into the SE corner,
line up with
the Vase, crouch and shoot the vase with
the pistols or Uzi’s. When
you hit it,
a camera will show a burner behind a waterfall for the
first time and music plays.
Optional
for a secret.
In the SW corner
is a hole in the floor. Standing at the pit and looking N you will see another
small gap near the floor
in the opposite wall. When you crouch
you can see
a fire. As you know, there is
also a vase behind the fire (You
saw it through
the gate of the room,
the vase is in!) Line up
so you face the exact middle
of that gap
and pull the Uzis, save and hop
back into the hole while firing
the Uzis, when you hit the
vase you’ll hear a gate open up. You can
also simply crouch and
shoot with the Pistols/Uzis till you hear the
gate of the
other room opening.)
Go out and left and up the ramp
to the first
level, the opened gate is
W from the bridge, go in and get Secret # 5,
Shotgun Ammo.
A
Block.
Go
out and left to the NW room, carefully
hop over the corner of
the Spike trap in the entrance and find a push block NW, pull it out so you can go
behind it and get the Arrows. Push the block back, all the way on the
wooden tile and get a screenshot of the Burner in the passage again.
Run-jump with a grab back out of
the room.
A
Jumpswitch.
Cross
the bridge to the room
NE, shoot the vase S and the Fire place
will extinguish, jump/grab the
Jump switch there and get another screenshot of the Burner in the passage (third
time).
A
Native.
Go
out and up the ramp to the
room SE, get the Shotgun from the SE corner and shoot the Native to get
his Shotgun Ammo. In
the NE corner is a switch and now you will see the
Burner in the passage is off.
Go
down to the Ground Floor
and enter the new room under
the waterfall N.
Ball
Puzzle, the Gold Statuette.
Objective is to
get the Spikes down in the pit E, the
trigger is in the alcove W, but in between are some
nasty traps. Each of the four
tile types is connected with
a certain trap. Remember the hint
at the start of the Waterwheel
Section! So you know, which tile
type is connected with which trap!
Different solutions are
possible. I did it this way:
Start
near the Boulder that most right
tile of the
first row of the Puzzle floor.
Run with a curve over the tile
without touching the Spike tile, the Boulder comes down and the tile is
safe.
Now a hop diagonally (SW) to the next Boulder tile, immediately back flip back. Hop to the same tile again
and then do a standing jump
over the fire tile in the
third row, cross the next
ball tile fast and hop over the corner
of the fire
tile into the alcove.
Make your way back as you
came and go into the room
E. Get the Gold
Statuette and see a gate
opening. Head back out to the hanging bridge
and open the Crowbar door W (ground floor). Get a Torch and
light it at the fireplace. Go out and into the tunnel S behind
the waterwheel. The new passage opened
up here, throw the Torch away so you can
find it later. A flyby of the
area starts; this is the
area above the Pyramid.
Mamacota Lake, Trapdoor Puzzle for the second Gold Statuette.
Pick up the
Torch and go right onto the bank
of the lake
to the dragonhead
on the W wall, light it to raise a trapdoor
N. Walk with the Torch to the lake
and find the spot from where you
can run-jump to the ledge
on the central pillar. Light the dragonhead on the S side (to raise
the trapdoor middle W - will stay up) then jump back W.
Leave the Torch in a safe place and find the underwater opening under the bank
(W). Swim in and go get a Medipack just past the Blade. You can swim
past the Blade along the ceiling.
Swim back out and climb up to where
you left the Torch and find a spot where you can
walk into the water so Lara will keep the Torch in hand. Swim E and SE along the E wall to where you
can walk up the bank
of the lake.
Jump up to the SE upper corner
and face N, spot the rock ledge
sticking out
Run
diagonally and left curved over the
ledge to jump onto that rock
ledge, go light the dragonhead and the trapdoor E raise.
Stand
on the trapdoor, hit "1" and Lara will drop
the torch where she stands, run jump and grab the ledge on the central
pillar, go the left then
jump and grab the ledge S. Step on the wooden
tile and the trapdoor middle E rises (Timed). Jump back to your torch,
quickly grab it and jump
back over to the pillar, leave
the torch there for now,
best is near
the S trapdoor.
Jump
over to the
ledge N and stand on the wooden tile, the
trapdoor middle S raises. Jump back to the Torch, grab it and jump S to light the dragonhead.
A trapdoor rises W (will stay up), leave
the Torch here for now and make
your way over to the
W side trapdoor, hop onto the
wooden tile there to raise
a Timed trapdoor (middle N).
Now you have
to get the
Torch to the central pillar in a timed run. Jump back to the pillar,
go left and jump to the N, onto
the wooden tile, roll and jump back, over to the S ledge,
grab the Torch, roll on the
wooden tile and jump to the central
pillar, leave the Torch where you can easily
pick it up (W side ledge).
Jump
to the wooden
tile W, jump back to the central pillar
and grab the Torch, jump to
the N side ledge and light the dragonhead. A camera will show a block under
water.
Jump
down to the ground, Lara’s gaze will lock at an opening in the S. Leave the
Torch where you can find it. Dive down into the lake and swim to the
S and find an underwater opening.
Swim in and stay high at the ceiling to
avoid contact with those Blades. In the room at the
end is the second Gold Statuette.
Pole
Swings up to place the Statuettes.
Swim out and climb out of the water
to the right,
Jump up, back up to the dragonhead
E, over to the central pillar
and to the ledge N. Walk to the W and jump to a ledge NW under those long Dragon poles. Stand with your back to the
wall …
…
and jump up to grab the first pole and go straight until
Lara can grab a small ledge in the end. Turn around and stand way back…
…
run and jump to the pole to grab it in the middle
of the right
hand part, swing and jump hard right to
land on the ledge where the
receptacles are.
Place
the first Statuette W, the second E where
the Flame is now gone, a slight
tremble occurs and watch the flyby
and see the 2 Natives are gone, they
are now fooling
around with 2 Skeletons
down in the Pyramid
The
Three Little Wheels.
The
trapdoor behind you opened up,
dive into the room and get
the first of the 3 Little Wheels. Climb back out and drop from the S side
of the ledge.
Find a good spot to get down to
the ground below the trapdoor
and face S. See that opening SE you swam in before getting the Statuette? Get over there
and go in, be careful the water
is gone from
the lake. In the pit is
a switch and after using it
you'll see a block go down. Go back out of the passage
and go back to the N side, just to the right
of the small
waterfall is an opening you can
crawl in. A block lowered there and some Revolver Ammo is now
available.
The
Pyramid.
Go
back out to the dry lake and get down to the lower
edge near the central pillar,
jump onto the slanted grey structure
and slide to grab the edge, shimmy
right and drop one more time to
get to that
small medipack on
the corner of the Pyramid.
Then you can get all the
way down to the now safe lake
below and get the Uzi Ammo from the SE corner
of the Pyramid.
Time to face the resistance, get into the
Pyramid and deal with them, shoot those Skeletons out or into one
of the pits
and place the first Wheel in the contraption on the wall (S).
For the
second Little Wheel.
Climb up to
the floor above (N side of
the room is an opening in the ceiling, climb
the ladder there) and go onto
the bridge N, dive into the
wall of water
there and save before you swim up
to the ceiling
and then into the shaft; avoid contact with the Darts and swim along the
bottom to the second pit
and down to use the underwater lever there (S). A camera shows a door opening in the W wall of
the pyramid room. The trapdoor at the end of
this tunnel opens up, too.
Swim over and up to climb
out at the Hanging Bridge, go
N through the tunnel behind the
water wheel and down to the Pyramid
again, just do safety drops till you
are on a bridge. Go in and onto the
W side bridge, jump over and climb up through the
opened door to get the
second Little Wheel. Go back to the Pyramid
and down to the lower floor. Place the second wheel
on the contraption.
Optional: Go onto the S side bridge
and before you climb up into
the passage there. Climb up,
jump into the wall of water
and go left at the big door,
the door opens for you,
throw the underwater lever on the left wall and the door will close,
so you can just spot a vase in a crawlspace over that door. First swim into a narrow
gap S and follow to some Flares.
Swim
back and go to the closed door,
roll and swim (under water but high) to the slanted bottom
E, as soon as Lara get her feet on the ground,
back flip/roll and grab the
edge of the
crawl space and pull up. Then you can
shoot the vase to get Secret 6 later on (camera). You can crawl forwards
and drop down and swim out to the big
door that is open now, go
left, (a block raises behind Lara) and up a bit, a Boulder will come rolling and that's your ticket out... You have to
swim to the
water wall (low) and let the ball push you out off the water, jump down and immediately side flip away.
Go back to the
Pyramid, down to the lower floor
and find the Spikes in the pit have retracted;
now you can
get SW Secret#6,
Explosive Arrows.
The
third Little Wheel.
Go
out E and wade to the opening E, climb up and follow back to the Main Cave. Dive into that water column
and get the third Little Wheel from
the bottom, swim up and go
through the Water column Room to get back down to the Main Cave.
The
Copacahuana Idol.
Follow
back to the Pyramid and go place the last Wheel. Climb up to
the upper floor; go into
the display to get the
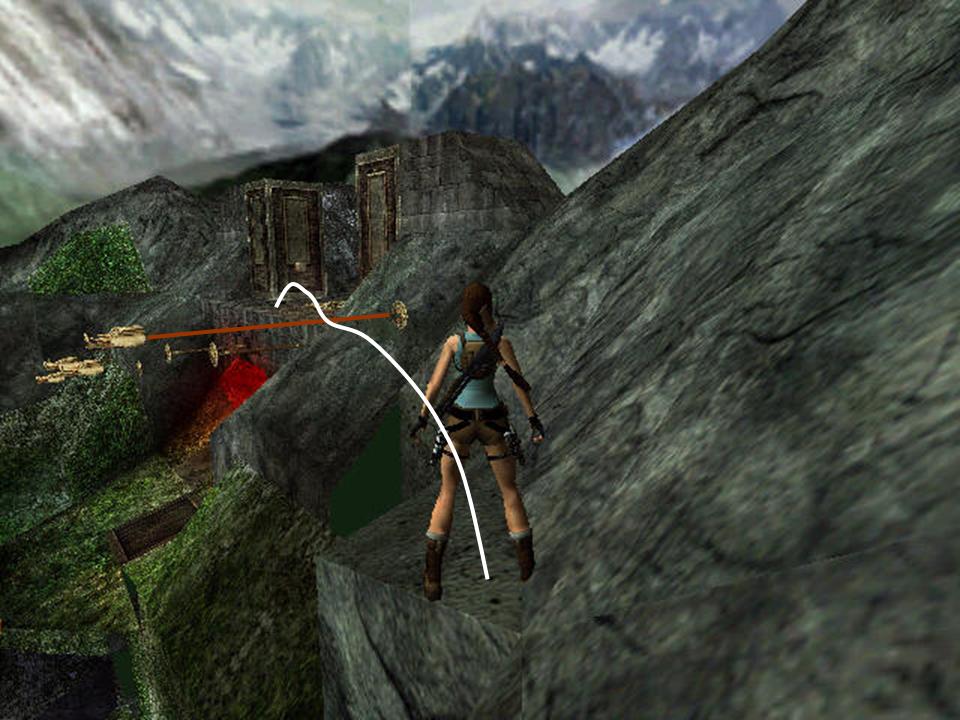
Copacahuana Idol. You'll
end up in another water room, swim
down to get some Revolver Ammo and then go up
through the hole in the ceiling,
climb up W and back flip, then jump hard left and land
on a ledge. Look up the tunnel and see a wall of
water. Take the revolver and put on some sunglasses to shoot that Gong, the water-wall will disappear. Now go jump the ledges
from side to side and the
level will end.
31-10-2007.