ICE HEART: THE BIG
CAVERN
Level by Dario Romero
Walkthrough by Treeble (which amplifies and replaces the one he wrote years ago
for this level)
The level barely begins and Lara is sliding to her death! As soon as the level
loads, hold down both the Jump and Roll keys so that Lara switches to a
backward slide, then immediately grab the edge of the slide, climb up and
backflip with a mid-air roll to grab the opposite ledge. Crawl into the narrow
passage and up the two icy ladders, coming to a couple of medipacks laying on
the ground, then drop into the water.
You can trick the heat meter by saving and reloading as you proceed underwater:
every time you reload, your heat bar is completely full, so take advantage of
this if you don't want to burn out precious medipacks. Swim through the passage
to climb up on the other end, coming out right in front of a Healing Crystal.
Climb to the level above to find yourself outside, and then make quick work of
the vampire bat that's been alerted to your presence.
Slide through the central icy slope towards the cavern, but be aware that a
bunch of snow boulders will be hot (...cold?) on your heels. Dodge them by using
the slopes inside the cave, then retrieve the shotgun ammo. Save your game,
then dive into the freezing water and locate the narrow opening on the wall to
the left. Swim inside and retrieve the supplies—the only SECRET of
this level.
Return to your starting position and then use the flat spot on the snowbank to
jump towards the rocky pillar in the center of the room. As you stand on it,
two more vampire bats fly in. After dispatching them, jump towards the rocky
slopes on the right side, grab the edge and shimmy all the way to the flat spot
on the left end. Climb up, turn around, and then do a running jump to grab the
edge of the blue platform on the opposite end. Slide down the passage.
Drop into the lake area below and retrieve the small medipack from the surface
on the center, then hop across to the area further on, where you'll spot a
wooden building on the right side. Head inside—mind the wolf—to retrieve some
supplies and the REVOLVER, then go back outside.
Dive into the lake right ahead of you and swim through a narrow underwater
passage nearby, on your left side. As you climb out of the water, retrieve the
large medipack and climb up the wooden ladder. Jump over the water and then
make your way around the room by using the flat spots on the left. When you
gain some height, by climbing up the gray rocky walls, you can then jump at an
angle towards a flat piece of bloody snow and, from there, towards the edge of
the rooftop. Shimmy to the right and then climb to the very top, where you'll
find the SHOTGUN as two vampire bats fly in.
Locate an opening on the rooftop and drop inside to find a lever. This raises a
trapdoor nearby, climb back out and from the bottom of the ladder to the
shotgun, jump across to the now raised trapdoor. As you move towards the
medipack, a poisonous snake wills itself into existence.
Crawl into the room filled with spikes and ignore the wooden ladder. Instead,
walk through the spikes all the way to the end, then climb the icy wall to your
right and backflip to a room above. Throw the lever and immediately hop back
twice to dodge the rolling boulder, then head into the open door to throw
another lever. Walk towards the resting boulder, then grab the ledge and shimmy
all the way to the left: with Lara's hands touching the wall above, feel free
to let go and land safely among the spikes. Carefully walk back and crawl
outside.
Return to the first lake area and climb back up to the entry point, minding the
square opening on the wall (we'll return here shortly). On the upper level, run
through the narrow alley between all the bloody snow. Clear the gap, and then
carefully hop across the flat surfaces on the edges of the spiked pit to find
shotgun shells right in front of the door we'd opened. Inside, find another
lever.
Climb back out and, as you jump back over the edges, you'll certainly notice a
baddy with Larson's face running around. Once he's done for, enter the opening
on the cliff side you noticed before and fall through the trapdoor to freezing
water way below. Quickly swim over the rocky formations to locate a safe cave
above, so climb out before you freeze to death.
Collect the two medipacks in this cave before dropping back into the water.
Keep following the "breadcrumbs" of rocky formations; when they
split, follow the ones toward the right side and surface near a skeleton
resting on the stone edges. Before collecting the medipack, jump to the
snowbank on your right side to dodge the two incoming boulders.
Once that is done, hop back into the cold water and swim through an opening
just above the place where the boulders landed underwater. Climb out into a
narrow corridor, gun down the speeding wolf, and then push the block in the end
as far as it will go. You're done here.
Dive back and quickly follow the rocky formations to the opposite end (the left
side you'd ignored just a few moments ago) to find a cave with a built-in
wooden structure. Head inside, dispatch the wolf and retrieve the supplies
before moving on to the cave area just beyond.
Two more wolves roam freely in this area, as well as an idling Larson
doppelganger. Near the shallow pond, find a narrow corridor leading to a
crawlspace and go through it to reach a lava filled area. Retrieve the medipack
right across from you and climb through the hole above it to stumble upon a
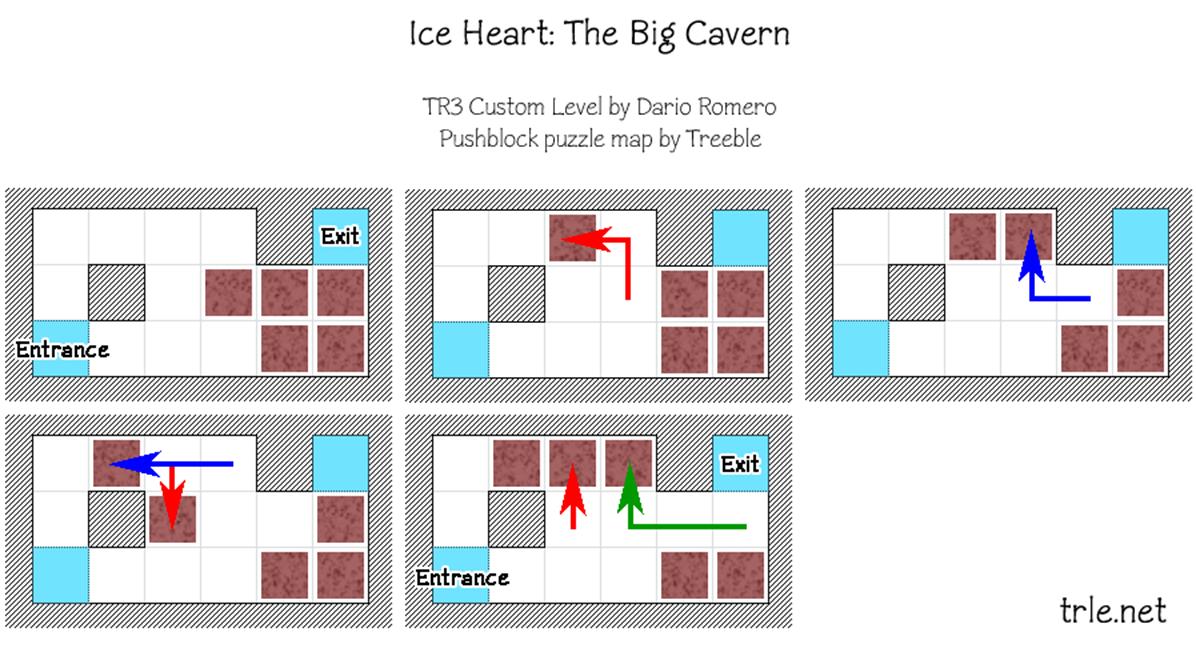
pushblock conundrum. Follow the steps in the image below to solve it.
When the blocks are out of your way, you can drop back to the lower level
through an opening on the floor on the opposite end. Jump to the crack on the
far wall and shimmy to the solid ground on the right, where a menacing boulder
stands atop a slope. It might be a good idea to save your game right now. You
need to sprint all the way in, until Lara stops by herself, and then
immediately crouch. The boulder should skip over Lara by a matter of
millimeters!
Top up your health with the medipack at your feet and drop to the break-away
floor down below. Stand on top of the light gray structure and jump to the
crack on the opposite side. Shimmy all the way to the block on the right, turn
around, climb up onto the break-away tile (in true Tomb Raider logic, it only
crumbles if you stand on it) and then sideflip to the left. Turn around and
keep jumping across the flat rocky pillars until you reach a muddy tunnel.
Crawl in and climb the ladder on the other end.
Activate the lever in an alcove to the left, alongside a small medipack, then
drop into the water pit and quickly swim through the freezing water to find
yourself inside a small building. Retrieve the shotgun ammo and you'll hear a
door opening nearby, letting a wolf in but also revealing your way back to the
area where you last saw Larson (or someone who looked a lot like him).
Enter the other wooden building to find the last door you've opened and then
pull the block all the way outside, so that you can use it as a stepping stone
to reach the platform jutting out of the rooftop. From that vantage point, jump
towards the icy pillar in the center of the room, then hop around its ledges to
reach a monkey swing. On the opposite end, crawl through the passage to finally
reach the zipline on top of the wooden building.
Ride the zipline all the way to a hungry wolf, and then use the rocky pillars
on the left tunnel to make your way up to the top. There, push the rightmost
block as far as it will go, and then circle around it and push it towards the
right side once. Use it to reach the rocky pillar in front of you (a small
medipack lies on the ground just behind it, should you need one) and then climb
into the opening in the ceiling to find another pushblock. Push it twice, then
crawl over it to spot a crawlspace right behind it.
Retrieve the small medipack and deal with the wolf on the other end, then save
your game. Towards the end of this corridor there's a trapdoor that drops you
to a short gauntlet of traps. As you slide into two break-away tiles, stand
still to fall with the first tile into another slope. The camera angle shifts to
show two boulders rolling towards you, so quickly sprint towards the camera
onto another set of break-away tiles, and stand on top of the one closest to
the doorway to escape safely.
As you walk down the tunnel, the camera shifts. Break it with the look camera
and negotiate the jumps across the two floating break-away tiles. Shortly after
the second, be quick to dodge the rolling boulder coming towards you and throw
the lever behind it. Immediately backflip to dodge yet another boulder, then
use the slope on the left side to backflip and grab a ledge just above the
original position the boulder was in.
There is a wolf in this narrow passageway, and another just as you drop down
into the next cave. You'll certainly spot the WOODEN KEY on the central ledge.
Don't be so hasty though: as soon as you stop on said ledge, a boulder will
roll down towards you; and after you collect the key, part of the ceiling will
collapse right on top of Lara, so immediately sideflip to fall into the water
and avoid the more pressing danger.
Climb back out of the water and spot the darker block on the wall. Pull it out
to reach a higher alcove and then monkey swing past the icy slopes. Drop into
the water pit with the floating Uzi clips and swim straight to the other end to
climb back out before your heat meter depletes. Climb the lengthy icy wall and
then slide down to find yourself back at the end of the zipline. Once again,
climb up the tunnel on the opposite side by using the rocky pillars.
After the pushable block, you'll notice the double doors on the left end are
now open, so head outside. Swim past the wall-mounted blades and get out of the
water near the building. A wolf rushes to greet you, so deal with it and then
dive back into the water. There's an underwater passage below the central
spotty pillar, so quickly swim through and climb all the way up on the other
end.
There's a lever on an alcove to your left. Throw it to raise a trapdoor over
the pillar, then drop to the floor below and run around to the opening on the
other end. Crawl over the now raised trapdoor and push the block on the end
once. You need to repeat this trajectory a couple of times in order to move the
block near the edge closest to the wall-mounted blades: if you look upwards,
you'll spot a light gray structure you can climb upon, provided you have the
block in the right place.
From said light gray structure, make a running jump over the railings on the
left side of the building, then head inside and locate another pushblock on the
left wall. Push it once, outwards, then drop back to the floor below and drag
the pushblock on the lower level all the way below this one, in order to use
both of them to climb on top of the building by using the ledge on the side.
As you reach the rooftop, you will unsettle two vampire bats, so deal with them
before dropping inside the building where you'll find a lever in the corner.
From the top of the building, dive into the water and find the newly opened
trapdoor near the back wall. Save your game before sliding down: beyond the two
blades is a series of jumps over break-away floors. On the opposite end, climb
up the wall to trigger a rolling boulder, then quickly hop back and grab the
edge to avoid it.
Once the coast is clear, hoist yourself up and walk into the darkness to finish
the level.
Original Walkthrough below:
TR3 - ICE HEART: THE BIG CAVERN by DARIO ROMERO
WALKTHROUGH BY LUCAS (TREEBLE)
Lara
starts the level sliding down to her death. In the last second, jump over the
lava to the crawlspace. Climb up and fall into the water. Swim across the
freezing water quickly: a crystal is nearby to heal you. Climb out to reach a
huge area. Slide down and jump into the alcove to the right to dodge the
boulders. Approach the edge and save your game. Jump into the water and swim to
the left through a small opening. Quickly collect the SECRET #1 and swim back. Climb up to the
ice ledge and jump onto the block. Jump over to the rocks on the right, shimmy
all the way left and take one running jump over the gap, grabbing the edge of
the blue wall across. Slide down through the cavern. Head left, ignore the
alley and climb down the wall. Jump to the medipack and hop across this lake to
reach a wooden house. Get in to retrieve the Revolver and head for the
second lake. Dive and swim through a small opening underwater to the left.
Quickly swim through and climb up the ladder. Take running jumps across the
flat surfaces. Once in the second rocky spot, take on a running jump to the
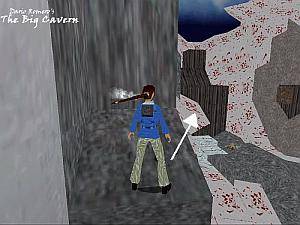
blood-marked snow (see attached screenshot). Then, take a running jump
to the rooftop and shimmy right. Climb up the ladder and pick up the Shotgun,
then drop into the hole and throw the lever. Jump over to the trapdoor, crawl
in and walk through the spikes. Near the dead-end, climb the ice wall and back
flip. Throw the lever and back flip twice to dodge the boulder, then throw the
second lever and head back to the ice wall. (Save your game). Jump and
grab it, then climb down and right, then go all the way up and back flip at the
top, you have to slide backwards so you can grab the ladder, then climb down
and safely crawl out through the spikes. Return back to the first lake and
climb up the wall. Head for the previously ignored alley and jump over the gap,
then take angled jumps to get on the other side. Climb down, throw the lever and
return to the first lake. Enter the cavern under the cliff. Drop into the water
and swim to the air pocket above the dead wolf to restore your temperature
gauge. Dive again and follow the green rocks to the right. As you climb out of
the water, dodge the boulders with side flips, then dive and swim through a
small opening nearby. Push the block in the end and return. Now swim and follow
the green rocks to the other side. Enter the house and exit on the other side.
Walk until the shallow water pit and head right, through the crawlspace. Jump
to the medipack and climb up to find a few blocks. Pull them out and drop into
the gap. Jump to the crack and shimmy right. SAVE YOUR GAME. You have to
crouch just by the step, so the boulder will fly over you. Pick the large
medipack and restore your health to drop into the gap. Get on the top of the
grey structure, jump to the crack, shimmy right, drop, turn around, jump to the
breakaway floor and jump across the water pit. In the end, crawl into the
passage and climb up the wall. Throw the lever on the left and drop into the
water. Swim back to the shallow water area and enter the other house. Pull the
block until the outside and use it as a boost to get onto the rooftop. From
there, jump to the ice structure, jump around it and then monkey swing to the
opposite end. Crawl through the tunnel to reach the zip line and ride it over
the water pits. Work your way up on the left side, using running jumps. Push
the block on the right until the end and then push it to the right. Climb it up
and jump onto the high rocks, then climb up and push the block twice. Crawl
over it and through the passage behind it to slide down. Fall with the first
collapsing floor and slide again. Immediately sprint right (towards the camera)
and fall with the first tile to a safe spot. Jump across using the breakaway
tiles and dodge the boulder, then throw the lever and jump backwards to dodge
the boulder. Head to the place where it was and climb up, then slide down in
the end of the passage. Jump to the platform with the KEY and back flip.
Wait the boulder roll over it and then jump back there and pick it up. As you
do, summersault to fall into the water and dodge the crumbling ceiling. Pull
the block and climb up to the higher column, then monkey swing across and dive
beneath the floating UZI clip. Swim across and climb up, then slide down and
work your way up the slope again, but this time head through the open double doors.
Swim underneath the knives and dive underneath the house, then swim through an
opening beneath the central pillar. Climb up the shaft and throw the lever.
Drop and head to the left side, crawl in and push the block, then work your way
around to pull it, get back in and push it out, then get back out to pull it
three times. Run around it to pull it to the edge and climb up onto it. Jump to
the flat spot on the opposite side of the building, then take a running jump
over the railings. Push the block on the left and jump back down. Pull the
block in the lower level close to the one you just pushed and climb them up.
Hop to the rooftop and drop into the opening for a switch. Then return and dive
into the water, swim through the trapdoor and slide down, jumping over the
knives. Deal with the collapsing floor sequence and climb up the wall. As you
do, a boulder will roll down, so immediately hop backwards and grab the edge.
Wait until the boulder has passed by, then climb up and walk into the darkness.
End of Level.
Secrets: 1 of 2