TR3 - STILL RUNNING LARA CROFT by SLASH
Walkthrough by Harry Laudie
Level 1 - Door to Nightmare - Run Through the Cliff
You start underwater, so swim forward
and go around the cage with the butler. When you see a pushbutton on the wall
swim up to get some air and a large Medi pack (1). Dive in and see a hole in the floor behind the cage but do not go
there yet. Follow the wall until you see a corner floor tile with no circle on
it. Swim up to pull an underwater lever. Now swim into the hole and follow the
tunnel to a cage door. Then swim up to an open trap door. This trap door may be
on a timer. Pull up and the trap door closes behind you. Climb the ladder and
at the top you get a cut scene of an underwater door opening with an Orca. Turn
around and jump to grab a crawl space. Crawl in for secret #1, a small Medi pack (2) and harpoons (3). Get back out and
climb the ladder again and go to the end of the corridor.
You see an alcove to the right that is
the top of a trap door. You also see a "20 seconds" sign on the
floor. Turn around and slide down backwards and grab at the end. You get a cut
scene of the closed underwater gate opening near the trap door. If you do not
grab at the end, you slide into a lava pit. Quickly release, drop, slide and
jump to another slope. Slide and jump and grab a ledge. Pull up and run left
and then climb a ledge to the right. Jump onto some collapsible tiles and run
to the right. Go through the timed door and back into the water. I found it
easier to stop just before the tiles and climb a ladder in the right side
alcove. You go through the trap door back to the starting position. When you
slide the second time, there is no cut scene to use up precious time. Swim back
up the tunnel and swim into the tunnel that the Orca came from. The Orca is
harmless. Pull up into a pitch-black corridor and follow it to overlook a large
outside area.
Walk to the edge of the platform and
turn around. Jump to grab the wall behind and shimmy to the right. When you can
go no further, back flip and roll to grab another wall and shimmy to the left.
Again when stopped, back flip and roll to grab another back wall. At this point
climb down, release, slide and grab. Release and grab again and pull up into a
crawl space. At the end are secret #2, a small Medi pack (4) and a large Medi pack (5). Get back out and walk through the floor spikes to the back wall.
Grab the back wall and start climbing. At the top if you stop and cannot shimmy
to the right to get over the slope, then shimmy left and climb a little higher.
Then shimmy to the right and when you release you are over the slope. Slide and
jump to grab another slope. Pull up, slide a bit and jump to grab a monkey
swing. Follow the monkey swing forward and then to the right. You have to align
yourself exactly on a ceiling tile boundary and drop to catch a sloped pillar.
The position is at the joining of the second and third ceiling tiles from the
end of the monkey swing. Too far forward and you slide to your death. Too far
back and you cannot grab the pillar and you fall to your death. Climb down the
pillar and drop to grab another sloped pillar beneath it. Pull up, slide and
jump to a slope. Slide and jump to grab a collapsible tile. Pull up to the tile
then forward jump to another. Side jump to the right to another tile. Run
forward and jump into a cave. Pick up secret #3, a small Medi pack (6) and harpoons (7).
Go out the other side of the cave. It
is helpful if you stand jump and catch the edges of the collapsible tiles. This
way you can maneuver a bit before you pull up and the tile starts to break. As
you jump to grab the tile, the cave catches fire. Pull up and turn left to jump
to another tile. Turn left and jump to another tile. Turn right and run/jump to
grab a sloped pillar. Pull up and slide down the slope. Near the end of the
slope jump to grab a crevice on the ice wall. Shimmy to the right and pull up
onto a tile marked as fuel.
Turn around, drop, grab and shimmy to
the right. Shimmy as far as possible so you are between a white tile and a fuel
tile. Pull up and use the crouch key and crawl onto the fuel tile. If you stand
up on the white tile, you are pushed back into the lava. You can stand on the
fuel tile. Turn around and run and jump into a water hole at the far wall. As
you drop into the water, you get secret #4. You fall into an underwater cavern. Pick up three harpoons (8,9,10) and a small Medi pack (11) from the floor.
Swim into the hole at the end and drop down into a tube in front of a large
boulder. Pick up a large Medi pack (12) and run down the tube to just before the GO sign and save the
game. Ahead of you are more collapsible tiles. When you start to run the
boulder chases you. I do not know what the numbers are for. Do not sprint or
you die. Just run and keep jumping and be careful of the deadly tile in the
middle of the red structure. The tiles collapse and the ball stops at the red
structure. Keep running over the tiles until you get to safety. If you fall
through a tile, spikes kill you.
Press a pushbutton on the wall. The tube
half fills with water so swim up to the ceiling and pull up into a room. Pick
up a small Medi pack (13) and press a pushbutton to the drain the room. Pull the wall
switch and quickly drop down to the floor below. Jump to the ledge and run
through the timed door into a tunnel. Pull the wall switch and the gate opens
at the far end. Go there and climb the ladder for secret #5, a large Medi pack (14) and flares (15). Climb down again and
pull the level to open the entrance door. Press a pushbutton on the wall again.
The tube half fills with water again so you can leisurely swim pass the boulder
back to the end where the boulder started. Swim up to a ledge at the end of the
tube and pull up into a room. Pick up flares (16) and a large Medi pack (17). Go to the back of the room and push in a movable block three
times.
To the right you see a black opening
with yellow spots. That opening is a death trap. Look up to the left after the
third push and see a crawl space. This is another timed run so save now. Light
the flare and you see a GO sign on the floor. Crawl into the hole and stand up
on the other side. You see lava and a sloped tile with GO on it. Turn your back
to the slope. Back flip, jump, jump forward and grab a wall ladder. Climb up
quickly as a fire starts beneath your feet. Then back flip, roll, and grab
another ladder. Climb up again as a spike ceiling descends upon you. Climb up
until you can shimmy to the left onto another ladder to avoid the spike
ceiling. Keep climbing and stay a little left of center. That seems to help in
avoid the damage from the slicing wall blades and you climb past them. At the
top, shimmy to the right and go as high as possible. Back flip and roll and
should you land on a flat tile to save a few times. It is more difficult than
it sounds since you cannot grab with a flare, cannot save while climbing a
wall, and I was not sure when the timer started for the fire or for the
descending spike ceiling.
Having reached the flat tile, climb the
wall in front of you. Shimmy to the right and climb a few sections. Then back
flip to a ledge with a pushbutton. Press the pushbutton and the trap door opens
above you. Jump back to the ladder and continue climbing trough the trap door
that closes behind you. Run into a tunnel in the left sidewall as two spike
rollers come towards you. Follow the tunnel to a zip line. You can see below
you a fire column. Behind that is a hole that you have to fall into. You have
to release the zip line early in the run. It is a trial and error maneuver.
Save the game when you are dropping down the shaft. You land in the boat and
fall some more. You go down a waterfall into a channel. You have to speed up
and make a sharp right turn to drive up over another waterfall into another
channel. I think you need the extra momentum from the first drop into order to
make the waterfall climb. And if you hit a wall, your speed drops and you
cannot make the climb. Or maybe I am confusing real world physics with Tomb
Raider physics. Once you make the first waterfall, follow the channel and turn
to the right. The next waterfall is easy and you are in a room with a closed
door.
The following method worked for me but
was confusing. Exit the boat (END + left/right arrow) and pick up harpoons (18) from the floor. Pull
the underwater lever on the wall. Surface and climb up into the channel that
you followed to enter here. Swim to the end and dive under the water to the
right to pull another underwater lever. You get a cut scene of an underwater
door. Swim back up the same channel and dive into a lower crawl space. Follow
the channel to an open door but ignore it and swim up and surface to pull up
onto a ledge. Pick up a crowbar (19) and see a closed fence beside you. Go forward to press a
pushbutton and the trap door opens. You drop into the water back beside the
boat. The door beside the boat was open now. Get into the boat and drive along
side the open door. Get into the open door and pick up harpoons (20). Then pull the wall
switch at the end of the short corridor. Dive back into the water and swim the
crawl space again back to the closed fence. The fence is now open so drop into
that room. Pick up harpoons (21) and then get secret #6, harpoon gun (22) and harpoons (23). Drop into the side opening back to the room with the switch.
Dive into the water and swim the crawl
space for a third time. Of course, the Orca and two crocodiles (1,2) get in your way, so
use the harpoon gun. This time enter the open gate back to the starting room.
The second underwater door to your right is open. Go there and pull up into a
green-lit corridor. Use the crowbar to open the door at the end. Enter a
green-lit room and just run forward to end the level.
End of the level 1.
Pickups: 23
Kills: 2
Secrets: 6 out of 6
Level 2 - Other World - find the Key
You start in a corridor with many doors
and you have no weapons. The room behind has weapons but the door does not
open. Go forward and a door opens on your right. Enter and walk until you stop.
The room is all white and there are no references. Slide down a slope and jump
forward to grab a monkey swing. If you fail you die on razor wire. Monkey swing
to the other side and drop onto a ledge. You get secret #1 and a large Medi pack (1). Then monkey swing
back to the door. Go forward down the corridor and ignore the door to the left.
There is a guard in the room. Walk to the picture with the two hands. Where the
hands touch jump and pull up into a tunnel. You hear a door opening. Run
forward and drop into the corridor below. The door ahead of you is open and you
have not activated any guards.
Enter the room and go to the right
corner. Walk over a closed trap door and enter an alcove. Press a pushbutton on
the wall and get a cut scene of a timed door opening somewhere. Exit and climb
the transparent block and jump to a ledge on the wall. The white floor in front
of you is deadly. Run and jump over the white tile to land on a clear floor
over an alien body. You may see many trip wires crossing the room. They are all
deadly. Also the white floors are deadly fire traps. This is the route. From
the opening, jump to the first alien and then to the next two aliens to the
right. Turn left and run and jump to another block. Turn left and jump to two
more blocks. Turn right and run, jump, and grab the box with an alien. Pullup,
turn left, and drop to shimmy under the wires. Try the next two jumps without
stopping to adjust and waste time. Pull up and run and jump to the next block.
Turn right and run, jump and grab the next block. Run and jump at an angle to
the black slope in the left corner. Slide down in front of the door and enter
the door before it closes. Of course there is also a deadly trip wire in front
of the door. If you fail, drop into the water at the last clear block and swim
back to the start. The trap door opens to let you back into the alcove to try
again.
When you make it, you are in a room
with some fixed and some movable boxes. The boxes design looks like heat
exchanger coils. At the start only one box is movable. I found it difficult to
describe how to move the blocks. So I made a sketch of the room and used
coordinates to describe the move. The movable blocks are "B#" and
"K" is the key.
Start position:
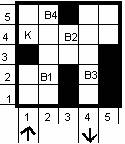
You enter at (1,1)
Move B1 (2,1)->(2,3);
(2,3)->(2,4)
Move B3 (4,2)->(4,1)
Move B2 (3,4)->(4,4);
(4,4)->(4,3); (4,3)->(4,2)
Move B1 (2,4)->(3,4) and go to (1,4)
for the Key (2)
Move B1 (3,4)->(2,4);
(2,4)->(1,4)
Move B4 (2,5)->(2,4);
(2,4)->(3,4) and go to (2,5) for secret #2 under B4
Move B4 (3,4)->(2,4);
(2,4)->(2,5)
Move B2 (4,2)->(4,3);
(4,3)->(3,3); (3,3)->(2,3); (2,3)->(2,2); (2,2)->(2,1)
Move B3 (4,1)->(4,2);
(4,2)->(4,3); (4,3)->(3,3); (3,2)->(2,3); (2,3)->(2,2)
Now go to (4,1) and expect to exit.
There is another movable block in the way. It is not shown in my sketch. Move
it back out of the way and exit the room. Be careful, as there is a trip wire
at the exit. By the way, secret #2 consists of a large Medi pack (3),
small Medi pack (4), and flares (5). Go around the
blocks to find a lock. Use the key in the lock and get a cut scene of the door
at the start opening. The trap door behind you is open so dive into the water
and swim back to the start. Run down the corridor and two guards (1,2) appear. Inside the
new room go left and hop to a ledge to pick up the MP5 (6). Use it to kill the guards. Be careful
not to hit the butler. Go around the room to pick up ten MP5 ammo (7-16), ten grenade ammo (17-26), and the grenade gun (27). Pick up two large Medi packs (28,29) from the dead guards. When I used the grenade gun on the guards, I
also killed the butler. I do not think that you are supposed to do that.
Go back into the corridor and enter the
other rooms. Enter the first room to the left. Kill a guard (3) and pick up MP5 ammo (30) and grenade ammo (31). If the door closes,
go left to find a pushbutton to open the door again. Exit and enter the last
two rooms to pick up two small Medi packs (32,33). Go back to the weapons room and use the two switches beside the
back door to open it. Enter a gray room and turn left into a green tunnel. The
door opens and you enter an arena with a T-rex (4). Run to the column in
the left corner where the T-rex is emerging and climb it. Run and jump to the
wall and grab the edge. Shimmy to the left to the second tile from the end.
Pull up, back flip, roll, and grab a high column. From there you can shoot the
T-rex in safety. This method is not exactly as fair as running and shooting
from the ground but it works. When the T-rex dies, safety drop to the ground
and find a key (34) near his dead body. Also some doors are open in the corner area.
Enter there and see three locks and two pushbuttons.
Press the right pushbutton and you hear a door
open. Go back outside and enter the open door. Follow up the ramp and down the
other side to a crawl space. Get into the crawl space and a grate opens at the
far end. Crawl down there and enter a room. Notice the barbed wire and the
slope wall. Pickup a large Medi pack (35) and a
small Medi pack (36) from the platform. Stand
by the switch at the wall and save for a terrible timed run. Pull the switch
and get a cut scene of a spike ceiling descending upon you. Hit the LOOK key to
stop the cut scene. Turn and run to grab the slope on the opposite wall. The
barbed wire has risen but the floor is deadly. Do not delay but pull up and
back flip. Just keep the jump key depressed and do not use grab or you are
dead. You jump up a series of slopes (I lost count of how many). The barbed
wire takes your health so you have to keep using Medi packs on the way up. At
the top is another descending spike ceiling. Eventually I was lucky and I got
to the top slope and the spike ceiling closed behind me. Anyway on the top
slope you can stand and stop jumping. Go to the corner and pick up a key (37). Look at the
ceiling at an interesting picture and look on the opposite corner for an
alcove. Go to the brown slope and jump up to grab an unseen crevice. Shimmy to
the right and pull up into the alcove. Get secret
#3 and pick up a large Medi pack (38) and a small Medi pack (39). Jump
back over the white platform. It is not solid and you can fall through it.
Press the pushbutton on the wall and enter the opening. Climb down the ladder
and get into the crawl space. Follow the crawl space back to the arena and go
back into the room with three locks.
Press the left pushbutton and you hear a door open.
Go back outside and enter the open door. Go up the tunnel and ignore the branch
in the left wall. At the top of the tunnel, pull up and start to slide. The
slope is not straight but has a drop at the end. You will see what I mean when
you see it. Jump, roll, and start to slide backwards. Drop into a lower slope
but at the end I could not grab the edge. At the end, just back flip, roll and
grab the ledge behind you. Kill the three crocodiles
(5,6,7) or they will get you on the way back. Go into the green gas room
and jump over a hidden spike trap in the floor to land on a platform. Pick up a
key (40) and exit back to the ledge. On the
opposite wall you can see breakable tiles and a wall grate. Use the MP5 and
strafe that area and the wall grate breaks. Turn to face the opening with the
green gas and look at the black crosshatched wall to you left. Jump to it and
grab the wall. Shimmy to the left and stop near the left wall. Place your hands
at about the middle of the black wall. Back flip, roll, and grab the breakable
tile. Shimmy to the left edge and pull up. Run and jump to the second breakable
tile and then run into the broken wall grate hole. Go to the end for secret #4 and pick up a large Medi
pack (41) and a small Medi pack (42). Dive into the
water and enter an underwater tunnel. Time a swim through the piston and swim
up a shaft to surface in a tunnel. Follow the tunnel back to the arena.
Go left into the room with the three
locks. Use the three keys and the double doors in the arena open. Enter the
door and go down the corridor to kill two guards (8,9). Follow the corridor
to a water hole and see a yellow underwater carrier (I don't know what to call
it). Ignore it for now and swim into the underwater tunnel. When you see two frogmen (10,11) swim back down the
tunnel and pull up to the ledge. They will follow you and you can kill them as
they emerge from the tunnel. Swim back to the wide tunnel section they were
located. Swim into the opposite left corner from the entrance and try to
surface. You cannot because of the old invisible ledge trick. Surface where you
can and pull up onto the invisible ledge. Look to the opposite corner and up to
the ceiling to see some items on a box. Run, jump and grab another invisible
ledge in the corner near the entrance. Stand jump to the block and get secret #5, a small Medi pack (43) and a large Medi pack (44). Dive back into the
water and swim back to the yellow carrier.
Use CTRL to get on the yellow carrier. Follow
the underwater tunnel and go past the wide section into another tunnel. As you
go up a slope, you will pass some trip wires and enter a dark green room. The
trip wires take some health and also activate sentry guns on the ceiling. Drive
to about the middle of the room and drive straight for the far end. If you go
too low, there are more trip wires. Go down a slope and up into a shaft. You
should save the game now. Dismount the yellow carrier (END + left/right arrow)
and pull up into a room. Kill the dog (12) and the guard (13) that was shooting at you. Do not kill the guard in the fire or
you have to reload because the key was left in the fire. Pick up a key (45) from the dead body.
Get back into the water and use the
yellow carrier to go back into the dark green room. You have to use the yellow
carrier. If I just swam back there, I died. The sentry guns have stopped
shooting at you. Drive back towards the other entrance and stay near the
ceiling. You will find a place where you drive up a vertical shaft and into a
room. Dismount the yellow carrier and pull up to a ledge. Go to the back
platform and get secret #6, a small Medi pack (46) and a large Medi pack (47). Get into the water and drive back to where you killed the guard.
I think that there was a bug here. If I dismounted the yellow carrier in the
vertical shaft, the water disappeared and I fell to my death into an empty dry
room.
Back in the room with the dead guard,
use the key in the lock on the wall and a trap door opens above the ladder. Climb
the ladder and pull up into another room. Run forward and the level ends.
End of the level 2.
Pickups: 47
Kills: 13
Secrets: 6 out of 6
Level 3 - Dangerous Antarctic Circle the Second - Save Jeeves
You start in the green-lit room that
you left in the first level. Go behind the console to pick
up a large Medi pack (1), two rockets (2,3), and
flares (4). Then enter the doorway and go down
the tunnel. Drop at the end and enter another tunnel. Enter the room with the
cage and kill a dog (1) and a guard (2). Pick up a key (5) from the dead body.
Go to the corner with the fire and dive into a water hole for a small Medi pack (6). Pull
and find the pushbutton on a wall. Press it and the cage door opens. Enter the
cage and pick up the rocket launcher (7) and a rocket (8).
Climb the ladder and enter a snow
tunnel. Go to the end to exit near a building. Kill the guard (3) and pick up a small Medi pack (9) from the body. Go
to the building doorway and see a lock. Use the key to open the door. Enter the
door and to the left is a mine tunnel. On the wall ahead is a wall switch. At
the far wall you see some rock pieces in the ceiling. Pulling this wall switch
causes an earthquake and the rock pieces to fall. Also the entrance door
closes. I suppose that is OK and that is all that happens.
Go back to the mine tunnel and see a
mine cart. Use CTRL to get into the mine cart and it starts. Go up the slope
and crouch under the pipes. At the top of the hill use CTRL to hit the track
switch or you drop at the track end and die. You start down a slope so use ALT
to brake and slow down. You have to negotiate a curve and jump a gap. If you go
too fast and you smash into the wall at the curve and die. If you go too slow
and you fall into the gap and die. After many tries, I found that if you
release the brake as soon as you hear the brakes squeal, then you should be OK
for both disasters. After you jump the gap successfully, the mine cart will
stop. Use END + left/right arrow to get out of the cart but Lara is very slow
when exiting so have patience.
Get into the next mine cart and start
up the next track. At the top of the hill, hit the track switch and apply the
brakes as you descend. The track curves and descends very rapidly. Keep
applying the brakes until you go under a low black ceiling. Release too early
and you smash into it and die. Then release the brake and the mine goes down
and jumps a lava pit at the end. It stops in a short tunnel before a closed
door. Get out of the mine cart and go back to the tunnel entrance. Climb down
the ladder and press the two pushbuttons on the wall. You should hear the door
open in the tunnel. Stand with your back to the ladder and stand jump forward
into the lava. The central section is actually safe water. Dive down to the
bottom to get secret #1 and pick up rockets (10). Swim around the bottom to pick up four small Medi packs (11-14). Find a crawl space in the middle of a wall and swim inside. Follow
it to pull up into a corridor. Go up the steps and use a pushbutton to open the
door. You are back in the lava pit. Climb back up the ladder and go to the end
of the tunnel and the open door.
Drop into a small pit and crawl into a
crawl space for flares (15). Exit and get into a second crawl space in the other wall. Crawl a
little and stand up in a tunnel. Walk down the tunnel and turn to the right to
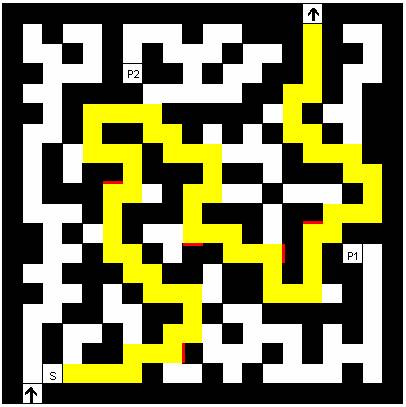
see a wall switch. Save the game at this point for a miserable timed run in the
dark. On the floor is a sign for "40 seconds". Look at the following
sketch for the only route. It is marked in yellow. The sections marked as
"P1" and "P2" are pick-ups of two rockets (16,17), two large Medi packs (18,19) and two rats (4,5). Although the pick-ups will use a few flares, they are worth
getting since you will need them later. The section marked "S" is the
switch. You will also see several wall markings to help you during the run.
They have the letter "N" on them. On the sketch they are shown as red
lines. The author says that you can use sprint. There are no long straight
sections but sprint can be used in the angled sections as evident on the map.
Eventually you make the door and it close behind you. You are in a tunnel.
Follow the tunnel and in the next
section you have to jump four slopes over lava. On the last slope you jump forward
to grab a ledge. Side jump onto the first slope and hope that you face in the
right direction. If not, try again and roll on the last slope. Go up the stairs
and use the pushbutton on the wall to open the door. Enter the corridor and the
door closes behind you. You face a ramp that is an obvious trap of some kind.
Give yourself full health and jump backwards onto the ramp to start a spike
roller. Run down to the end wall and jump up as the spike roller hits the wall.
The spike roller pins you against the wall. Then back flip over the spike
roller and into the corridor. I lost most of the health but survived. Go up the
ramp and turn around. Jump up to grab the edge of another ramp and you get to
try it again as another spike roller starts. Again start with full health. Then
jump up as the spike roller approaches. Go up the ramp and turn and pull up to
another ramp. Start with full health and walk forward. Jump up when the spike
roller is close and you should survive. At the top of this last ramp, you see
another mine cart.
Get into the mine cart and start up the
slope. At the top of the hill, crouch down to avoid the pipes. The mine cart
stops at the end. Get out and see a very deep pit. Run, jump, and grab off the
edge of the tunnel. You falling screaming and land in a water hole. Ignore the
lower side tunnel and pull up in the direction of the open door of the
building. Do not enter the building but stand there at the door entrance as the
spike walls close. Walk, and do not run, through the floor spikes to the only
side wall you can reach behind a spike wall. Press the pushbutton on the wall.
Now walk back through the spikes to the door entrance.
Walk inside the door and turn to the
right. Look up to see a breakable tile and a sloped wall. Stand with your back
to the wall and stand jump to the breakable tile. Then stand jump to grab the
slope. Pull up, back flip to a slope, and jump forward to grab a monkey swing.
Turn around and follow the monkey swing. Release on the tile before the last
tile, and you should drop to a ledge. Jump to a lower side ledge and safety
drop in the hole. Enter the open door to get secret #2, a large Medi pack (20) and two rockets (21,22). Exit the corridor
and climb back up onto the ledge. At the opening, run and jump to the far
slope. Then jump with a right curve and you should avoid the spike wall and
floor spikes. Ignore the trap door on the ground. That is the exit if you had
use the water hole side tunnel.
As you face the wall, go to the right
corner and climb a black ladder. Near the top, back flip to a ledge. The run
and jump to a track section at the opposite wall. Back flip to the sloped track
section and jump forward to grab another track piece. Then run and jump forward
to grab a black ladder. Climb to the top section, back flip, roll and grab an
ice ledge. Pull up onto the ledge and take a look up as to what is ahead. First
stand jump to the far corner of the slope beside you. Then jump with a right
curve to grab a breakable tile. Note that the slope and the breakable are not
in line. Pull up and run to another ice ledge. Pull up, slide, and jump to grab
a breakable tile. Shimmy to the left side and pull up. Side jump to another
breakable tile and stand jump to grab the last breakable tile at the wall.
Shimmy to the right side of the tile. Pull up, turn to the left, and run and
jump to grab the edge of a column. Pull up onto the column. Turn around and
stand jump to the broken piece of track and enter the tunnel.
Run down the tunnel and slide into an
ice cave with more track. Kill the guard (6) and the dog (7). Enter the building to the right and pick up a large Medi pack (23) from the floor. Get
into the mine cart and start up the track. There are three hills. On the last
hill apply the brakes carefully. You have to negotiate an S-curve in the track
and also jump another gap. This is similar to the first mine cart trip. When
the brakes squeal, release the brakes and you should make it after a few tries.
Before you enter the next section, go back down the track to the entrance of
this ice cave. To the left of the entrance, pull up into a crawl space. Go to
the end for secret #3, large Medi pack (24) and a rocket (25). Return back to the mine cart.
Enter the alcove and press the
pushbutton to open the door. Enter the corridor and the door closes behind you.
As you run down the corridor, the walls change from red to black with green
dots. At the end you enter a pitch-black area and a deep pit. Jump up to grab a
monkey swing. It is very black and flares do not help. As an added misery,
there are ledges projecting down from the ceiling to stop your progress. You
have to monkey swing over the central hole in the red structure and release.
Release anywhere else and you drop to your death. It was impossible to make a
sketch of this room. It ia also difficult since you cannot see the bottom
structure. The green dots on the wall are only help you get. The route is
Start at the entrance and grab the
monkey swing
Go forward 15 hand holds, stop and turn
right.
Aim to the right of the dots on the
wall.
Go forward 21 hand holds, stop and turn
left.
Aim to the right of the dots on the
wall.
Go forward 11 hand holds, stop and turn
left.
Aim exactly at the dots on the wall.
Go forward 14 hand holds, release and
you should fall into the hole, through a "N" tile and drop into some
water.
The exact count may differ since it
depends on where you start and the angle of your turn. Swim down the tunnel and
pull into a corridor. Pull the wall switch and the door opens. You also get a
cut scene of a door opening back in the green-lit start room. Enter the door
and you are back by the cage. Enter the other tunnel to get back to the
green-lit start room. Go behind the console and enter the open door. Go down
the tunnel and slide into a large room. You are attacked by four creatures (7-10). Use the rocket
launcher to kill them and pick up four
"N" swords (26-29). Run over the gray
tiles at the room entrance and the four green quarter circle segments on the
floor and the cage at the back of the room opens. Enter and see the butler
making strange noises. At the back of the room, the middle block is movable.
Pull it back and press the pushbutton on the back wall. You get a cut scene of
a trap door dropping. Pull the block back to the entrance so that you can jump
back into the tunnel. Find the trap door and climb the wall to pull up into a
room. On the ledge are four blue prizes. Pick up any one and the level and the
game ends.
End of the level 3.
Pickups: 29
Kills: 10
Secrets: 3 out of 3