TR3 - THE GHOST ISLAND 1: LARA'S NEW HOME by DAVID RUKAWA
WALKTHROUGH BY LUCAS (TREEBLE)
"Welcome back to my humble abode. Feel free to take a look around."
Lara now has a TV on her bedroom, sounds like she's beginning to have one
boring life as well... No news on the bathroom and it seems her armory turned
into a general storage area (and everything is still packed). Go downstairs. To
the left there's a library in the hallway and also the kitchen, which has one
nice little garden exiting through the backdoors. To your right, there's a
switch that'll open the main door, right by the double gates. Cross them and
the level is over.
To the right there's a little chamber for the Scion - or rather, what's left
from it - and a little further on the yard, a table and an underground pool.
Time to go adventuring...
End of Level.
Secrets: none
TR3 - THE
WALKTHROUGH BY LUCAS (TREEBLE)
Jump over the wall and go down the hole
to the left. Pick up a KEY behind the column and return. Jump back over the
wall and use the key near the small door. Crawl in, go up stairs and approach
the doors. Push lever and crawl back to the button, enter the corridor and pick
up the KEY on the ground of this small room. Return, jump once again over that
wall and use the key.
Enter, pick up the Shotgun and go to
the right. Kill the indians
and push the lever. Go up to find some goodies and then go down to find the opend door. Climb up to the right, push the button, then go
to the left and push the other button. Go down and enter the door. Climb up via
the blocks to the right and climb the wall. Get across the pillars, push the
lever and get in.
Follow to the right, climb up and pick up a KEY. Use it on the opposite end,
enter and fall into the water. Surface on the center and push the lever. Return
and get out into the desert, enter to the left and go down. Enter the first
tunnel to the right, right again, climb up and push the lever. Get back down
there and enter the passageway. Take the second left, climb up the stairs and
shimmy across to avoid the spikes. Push the lever and return.
There's a block near the door to the right, it can be pulled to reveal a lever.
Throw it and get out. Go down to the area with shallow water, go to the right,
crawl and follow to the right. Push the lever behind the bush. Return to the
point where you used the key, getting past the pit and the desert. Drop through
the hole in the hallway, follow to the right, climb up, push lever and return
to the four pillars room.
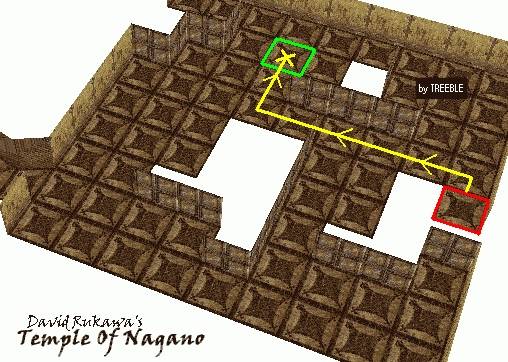
Follow the central passageway now and reach a movable block puzzle. This is a
tricky - ie, senseless - one, check the image below.
Move the block to open the door, go up the stairs, throw the lever and return
to the door that has opened (the wall can be climbed). Take the SCROLL and dive
into the lake.
End of Level.
Secrets: none
TR3 - THE
WALKTHROUGH BY LUCAS
Run through the corridor and pick up
the MP5. Drop down and slide into
the water pit. Climb out of the water and head through the opening by the
closed door to reach the palace entrance. Throw the lever and jump onto the
rooftop, pick up the Uzis on the
corner and then head through the opening on the other side. Go down the rocky
caverns and crawl until you reach a small room. The block on the far left
corner can be pulled out (pull it twice). Get in, sprint past the spiked walls,
enter the side passage and throw the lever. Go up the new passage and climb up
the ladder, drop into water and swim across. Climbing out of the water on the
other end and you'll reach a room where you can pick up the GOLD KEY 1. Climb down back to the
palace. Backtrack a little further - to that closed door - and enter that
passage. Pick up the Desert Eagle
and head through the pathway. Climb down and get past the blades to reach a
deep, dark pit. Jump into the water pit and throw the underwater lever, then
swim back and walk through the spikes
until the ladder beneath the open door. Climb up to it, throw the switch on the
backside of the pillar and quickly dodge the spiked wall. Return and jump into
the water pit again, climb out of water and walk to the next ladder. Pick up
the GOLD KEY 2 and do the same trick
- jump into water and climb back. This time, take the last ladder and climb
back to the temple. Use the two keys to gain access. Zoom past the statues
chamber and take the first left. Run past the fire-blowing dragon statues and
throw the lever. Return and enter the passage that you just opened. Climb down,
touch the far wall and sprint to the other side. Quickly push the block to
avoid the spied walls. You'll have reached a room with several levers, throw
down levers 3 and 5, from left to right, and pull the block once so you can
pull the one lever that's hidden behind it. Work your way back up and take the
new path. Work your way up and jump to the levers, push the first and the third
ones to open the double doors across, get there to push another lever. Drop
down to the ground floor and enter the passage you haven't yet - with a
skeleton and a cobweb. Run through it, head right past the Dagger Of Xian and pick up the SILVER
KEY in the end. Get back to the palace and use it. Slide down until you hit
water, then follow the pathway to reach a locked door
and a passage on the opposite side. Drop into the hole and rush past the spiked
walls. Go around the wall and pick up the SILVER
KEY on the ground. Climb up the ladder and crawl into the alcove with the GOLD KEY. Head to the locked door and
use the silver key. Get in, climb up the wall beneath the ceiling opening
(unmarked climbable surface) and use the gold key there. Drop down, enter the
passage, kill Larson and pick up the KEY
from his body. Use it.
End of Level.
Secrets: none
TR3 - THE
WALKTHROUGH BY LUCAS (TREEBLE)
Go straight ahead and through the
little tunnel to the right. When the cavern is wide open, go to the right to
find a KEY and meet the first skullo. Pick up some
goodies before crawling through the tunnel on the other end. Use the key,
enter, push the lever, return and go down the new passage. Kill the skullo and push the button to open the golden skull door.
As you approach the second skull door, it opens. Enter the Sannoh
chamber, push the button to the right and enter. Don't bother the blue skullos and they won't bother you. Cross the bridge and go
to the right. Push the lever and return. Jump over the gap and push the lever
nearby the sarcophagus. Return and enter the last door, to the left.
Kill skullo the great, go to the right, pick up the
INVISIBLE KEY on the golden skull tile (NOTE: it can't be seen, just try picking up
something on the skull) and follow to the
tunnel in the back end. Climb the ladder and hop to the other side. Use the key
and slide down.
End of Level.
Secrets: none
TR3 - THE
WALKTHROUGH BY LUCAS (TREEBLE)
Slide down,
pick up some goodies in the crypts, including the MP5. Follow to the left and go down the tunnel to reach an area
with two keyholes. Take the left tunnel first and climb up on the end to find a
room full of sarcophagi and the KEY 1. Return and now take the other tunnel.
Climb down the hole and crawl in, climb up on the other end and kill the skullo to get KEY 2. Return and use both of them.
Enter and take the first right. Push the button and climb down. Time your way
through the squashers and get the SERPENT TEAR 1.
Push the button to stop the squashers and climb back
up. Now go up the central hallway, push the lever to the right and slide in.
Watch out the spiked boulder and drop in the hole just
beyond.
There's one frozen boulder. Pull it off your way so you can operate the lever
behind it. This opens a door nearby, cross it, climb
up the ladder and into the tunnel with the swinging blades. Time your way through
the swinging blades, throw the lever and return. Climb the ladder all the way
to the top now, pick up SERPENT TEAR 2 and use both of them. Pick up the CROSS
and crawl outta here.
End of Level.
Secrets: none
TR3 - THE
WALKTHROUGH BY LUCAS (TREEBLE)
Slide down. There will be three ramps.
Two of them take to instant death, and the last one hosts a hidden crawlspace -
it's the first one to the left. Slide backwards, climb down the ladder, drop
and grab the crawlspace just beneath. Crawl in and approach the door.
End of Level.
Secrets: none
TR3 - THE
WALKTHROUGH BY LUCAS (TREEBLE)
This is where the plane crashed. Slide
down and follow the tunnel. Turn the wheel, enter and turn a second wheel. Push
the two buttons over the blood marks on the ground and return, climb up the
opening on the wall and turn yet another wheel. Get back down and go out - time
to make this village a deserted one...
There are several items on the huts. Go down via the tunnel near the shallow
water pit. Dodge the rolling blades and push the button in the end. Return to
the huts and enter the cave to the left. Fall into the water and swim to the
other end. Surface and enter the small stone building.
End of Level.
Secrets: none
TR3 - THE
WALKTHROUGH BY LUCAS (TREEBLE)
Slide down and kill the Indian wearing
a jacket. Go to the right, pick up some yellow flares, and follow through the
open passage. Dodge the rolling blades, push the
button beneath the torch to raise the trapdoors. Climb up on the block and grab
them, shimmying all the way to the right. Push lever and return to the previous
room.
Go up to the left and push the three buttons. Enter, kill the guard holding a
flare and push the lever. Return to the central room and slide into the last
door. Do NOT shoot the soldier in blue - he'll be of great help in the next
moments. Approach the Shiva statue to begin the final showdown. Once it goes
down, pick up the ARTIFACT from its body.
End of Level.
Secrets: none