Search for the Gifts (Die Suche Nach Den Geschenken)
Level
by Scottie
Walkthru
by Harry Laudie
[Note] I
found the intermittent floating platforms jumps to be too difficult for my
abilities or perseverance. I used a savegame from the author found in the TRLE
forums. I have included the savegame here as a convenience for others. There
are also two other savegames and a sketch. You need to rename the savegames to
use them. [End note]
The
game begins with a picture of Dr. Suess's grinch in a Santa Claus suit.
However, I cannot translate the associated word balloon in German.
The
level starts with Lara in an outdoor area. Run forward into a cave. Follow the
tunnel into a small room. To the north is a closed door marked Graffiti Room
that needs two items. To the west is a closed gate that needs one item. Go
south into a room with snowmen. Pick up the Guardian
Key from the pedestal. The floor disappears and you fall into water
below. Swim into an underwater tunnel in the south wall. Follow to the end and
pull up. Run up the steps and follow the corridor. You pass R2D2 moving around
in circles in an alcove. Pull down a jump switch to open a closed gate.
Enter
the open gate and the gate closes behind you. You enter an area in front of a
deadly pool with intermittent floating platforms. You can shoot some vases
behind the tent in the corner but they contain nothing.
It
is useful to use a walk-jump rather than a complete run-jump. This is a
bug/trick that I read about in some forum. You can a full jump but without the
full run up. But it is difficult. This following is as far as I got with the
jumps and gave up in frustration. The timing is such that you cannot adjust
your position before the platform disappears and you fall.
--
Stand near the plants near the room entrance.
--
Stand jump west onto the red platform.
--
Stand jump south-west onto a blue platform. Try to land on the closest edge.
--
Run and jump west onto a red platform.
--
Side jump east onto a blue platform.
--
Side jump north-east onto a red platform.
--
Run and jump north-east onto a blue platform
--
Side jump north-east onto a red platform.
--
Run and jump north onto a blue platform.
--
Stand jump north onto a red platform
--
Run and jump north onto a blue platform. Try to land on the closest edge.
--
Run and jump north onto a red platform at the wall.
I
assume you can continue doing stand jumps north and finally land in the opening
in the north wall. I tried many times to jump the intermittent floating
platforms, but gave up in sheer frustration. I used a savegame from Scottie at
the TRLE forum. Thanks. >>> savegame (right click and save target as)
You
reload with Lara standing the opening in the wall after the intermittent
floating platforms jumps. Run forward and get a flyby of many lights being lit.
The flyby ends with a display of an item. Flares are now useless. Run to the
wide opening in the north wall and slide down the slope. Follow the corridor
into a large room. There are many floor tiles that are firetraps. Use the
binoculars to see the correct path in the mirror room to the south. Here is a
sketch of the safe path. The V is the location of the Golden Vraeus. The green
tiles are safe and the red tiles are deadly.
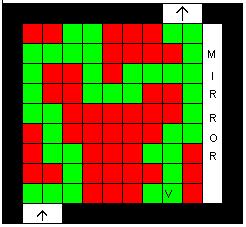
Stand
on the tile beside the entrance way with your back to the wall. The steps are
counted as Lara walking and not running.
Walk
east 10 steps, north 4 steps, east 8 steps, and north 4 steps. You can now
center yourself with the north wall tiles at this position.
Walk
east 12 steps, south 8 steps, and east 6 steps. You can now center yourself
with the east wall tiles at this position.
Walk
west 8 steps, south 8 steps, east 4 steps, and finally south to the mirror
wall. Now you may not need the binoculars to see the path. The path is very
clear in the mirror. Look in the mirror and follow the safe tiles around the
fire holder. Pick up the Golden Vraeus from the
floor. Follow the tiles back and go east through the wall. You can see the
actual opening in the mirror image. >>> savegame
(right click and save target as)
Enter
another tunnel. You can shoot more empty vases in the room with the tree if you
want. They contain nothing.
Drop
into the water hole in the north wall of the tunnel. Swim up the tunnel and
surface at the end. Pull up and go east. You see a maze with glass walls and
swimming fish. This maze seemed rather easy. Go into the opening at the south
wall. Go straight, left, straight, and right at the end. Then go right again
and left at first junction. Go straight to a T-junction. Go right, left,
straight and pass a junction. Loop around to the left, and enter the maze
again. Go straight, right, right, and straight to the exit. >>> savegame (right click and save target as)
Follow
the tunnel and pick up the Golden Vraeus off
the pedestal. This must be different than the first one that you picked up. Two
different items are shown in the menu. Follow the right side tunnel and get a
flyby of the underwater tunnel. Get into the water and swim to the end. Pull up
into a corridor. Go east and see the Home of the Reindeer as shown in the
flyby. Look at the reindeer which are four raptors dancing. Exit by the opening
in the south-west corner. Follow the tunnel and the gate opens as you approach.
You are back in the room where you started.
Place
the Guardian Key and the two different Golden Vraeus in the appropriate slots
and the door to the Graffiti Room opens. Enter the room and see all the
presents and the strange wall murals. The murals are more horror pictures than
Christmas pictures. This room is the end as the author’s readme states that
there is no finish trigger.
21-sep-2010