HANUKKAH
REVISED
LEVEL
MADE BY MASHA
AUTHORIZED
WALKTHROUGH WRITTEN BY SELENE
Pickups: 8x Stars of David, Hanukkah Rules,
small waterskin, small medipack, Oil Can, torch, jar
+ 4 Secrets (Golden Roses)
Enemies: None
2nd Tevet, 8th day of the Hanukkah
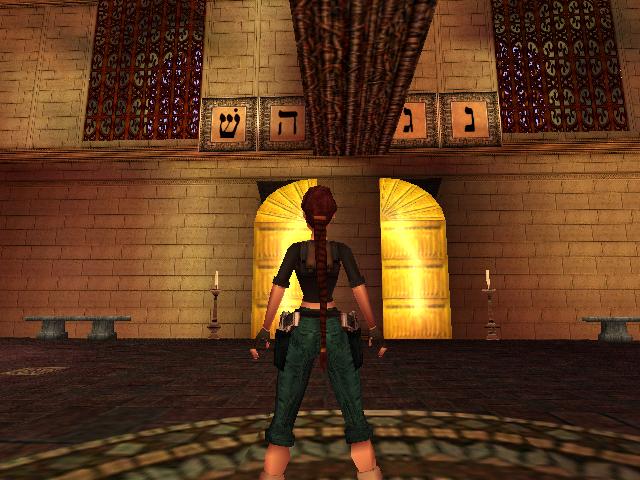
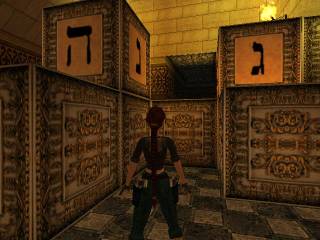
You're standing in a hallway surrounded by four small
rooms and straight ahead there's a pedestal with a scroll as well as two closed
gates blocking the doorway at the far end. First of all turn left and enter the
first room. Hidden underneath the large green plant is a Star of David, the first out of a total of
eight.
Return to the main hallway and pick up the scroll from
the pedestal. These are the Hanukkah Rules and
the scroll reads:
"Search for the oil.
Pour it into the dish.
Put the candles from right to the left
on the candlesticks,
light them from left to the right
and you will see the miracle of the Hanukkah."
That doesn't make much sense right now, but it'll all
become clear along the way. The double gates at the far end are now open, but
before going that way nip into the left-hand room. Dive into the small pool and
go to the other side of the fountain to find a small
waterskin at the bottom.
Climb out of the pool, go back to the hallway and now
it's time to proceed through the open gates. You'll enter the very
impressive-looking, multi-story Main Hall and as the enchanting fly-by
indicates there's a massive wooden structure at the centre of the room, shaped
as a hanukkiah- the nine-branched candlestick traditionally used during
the Hanukkah. On top of the candlestick structure there's a white bowl,
currently empty.
When the fly-by ends start going left and near the
corner you'll find a golden chest. Shoot it and pick up the Star of David (2/8)
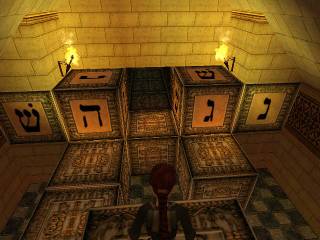
left behind. Take a closer look at the S wall. Our ultimate goal is
to open the golden gate, but for now pay attention to the Hebrew letters higher
up on the wall:
In the readme you'll find a short note on the meaning
of these letters, but what's important right now is to take note of their order.
This will help you to solve a few puzzles that are essential to the progress of
the level.
And now on with the show. Turn left and go to the E
wall. Open the gate there by pulling the switch next to it. Head up two flights
of stairs and a gate will open right before the third flight, letting you out
onto the first floor.
Go right from the entrance and look for a switch at
the back of the rightmost centre column. You'll hear the sound of a gate
opening, so turn and enter the room near the N/E corner. A short flight
of stairs leads up to a central platform with scrolls and books littered about
and a fancy ornate block decorating the back wall.
The centre platform is flanked by two alcoves and
there's a button in each of them. As you push each button a torch is lit on the
wall above the corresponding alcove. Upon pushing the second button the ornate
block up on the central platform lowers, revealing a hidden depression. Hop
down into the depression and pick up the Star of
David (3/8),
causing a second gate outside on the first floor to open.
Pick up a small medipack in
front of the left button and go back outside. Go left to the far end to find
the now open gate, leading into a small library. When you first enter the back
wall looks like this:
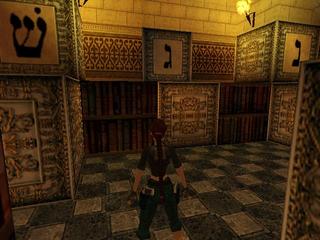
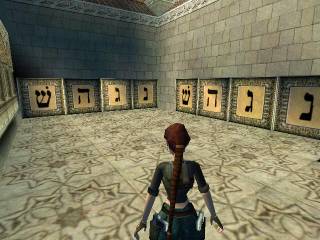
This is the first puzzle where you'll be required to
use the order of the Hebrew letters out in the Main Hall to your
advantage. The three ornate blocks on the floor are moveable, as is the middle
block up on the bookshelf at the back wall. In addition there's also a fourth
moveable block behind the latter, revealing the fourth Hebrew letter required.
Above the ornate block positioned right and slightly behind Lara in the above
screenshot there's a button. As of now it's too high up for you to reach, so this
will be our main focus here.
What you need to do is basically moving the three
ornate blocks on the floor around so that you will be able to form the
much-mentioned string of letters on top of the back bookshelf. The left and
right letter up there are immobile and in the correct places, leaving you with
two blocks that you have to move into the right position.
Start by focusing on the ornate block to the left.
Stand by it facing N and pull it once towards you. Turn to face the S
ornate block and pull that one towards you once as well. Finally face the
central block tucked up against the back of the column with the button and pull
it towards the back shelf as far as it goes. Go to the opposite side of the
block and push it up against the back. By now you should have uncovered an
ornate floor tile underneath the aforementioned button.
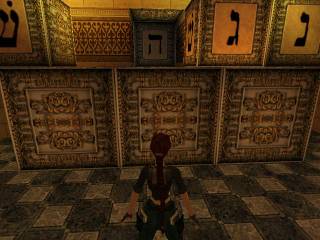
Climb onto the back shelf and pull the letter block
towards you once. Now go around it to the left and push it up against the still
block decorated with the same letter. At this point the picture in front of you
should look something like this:
Go to the left ornate block on the floor and pull it
out once. Go around it to the right and pull it once towards you. It should now
be aligned with the middle tile at the back shelf. Climb onto the shelf again
and pull the second letter block out as far as it goes. Drop down to the floor
and move the left block BACK into its original position aligned with the other
two ornate blocks on the floor. See the screenshot below for further
clarification on that move:
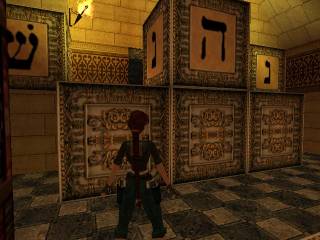
Climb up on the right side of the letter block and
push it onto the ornate block you just moved back. Pull the middle block out
once, go around it to the right and push it next to the leftmost block. It
should now look like this:
Finally climb onto the end block and push the last
letter block up against the back wall. If done correctly the ornate tile behind
you will rise into a block, allowing you to push the button. The final picture
is supposed to look like this:
Push the button and turn around to find that a final
ornate block has lowered in front of the back shelf. Drop down and retrieve the
Star of David
(4/8) from the floor. Don't leave yet though, first climb up
onto the shelf and go to the far back of the alcove previously hidden behind
the letter blocks. Here you'll find Secret # 1: a
Golden Rose.
You're done with the library now so go back outside
and through the main entrance. Continue up another three flight of stairs and
out through the gate that opens on the left before the fourth flight. You've
now moved up to the second floor. Head right and shoot the urn near the corner
for Secret # 2: another Golden Rose.
That's all we need to do on the second floor, so
return to the stairs and keep going upwards. After three more stairs you'll
reach a gate that will let you out onto the third floor. Go left and open the
nearby gate by pulling the switch next to it. Enter a small room with two urns
and an ornate block. Draw guns and shatter the two urns, causing the ornate
block to lower.
Run through to the next room and pick up the Oil Can from
the pedestal. A fly-by shows some blocks rising out in the Main Hall:
three on top of the candlestick structure and one underneath a switch down on
the ground floor. Leave the room and a gate will shut behind you, no worries as
there's nothing else you need in there.
Now return to the main entrance and stairs. Going up
you'll reach the third and final floor, but as of now there's nothing we can do
up there. Instead go downstairs to the ground floor and cross over to the far
side.
Locate the block that rose before, pulling the switch
on top of it opens the next gate. You'll come to a stairwell identical to the
one across the room. Keep going up until you're let out onto the first floor.
Head right, open the gate by pulling the switch and go through to end up on a
ledge overlooking a beautiful garden.
Safety-drop down to the ground and have a look around.
There are two lines of blocks along the W and N wall. Ignore the
E garden for now, we'll get to explore that soon enough. For now just focus
on the task to be done in this part of the garden.
The four blocks with the letters that are clumped
together in the middle of the garden are all moveable. You need to use these to
fill out the four blank spots next to the already placed letter blocks by the
walls N and W. Again the blocks need to be arranged in the same
order as the string of letters in the Main Hall.
You can move the blocks in any order you like, but at
the end of it the blocks should be placed as listed below. X marks the blocks
that are already in place, the cardinal directions indicate where the moveable
block is positioned at the start of the puzzle.
W wall: S/E block- X- N/W block- X
N wall: X- S/W block- X- N/E block
The solved puzzle should look like this:
If done correctly you can enter the short hallway S
and pick up the Star of David (5/8) from the formerly empty pedestal
at the end.
NOTE: The first time I played this level I visited
the S garden before solving the block puzzle and upon completing the
puzzle I found that nothing happened and that the Star of David did not appear
on the pedestal at all. This could be an issue triggered by saving the game in
a particular spot or by the act of visiting the S garden before solving the
block puzzle. To be on the safe side just solve the block puzzle when you first
enter the garden and keep regular savegames in case it doesn't work.
After picking up the star continue through to the next
garden. Go past the small pool with the fountain and open the gate on the
opposite side. Crawl underneath the the large star on the right side and look
up on the wall to spot a jump switch. Pull it down and a camera shot shows a
block sliding out of the wall in the pool outside.
Standing on the newly revealed block in the pool, open
the inventory and select the small waterskin. Lara will stoop down and fill it
with water. Return to the garden with the blocks and pull the switch on the
wall to raise an ornate block. Climb onto it and pull up into the N
alcove. Turn and hop back to the main entrance.
Upon leaving the garden behind turn left and go back
downstairs. We'll explore the remaining floors later on. For now return to the
ground floor and go left. Pull the switch to open the final gate down here and
enter a room with scales and two closed gates. There's also a jump switch
underneath a monkeyswing above the entrance and an ornate tile on the ground.
Go over to the left scale, save your game (in case
something goes wrong) and stand in front of the scale facing the S wall.
Open the inventory and select the currently full waterskin, press Enter to use
it. You'll know that everything has gone well if Lara gets up on her toes and
pours the water onto the scale. The scale is pulled down by the weight of the
water and the gate opens. If it doesn't work straight away, reload a previous
savegame and try again.
Pick up the Star of
David (6/8) from the
pedestal and leave the room. You need more water for the second scale, so head
right and up the stairs again to the first floor. Return to the garden with the
block puzzle and head through to the pool. Fill the waterskin again and make
your way back to the ground floor the same way you came.
Enter the room with the scales again. Do not attempt
to pour water onto the second scale yet though, unless you want to return to
the garden to fill the waterskin again. As you can tell there's a stone tile
underneath the second scale that sinks into the ground when you step on it,
making it impossible for Lara to reach up to the scale. What to do?
When Lara steps onto the stone tile you'll hear the
sound of a trapdoor dropping. This is located just next to the entrance. Follow
the short ramp down to a room with more ornate blocks and a switch currently
out of reach.
Go to the single block in the corner and pull it out
three times. Move around it to the right and pull it towards you once, then go
back left and push it up against the other blocks. Climb onto it and pull the
lever, one of the other ornate blocks lowers to your left to reveal an alcove.
Notice how the ceiling inside the alcove is made from
stone? This alcove is actually directly below the second water scale in the
room above. We need to find a way of holding the stone tile up so that it won't
lower whenever Lara steps onto it. Left of the alcove there's another moveable
ornate block, pull it towards you once.
Now drop down to the floor and, facing W, pull
the block underneath the switch towards you once. Go around it to the right and
push it up against the wall. Move around the block to the left and push it
twice. You should now be able to climb up and push the top block into the
alcove.
Return to the floor above and check on the right scale
again. Held up by the ornate block the stone tile should now be stabile and you
can pour the water onto the scale to open the gate. Pick up the Star of David (7/8)
from the pedestal and a block rises out in the room with the scales.
The block is too tall to climb, which is why we have
the nearby ladder. Climb almost to the top and backflip to land on the block.
Turn left to face the entrance and use the overhead monkeyswing to shimmy
towards the jump switch. Drop and press Action again to grab it, pulling it
down opens a gate high up on the W wall.
Climb the ladder again, backflip to the block and use
the monkeyswing to shimmy over through the open gate. Pick up the final Star of David (8/8)
and go behind the pedestal. Run straight through the blue curtain into a
hidden passage where you'll find Secret # 3: the
Golden Rose.
Drop back down to the floor and return to the ground
floor. Go right and head upstairs again. Ignore the first floor this time
around, just go straight up to the second. Right of the main entrance you'll
find a gate, use one of the stars here to open it. The urn is moveable, pull it
out twice. Go around to the left and push it onto the ornate tile next to the
tall stone column.
Use the lever right of the urn and you'll find that
the block is an elevator transporting the urn up to the next level. The front
of the stone column is climbable, so climb up to the top and push the urn onto
the top of the climbable column. Drop back down to the ground and on the other
side of the main entrance you can use another star to release a second urn from
its "prison".
Move the second urn onto the ornate tile on the other
side of the elevator and pull the switch next to it to send the second urn up
to the next level. Next to the main entrance there is a third switch, pulling
it will send the higher elevator with the first urn up to the second floor.
Drop down to the ground and head up the stairs to the
second floor where you'll find the first urn. Pull it off the elevator, which
will lower again automatically. Drop down through the hole and drop again down
to the ground floor. Go left and flip the switch back up to raise the elevator
with the second urn. Climb up to the urn, pull it onto the second elevator,
drop down to the ground and use the switch next to the entrance again to send
the second urn up to the second floor.
Run up the stairs and pull the second urn off the
elevator, again lowering it. That's ok, we're not going to need it any more
anyways. We're now going to turn all our focus towards the hanukkiah, the
nine-branched candlestick. The middle branch holds the bowl which will contain
the oil, but we'll take care of that later.
For now we will start going right to left as written
in the Hanukkah Rules. Start off with the first gate near the S/W corner.
Place the next star in the receptacle, pull the urn out and shove it along the
walkway all the way up to the first gilded block on the candlestick. A camera
shot shows the ornate block inside the urn alcove lowering, go back there and
pull the lever. The ornate block with the urn raises, go back out there and
push it onto the gilded block on the candlestick.
This is basically what you need to do all along the
line. Do the same thing with the next two gates/urns/switches. For the fourth
branch of the candlestick you don't have a gate, so you'll need to use one of
the urns that you brought up here by the elevator. Once you place it up against
the gilded block a gate behind you opens, run in there and use the switch to
raise the urn. Return to it and push it onto the gilded block.
Do the same thing with the second urn you brought up
with the elevator. From there on you can proceed with placing the remaining
stars in the receptacles, pushing the final three urns onto the ornate tiles,
pulling the switches as they are uncovered and finally pushing the urns all the
way onto the gilded blocks. When you've placed all the urns climb onto the
middle blocks and pour oil from the can into the white dish. Watch the
following fly-by to see what happens next.
Go to the main entrance and go all the way down the
stairs to the ground floor. Cross the Main Hall and head up the stairs
across the room. Run all the way up to the final floor and go right to find the
block that lowered. Pull the switch, opening a nearby gate. Inside the alcove
you'll find a large mirror. Pull the mirror out and place it on top of the
gilded tile near the blue railing.
Doing so opens a second gate at the other end, go
there to find another mirror. Pull it onto the nearby gilded tile and a block
lowers near the corner. Pull the newly revealed switch and a fly-by shows
trapdoors open above the mirrors. As sunlight comes through it's reflected off
the mirrors and streams through the centre of the decorative star, hitting the
white dish and thus setting the oil on fire.
At the same time a gate opens somewhere else,
revealing a pedestal with some torches on it. Returning to the main entrance,
go down the stairs to the floor below and find the gate leading to the torch
room. The gate closes behind you as you enter. First use the switch next to the
gate to reopen it, then pick up a torch and
leave.
Retrace your steps down to the ground floor, cross the
Main Hall and go all the way up the stairs to the top floor to the top
of the candlestick. Go to the middle block and use the fire to light your
torch. As stated in the rules light the urns from left to right (opposite of
the order in which you placed them) and watch as the golden gate on the
ground floor finally opens.
You know where to go next, so run down the stairs and
head through the gate to a beautiful garden. Before doing anything else we're
going for the final secret. Go to the S/W corner and enter the dark
passage, at the far end you'll find Secret # 4:
the final Golden Rose. Return outside to the garden and pick up the jar from
the pedestal, then watch the fly-by that brings this beautiful level to an
end.