WINTER CHOICE
Level by Tifa Nazah
Walkthrough by DJ Full, who made a half English version, then got stuck,
so read eTux/Ward Dragon’s review to solve the apple puzzle, wrote the second half
and finally combined his text (and a map) with Scottie’s screenshots (and a
map) to make a complete guide. It may seem sophisticated, but it worked.
FOR NOT TO GET LOST:
1.2.2.2. Lower Corridor: DOPPELGANGER
2.1.2.2. Left crystal: WINSTON
2.2.2. Burn: Transgenic Cabbage Field, KURTIS
BACK IN TIME (PREAMBLE)
OK, so it's
Today, over 2 weeks after the release, “Winter Choice” there are
still only 7 reviews on this game. I think it will once become one of the most
out-of-mainstream, alternative-thought levels ever.
GENERAL INFO
1. There
are 12 paths, leading 6 times to the wolf valley, and to 6 different TR
Characters endings. All of them are shown on the MAP:
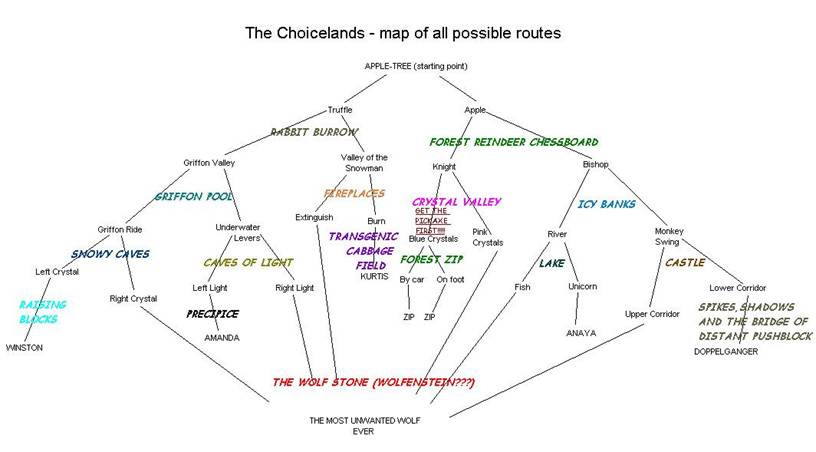
2. When You make a CHOICE, the walkthrough splits in two, telling
You what to read next. The chapters are always named the same as the parts of
the MAP. What is more, it seems me
and Scottie had an identical idea of numbering them. For not to get lost, refer
to For not to get lost.
3. For now
it doesn’t work for me, but when I learn how to do it, I’ll put some [spoiler2]s inside other [spoiler2]s, for You to be able to unfold and
read only what is necessary, depending on a path You follow.
4. You
can't save, but don't worry - there are no traps or enemies in this game, so You can run around safely as long as You wish (unless You wanna do a speedrun). EDIT:
Tifa has updated the download package – now You don’t need to mind the last phrase.
5. Don’t
shoot the animals. (Of course I did - I wanted to check if they are immortal.
And they are indeed.)
6. Whoever
this background musician is, he can’t play the violin at all.
SHORTCUTS USED
Moves:
RJ – runjump
JG –
jump/grab
CP –
climb/pull up
RJG – runjump/grab
RJGP – runjump/grab/pull up
JGP –
jump/grab/pull up
GP –
grab/pull up
SJ –
slide/jump
MS – monkey
swing
MR – midair
roll (or "midroll")
BMR –
bounce off with a midroll
SD – safety
drop
Items:
SM - small medipack
LM - large medipack
F – flares (unfortunately not included)
WALKTHROUGH
Get up and
make the first CHOICE: either go around the apple-tree and press the hidden
switch mentioned in the preamble (do it facing SW and NOTE: as soon as
You obtain the Apple this way and – as a result – realize what kind of a level
this one is, it may happen You will not need a walkthrough anymore), or pick up
the Truffle. If You choose the Truffle path, go to
“Truffle” chapter. If You follow the Apple route,
refer to the “Apple” part. The chapters are always named the same as the parts
of the MAP (above). TIP: You
can hit the end of graphics by entering the forest on the left of the big tree.
1. Apple
Give the
apple to the deer and it teleports towards the just pressed tree, allowing You to enter the forest. Follow the path to the tree
blocking it. Press Action and THEN Action + Up to turn
the branch and proceed to shatter the crystal several steps further. Advance to
reach the chessboard.
CHOICE: Checkmate
the black king with the white knight (move it 2N and 1W) or bishop (2N, 2W).
1.1. Knight
If You follow the white knight route, the left grate is lowered
and You can proceed through the green passage to go through the crawlspace at
the end. Enter the valley. On the ESE of the pit, there is a block. Pull it out
of the wall to reveal a cave with the Pickaxe. Get it and throw all 5 crowbar
switches in the valley. The last of them is in the pit - hop on the pillar in
there and SD to the bottom to throw the lever. Search the crawlspace for
Precision Shooting Instruction. Get out and climb the ladder to reach the
valley again. Go inside the W cave to find 10 x Bow
WARNING! Don’t touch the frozen waterfall or You’re doomed (optionally shatter it). Throwing the switches
has lowered the icicles further in the cave. Get behind them and go up the ramp
to shatter the ice cage and free the wraith. Don’t worry about it but quickly
run across the created bridge for the Bow. Picking it up destroys the ghost.
Now You can shatter all the crystals in the valley. ANTI-TIP: You can destroy all of them
without using the bow. To do so, stand on the top of the slope in front of the
E icicle portal. From the highest point, jump NE. Wandering over the rocks, You can shatter almost all the crystals in this
valley. However, doing so doesn’t change anything yet. To open the S passage, You need to climb the rocks in the SW part of the valley and
destroy the remaining crystals (according to what is said, breaking the blue
opens the S passage, and eliminating the pink reveals the E one). After that, You can make the Extra Choice.
EXTRA
CHOICE: in the case described above, taking the E path is safe, but following
the S corridor results in getting stuck permanently. So, if You wanna finish the level – the point is to either follow the
E passage, or find the Pickaxe before You enter the S portal, no matter if You
use the bow or not.
Following
the intended way, You make the intended Choice.
CHOICE: Follow
either the blue or pink route.
1.1.1. Blue Crystals
Behind the
S one, slide the floor. Shatter the ice in front of You,
then the wall on Your left and the ice cage surrounding a SM. Get the pickup
and RJ back over the sliding floor. Slide/shatter the following walls till You have one on the E. After destroying it, jump across the
junction to avoid being thrown back to the maze center. Shatter several more
walls and slide out. You’re in the last forest. On Your way through it, from
the place where the path turns right, pick up the Crowbar hidden on the left
side. A tree allows You to pass it by. Use the Pickaxe
to open the last door, and make another Extra Choice.
EXTRA CHOICE: Either get in the car using the Crowbar and
drive out of the level to see Zip ending, or get to the finish trigger on foot
(works the same way).
1.1.2. Pink Crystals
If You enter the passage behind the E icicles, SD twice into
the lower corridor. Shatter the following icicles and another ice piece
covering the crawlspace. Get through, destroy some more icicles and the last
ice blockade, crawl again and climb the 3 ladders (on the top of the 2nd
one, optionally destroy the last crystal behind You)
to get on the ledge. Slide down and pick up the gift for the last wolf ending.
1.2. Bishop
If You chose to checkmate the king with the bishop, the right
passage is unlocked. Follow it to the end, where You
need to perform another Choice.
CHOICE:
either jump into the water, or follow the MS to the other bank.
1.2.1. River
If You jumped in the water, swim to reach the lake. Throw all 5
underwater pulleys (this lowers a grate behind the underwater door on the W.
Reach a dry place behind it to find Scissors Part 1. Get back outside and throw
all 5 branch levers. A pink crystal behind the slope on the E part of the N bank is now revealed.
Shatter it to find Scissors Part 2 and combine the item with Scissors Part 1 to
make the Scissors.
CHOICE:
Either use the Scissors to cut the rope and free the unicorn, or cut the net to
free the fish.
1.2.1.1. Unicorn:
ANAYA
If You released the unicorn, it reveals a field of crystals,
where You can (not necessarily) shatter some of them and need to pick up the
Anaya Gift. A trapdoor opens behind the grass – hop in and climb the ladder for
Anaya ending.
1.2.1.2. Fish:
WOLF
If You freed the fish, it opens the underwater trapdoor
covering a maze. Swim through it ascending, and under the icicles, to resurface
above the wolf place. Get out of the water and slide down into the valley to
pick up the Wolf Gift and watch its ending.
1.2.2. Monkey Swing
Go down the
slope and platform using the ice floats to get on yet another bank. (From here,
You can still change Your mind and jump into the river
to visit the part 1.2.1.)
SHORTCUT:
the whole right bank is accessible.
No matter
how You reach the destination, notice a spiky switch.
Pull it and go up the revealed ramp into the stone corridor. Follow it until You hear a rumble.
CHOICE:
Either SD to a hole behind You, or proceed to the end
of the corridor.
1.2.2.1. Upper Corridor: WOLF
If You choose to proceed further, pull the ceiling trapdoor at
the end of the ramp and get outside to find Yourself in the
1.2.2.2. Lower Corridor: DOPPELGANGER
If You SD,
follow the another corridor and push the blocks to reveal the next passage. Go
up the ramp, throw the switch and the following 4
levers in the corners. This allows You to shatter the basket
in the next room for a LM, go around the ladder and climb it to the very top. BMR, land on the shelf, go along the cornice, up the ramps and in
the cave of statues. Press all the dragon balls to cast some criss-crossing shadows and spawn the Doppelganger Gift by
the grates. Pick it up to lower one of them. Exit to the following corridor and
find a torch on the pedestal behind the crawlspace on Your
left. Throw the torch into the corridor through the crawlspace and pick it up
once again. The torch, not the crawlspace. Light it
with the nearby fireplace and proceed to the next cave. Drop the torch by the
pit and hop in to find a niche N wall, with a Pickaxe inside. Get it and hop on
the blocks to get back on the edge. Use the Pickaxe (a modified Crowbar) to rip
the Ice Crystals off the walls and move the cube under the W wall torch. Place
the Ice Crystals on their pedestals and watch Tifa’s
version of crystal dynamics. Grab Your torch and hop
on the pushed block to light the wall one. Go around the pit, get 2 more Ice
Crystals, put them You know where and move the pushable cube across the created bridge. On the NE, there
is another wall torch. Light it just like the previous one to raise the grate
and access the outside area with a leafless tree. Go around or inside it to
spot the Doppelganger and give her… him… it… his… her… its…
whatever... gift.
2. Truffle
Notice a Truffle
under the apple-tree. Wild boars like them, and one of them is standing near
the N crawlspace, blocking the way in (I called this guy
Three switches
are necessary to unlock either left, or right path. So
either follow the left wall, go back to the entrance
and follow the right wall, or reverse this path, as order of pressing these first
two levers doesn’t matter. Even if You pull all 4
switches, You can still make the Choice.
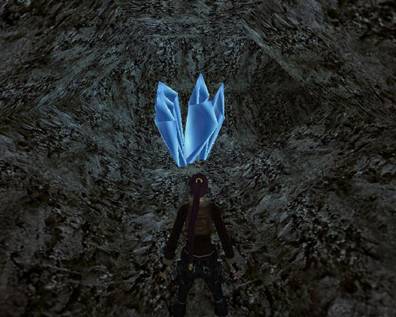
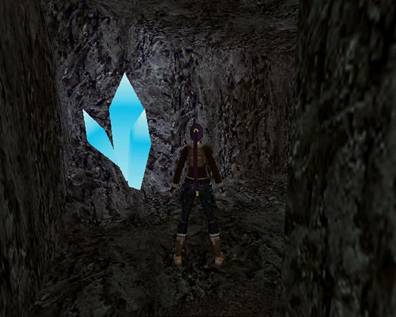
CHOICE: either
go N and find this crystal, captured on another picture
by Scottie:
to locate
a way to the Griffon Valley near it, or check the S part of the Rabbit Burrow
to go behind THIS crystal (also from Scottie’s screenshot):
and enter
the Valley of the Snowman.
2.1. Griffon Valley
Hop in the
water.
CHOICE:
Either pull the underwater levers or swim for the Griffon’s Egg.
2.1.1. Underwater Levers
If you pull
the levers, the exit door opens. Climb the ladder back on the starting ledge,
RJGP (refer to the SHORTCUTS USED if you need to) on the closest pillar and RJ
on the lowest one, with a tree. No need to use the zipline.
You can just RJ into the revealed cavern and slide down. Shatter a barrel in
the corner for Light Crystal. Can’t use it on the nearby door yet – first you
need to get another one from the SW, press the 4 “hemisnowballs”
to raise a statue of some kind of a mirror god, and move it to make the CHOICE.
CHOICE: Move this guy to illuminate either the N
slot, or the S one. These puzzle holes are modified Poseidon statues, and the
crystals are replaced tridents, so you need to climb one of these portals to
place a key item.
2.1.1.1. Right light: WOLF
If you
choose the S door, climb the wall. NOTE: near the top of the second one, keep
to the left side to avoid being pushed off ledge when you pull up. Get on the
top of 2 more ladders and emerge on the top of the slope. TIP: From
here, You can get through the opening on Your left to
visit the ending of Chapter 1.2.1.2.! If You wanna follow the intended way, just slide down and grab the
gift to see the wolf again.
2.1.1.2. Left light: AMANDA
If you
follow the N passage, throw the jumpswitch, climb
through the open trapdoor and backflip into the
alcove containing Amanda Gift. Continue up the ladder, to the top. Backflip in the passage and follow it into the open space.
Move the rock towards the N wall and use this cube as a base for a jump to grab
the crevice. Shimmy right, till you can pull up in the niche. Crawl through the
hole and stand up on the other side. Climb the ladder, go along the cornice,
grab the MS (face SE to do it) and get across the pit. On the top of the
following ramp, move another block, get on it to jump on the other ledge from
there and STOP. Don’t run or you’ll fall. Get on the W blocks and hop on the
highest ledge to see Amanda and the final stats for her ending.
2.1.2. Griffon Ride
Swim around
the biggest, furthest rock to find a hole in it. Get in for a Griffon Egg. Picking
it up gets rid of all underwater switches.
Use the ladder to climb back on the starting ledge and platform on the
highest rock (RJGP, JGP, RJGP, CP, RJGP - refer to the SHORTCUTS USED if you
need to). Don’t worry about the griffon – it won’t harm you (and it’s immortal,
btw - yep, I’m quite evil guy and of course I tried to shoot it). Retrieve the
creature’s egg and you’ll get extra transport to the next level.
No weapons
here o.O. So it seems the griffon is a greedy bastard
who apparently claimed a payment for the ride. Enter the SW hole and, going
through the snowy cave, pass by some blocks. Reach the ice-cold pool, take the
Ice Hammer from the pedestal go between some diagonal
walls to exit.
CHOICE
(with a TIP): you don’t need to climb any ladder. Just stand by the
wall, aim with the shotgun and destroy either left, or
right crystal.
2.1.2.1. Right crystal: WOLF
Choosing the right path results in letting you in some corridors. It looks at least odd, sprinting through
them with the hammer raised above your head. I wish there was Lara’s barbarian
war cry applied. Anyway, the path ends on the top of the slope. Don’t mind the
hole far on your right – it’s another way out. Slide down to the very bottom,
to meet the wolf guarding a gift. Just like all other animals (shortcut for
“animated pals”) in this game, it is immortal. Pick up the gift and watch the
stats for the Wolf ending.
2.1.2.2. Left crystal: WINSTON
Choosing
the left crystal leads you to the ice chamber. Go W to find a jumpswitch. Throw it! That lowers a hiding block in the NE
corner, and the switch is revealed. Pull it to uncover the one behind the S
pillar. Activating that one allows you to move the NW lever.
The switch on the WSW follows, then you need to go SW once more to hit the preultimate one. The last lever waits for you near the jumpswitch. Activate it to find Winston Gift behind you.
The butler appears in the teleport. Approach him to give him a present.
2.2. Valley
TIP: You can take a trip to the area
that was intended to be inaccessible. Climb the wall and jump over the snowball
to find a point from which You can walk over the
hills, around the place. When You have enough
exploring, notice You can take one of the two paths.
CHOICE:
Slide down the slope to burn something or remain where You
are to put the fire off. Detailed description of both tasks lies below.
2.2.1. Extinguish: WOLF
Take a hat
off the snowman’s head. Climb the NE ladder, BMR on the ledge and push the
snowball off the rock. Falling ball opens the ice trapdoor and makes you able
to fill the snowman’s hat (apparently, a Bucket) with water. Take it to the NE
fire (it can’t kill you) and extinguish it (facing SE, not getting too close).
Enter the accessed passage.
WATCH OUT! For the illegal slope and
corner bug at the end of the canyon. You’ll need to replay the whole
thing if you get stuck here like me.
2.2.2. Burn: Transgenic Cabbage Field, KURTIS
Again,
don’t step into the forest – the end of the world and graphics. Watching out
for the buggy camera, take the SE, S and N branches (it may seem you can’t pick
up the SE stack, but it’s possible – you need to stand in front of it, not
above it). Meanwhile, get the torch from the NE corner and bring it closer to
the fireplace. Make sure you have all three stacks and put them in the
fireplace (each of them from the different side). Push the N stone off its tile
and get Fire Stones from under it. Using them is a little bit complicated: you
need to approach the fireplace from the S and not to get too close to it or it
won’t work (took me nearly half an hour to figure it out). The started fire
doesn’t kill Lara. Light the torch and drop it to burn the ice (this fire WILL
kill you if you jump over it when it’s not extinguished yet). Jump into the water, swim in the hole and through the passage to resurface
in the well. Climb the rope (in the meantime, the well fills with safety water)
and backflip to land on the… LOL, a
cabbage patch. And caterpillars on some of them…
I used the binoculars to take a closer look at it and the game crashed. So
don’t draw the binoculars here. I had to replay the whole thing… O, sh… I mean, shed. Get the Pickaxe from the shed. Find a
flat piece of the ground, by the N and press Action to realize the Pickaxe acts
like a crowbar. Enter the crystal cavern. Shatter lots of crystals on your way
through the cave and find Metamorphosis Crystal at the end of the path. Go back
and place the item on the pedestal near the well (approach the slot from the
S). Watch the caterpillars change into butterflies… Imagine that crystal as a
growth hormone medium and the whole Advent magic is gone, mwhahahaha,
sunken in biotechnology stuff. Whatever. Use the
Pickaxe on the S fence in front of the open door and you can enter the barn! And
watch the Kurtis ending.
DJ Full
