THE JERUSALEM PROJECT: THE CHERUBIM ARE CALLING
Levels by Clara, Masha & Spongebob
Walkthrough by DJ Full
Note: There is another walkthrough available by G&D productions –
you can find it HERE
BEFORE YOU PLAY THIS GAME, it's recommended to play "Wessely's Last
Will", as "Jerusalem Project" is its direct sequel.
GENERAL REMARKS:
1. This is a quite big levelset with many leveljumps back and forth.
Don't panic if You don't get something the first time You visit a level.
2. Secrets:
- keep in mind You often don't have a second chance to retrieve a missed
pickup
- it may happen you will need one item many levels after You collect it.
Check various items and various combinations.
4. Save/load error: very rarely, if You save the game during placing a
puzzle in its hole and reload this particular savegame, it may happen the
engine does not recall which pickup Lara was to place. And You are doomed.
5. Exit/launch bug: very often, if You save tha game during placing a
puzzle in its hole, quit/launch the game and reload this particular savegame,
it might occur that the pickup is lost as well.
6. Points 4 and 5 usually occur without further complications. But
sometimes Lara gets teleported (check Ruby puzzle hole in Herod's Temple) and
sometimes the game crashes completely (see Temple Mount Key in The Wailing
Wall).
7. Ladder glitch: sometimes, especially in the last level, ladders get
glitchy if You hang with Your legs free too close to the corner. Sometimes this
happens even if You are not in the corner.
8. You can roll out of crawlspaces without turning around. Hold Jump +
Forwards in order to do so.
9. The game is based on TREP. So TRNG New Sound Engine does NOT work
here. If someone saves/loads the progress during a dialogue/monologue, he/she
is likely to miss some phrases that might not be important at all, however they
may contain a crucial hint. So it's recommended to NEVER save/load until a
sound is complete. All in all, such events most often happen when no danger is
approaching, so You're very unlikely to die in such moments.
10. Lifebar is NOT refilled at leveljumps, so better conserve medikits
by conserving Yourself.
11. Duck in order to grab some pickups.
PLAYING REMARKS:
1. Super swing (required in some points, and many players still don't
know this move exists):
- grab a rope
- tap sprint once for Lara to rapidly gain speed and put her legs back
on the rope
- wait until she swings backwards
- hold sprint and wait until she swings forwards
- release sprint / hit jump
This way, Lara is able to reach shelves that are higher than the rope
itself (compare 7th secret in "Jungle Fever" or rope swing secret in
"Green Base", or another rope secret in "UUB 2" - You HAD
to play at least one of these)
2. Crawlspace rollout (many players still don't know about this one
either):
- approach a crawlspace edge
- roll out with jump
3. Torch:
- blocks/pushables (You can't push anything on the same square a torch
is dropped onto)
- causes "flame ghosts" (You need to dispose of an unnecessary
torch in the water wherever You can)
4. Do not shoot at everything that moves. This is a quite realistic
game.
SECRETS:
Al-Ashkar 3
Jerusalem 2011 1
Church 1
Yad Vashem 1
Wailing Wall 2
Jerusalem 70 AD (I) 6
Herod's Temple 1
Jerusalem 70 AD (II) 4
The Temple Mount 0
The Cherubs are Calling 1
Many thanks to Scottie and Clara for making me unstuck in Herod's
Temple.
Many thanks for the builders for allowing me to write all the following.
Many thanks for Herod for building a temple and giving Masha a lot of
inspiration.
Let's do it.
AL-KASHKAR
Prologue
Talk with Zip. Head to the entrance in front of You and take the right stairs.
Step on the balcony and - following the left wall - reach the first door on
Your left. It seems to be a texture only, however it's not. Push it open and
jump on the table for two big medis and Koran (the first secret). Now go around
the balcony to find the door the camera showed You in the very beginning, and enter
the apartment. Rana greets You and asks You to sign the document allowing You
to explore desert caves and use weapons there. Do it with a pen lying on the cabinet next to Rana's desk. Keep in mind
what she has said about the carpet hanging on the wall. Quitting, get the large
medi from the cabinet. Go downstairs. The exit is now open, but You may want to
use the side switches to see a foundain in the pool before You leave. In the
vestibule, get some flares from here-you-get-served desk and exit. Turn right
and enter the other door leading into the same house You have just left. From
the following corridor, grab another large medi. Get out of the house.
Mosquee Key
You need a key for that gate nearby. Go left and right at
the well. Approach the far gate made of metal bars and pull the lever next to
it. The gate opens, letting You in a small garden, and there's Your key lying on the ground. It's called Flowery Star.
Get it and put in the Mosquee gate lock. The door opens and lets You in.
The Mosquee
Open one of the doors. I'd like to write "If You have a compulsion, open
both", but unfortunately You can open only one in this version of the game
(from the word "unfortunately" You can guess it's ME having such
compulsions ). There is a guy sitting at the edge. Before You walk towards him,
get a healing herb from Your left (a small medi). Then, You have two options:
either push the column in order to watch a brutal yet epic work of Sponge
showing the guy falling 70 metres down to end his life on the bottom of the
sandy pit below, or do NOT scare off the guy and he will help You later. You
choose. In the first case, You get another star-shaped key at
once. In the second, You will be back here and get it anyway, so I will
describe this latter way only. The pit the grey man is sitting above is
actually a way out of some other place, so there's no need for You to descend
down there now. Go back and spot a crawlspace near the mosquee entrance. Crawl
in and roll out of the crawlspace (You can do it in this game). Shatter the
carpet (YES! SHATTER THE CARPET!) and throw the switch to open the well. Well
done - now You can get in and land in the water. There's a herb in here. Get on
the waterfall and slide downstream, into the cave.
45 degrees to go
Get two more herbs from the bottom and stand on the water lily. Use the flat
rocks to jump on the top of the slope. Shoot the rock on Your right and the
stone is unlocked to roll down the slope and smash the underwater door open.
Watching for the spike pits, slide back into the water. Turn two star-shaped
switches behind the door. The chamber on the top of the slope is unlocked, but
don't go there yet. First, You need a key from the underwater
maze.
The maze
Proceed through the nearby corridor and resurface before You dive into the
labyrinth. It's filled with blocks raising after You swim over them. This helps
You not to swim through the same corridor twice. Or is it only my feeling?
Also, there is a secret inside, but it is accessible only after getting the key. The easiest way to obtain the Ornate Star is to dive
from the air pocket to the very bottom of the middle corridor, follow it to the
very end, then swim over a cubical block and turn left at the small air pocket
to finish the path in a 3x3 pool. Grab the item and the door near the twin
switches open. Also, the secret is now accessible. You can't exit the maze the
same way You entered it. Swim into the newly open corridor and, on the
following junctions, turn right, right, ahead, ahead, ahead, left. Swim into
the golden light and grab the Golden Rose (2nd secret) from there. Take a
breath (there is some air above You), exit the golden room through the portal
and follow the right wall until You reach a junction. Swim ahead and do a quick
left/right combo on the next one to approach a high opening on Your right. Go
through and swim diagonally left to find the initial air pocket. You are out.
To the shrine
Remember the doors on the top of the 45-degree slope? Go there and hop on the
block behind them, actually being a part of the floor. A huge door is in front
of You. Here, I was scared I am missing a key, but don't worry - one of them is
already placed, it only looks like missing from the distance. Place the Ornate
Star and the door raises to let You in the chamber with an opening in the rock.
Hop through this crack to find Yourself among the desert rocks. You need two
keys to open the door of the nearby shrine.
1st Shrine Key - the Demifrog
Enter the next cave. Soon, the passage splits up. Take the right one and find
Yourself on the edge. A flyby shows You the mighty Demifrog appear.
You can't kill it - You just need to descend down there and get back with a key. There are several ways of descending without a health
loss. The simpliest one is to slide backwards and grab the end of the slope to
the left of the closest (and shortest) pillar. And drop on the lower ledge.
From here, jump S into the alcove and (killing a bat in the meantime) slide down
completely. The pink leads You between the bottom pillars. Avoiding the Demifrog,
grab the key from the green cave (some more bats guard it). If You did not kill
the grey guy earlier in the mosquee, he'll kill the Demifrog (although
it takes him so much time that You are very unlikely to see it happen). If he
does not show up, simply hide in the place where You have found the key and kill all the bats (probably 7 - but I am not sure if I count
right) from here, sticking close to the surrounding rock (the shockwave can't
hit You there). Climb the ladder. Killing one more bat, follow the swingpole to find
another shelf. Go along the shelf to the end. Look right to spot two more
swingpoles. Pass this sequence and land on the next rock. Grab the ladder on
Your right and pull up. Next point is the shelf in front of You - hop to grab
its ledge and pull up on it. Keep turning right to check another ladder, kill a
bat,
slide down a slope and swing another pole to get thrown onto yet another shelf.
Go through a crawlspace on Your left and jump on the rock beneath a ladder
leading back upwards. Grab it and backflip (optionally with a midair roll) on
the top shelf. If You look around, You can spot a secret - a Golden Rose.
One more jump and You get it. From now on, You may think secrets are quite easy
in this game - and I can assure You THEY ARE NOT. So keep Your mind open, as
playing with open eyes will NOT be enough! Get back on the ladder, shimmy
around the corner and backflip with midair roll to grab a crevice. Shimmy left,
land on a platform and hop back into the place the whole Demifrog part has started in.
2nd Shrine Key - over the abyss / encrypted
Follow the remaining part of the corridor. Use the swingpoles and ropes to
swing across the sandy pit. Super swing is NOT advisable when You reach the
last rope and want to land on the opposite shelf... but there is an easier, and
more profitting way to get there. Instead of aiming in the far cave, super
swing to the shelf where the bush grows. Turn right to spot a herb on the corner
rock. While a single running jump onto is enough to get there, the way back is
a bit more difficult. Via two standable, triangular parts of the rocks, reach
the third one, diamond-shaped. Runjump over the next (flat) part to slide down
the next slope and bounce off it to return to the bush shelf. Pull up on the
one above it. Face the hanging shelf on Your left. Hop on the one under it and
make the final (banana) runjump to land next to the opening You saw from the
ropes. Pull up into the crawlspace, kill some more bats while following the next
corridor and enter the crypt to eliminate two more. There is a receptacle near
the bars. If You killed the grey guy earlier, You probably already have the
Progenitors Star, so You can skip the whole following Church part, as You don't
need it. However, in such case I anyway recommend to visit that place, just
because it is awesomely designed. Look around for a switch on the wall. Press
it and watch a piece of ceiling becoming a piece of floor. Through the fresh opening,
reach the... storage??? There is nothing inside, as well as in the following
chapel, so You can proceed into the bell tower. Ignore the ladder and the bell
above You - just climb on the box and kick the grate to make the way out. If
You don't have the Progenitors Star, exit through the crawlspace to revisit the
settlement. Go inside the mosquee and notice the grey guy has gone (probably,
he's still fighting the Demifrog). Push the box to get the Progenitor's
Star from it and go back through the chapel to place it in the receptacle near
the fallen block. The bars are removed and You can get the second Shrine Key from the sarcophagus. And a large medi from behind
it.
Getting back/Placing the keys
There are two ways: either again through the settlement, the well and the
45-degree slope, or another one, not yet described - and this is why I'll do it
now. Go back through the last cave and use the less harming way (I think there
are several of them) to slide down into the sandy pit. Swing over the spikes in
order to get back to the 45-degree ruins and, once again, follow it to its top.
Reach the place surrounded by rock and hop right to find Yourself at the shrine
door. Place the keys and get in to realize You are in sudden need to find three
Energy Crystals. Call Zip and he says he's landed in the sandy pit. Go there,
approach the helicopter and the final trigger throws You into the mighty city
of Jerusalem.
JERUSALEM - OLD CITY, 2011
Welcoming committee
Here You are - slowly expanding as the initial camera sequence flies
closer and closer to Lara, standing at the edge of the roof. She descends and
off You go to explore the city. In the very beginning, You get warned about the
guy on the balcony. No, not that one at the other end of the zipline. Yes, I
also have been thinking this is him (for over two weeks), but actually that one
is a U.S. soldier protecting the Jewish quarter, and the real threat is hidden
on his right, on another balcony: probably a kind of frightened man who shoots
everyone that moves because - as Zip assumes - "he has something to
hide". And he really does, so keep it in mind - but before You get rid of
him, You need to be aware of two optional pickups:
1. Getting the shotgun
Descend down the nearby ladder and open the door. Step into the corridor
and follow it turning left until You reach the button. Press it and enter the
lockup. Here, You can find the shotgun, 12 additional red shells for it... btw,
there is no blue ammo at all, in the whole game, so I will refer to normal
shells simply as "shells" (same for the future... or past [as You
will find it in the past] crossbow - it has neither poison, nor explosive
arrows to find)... also a large medi, a small one and some flares in the
lockup. Pick them up. Now You can get out (don't forget to close the door
behind You) and back on the initial roof.
2. Finding the 2nd secret
You may wish to grab the hanger, but this way You will miss a secret.
I'm sorry for this - it was my idea You won't have a ride. So any complains
must be addressed to me, not the authors. To get the 2nd Golden Rose, sprint through the
gap in the fence onto a nearby roof. Slide down, grab the edge, shimmy left as
far as You can (but NOT around the corner!), pull up and bounce off, rolling in
midair and curving the rest of the jump right, in order to land on a balcony,
right next to the flowery item. Get it and jump out of the balcony, aiming at
some higher part of the pavement, for not to scratch Yourself (remember,
lifebar is NOT refilled at leveljumps!).
Flat Key / Bottle of Kosher Wine
Go W, between the houses. Spot a sign "Alone on the walls".
Copy this info and paste into Your memory. Remember the man on the balcony? You
need to prepare Yourself - visit the market part under the far S arches for
some shells, flares and a small medi. Now climb the awning near the enemy
balcony and shoot the guy - the just acquired shotgun would do the best. Search
the body to find a Flat Key. No, not that
the key is flat (I thought so at first). It will give You an access to a
certain flat. Remember the sign? Yep. Before You go there, find a pushable
cupboard near the recently climbed awning, shoot the fragile glass and pull it
once or twice... actually, You can move it over the whole level... to reveal a
Bottle of Kosher Wine. You can drink it, but nothing happens in such case.
The Flat
Get to the "Alone on the walls" sign, follow the passage
behind it and go over the bridge to see a keyhole. Yes - put the Flat Key in it
and the flat is open. Break in and rob the terrorist! He has a shatter chest
with some revolver bullets, and a medikit on the table... he was very unwise
not to take it with himself if he wanted to fight people. Now Lara can get the
item for herself. But what is even more strange, there is a revolver behind the
double doors and under another pushable cupboard with some shatter-at-first
glass on it. Get the weapon and You can see a static cam hint. It means You
have one pickup, and need to find another one to lower these indicated bars. If
one pickup is a revolver, the other combinable must be the laser sight. But at
first, You will get the first Energy Crystal. Find a switch, press it and go
through the open window.
The Blue Energy Crystal / Prayer note - "Show me" part
Shatter another one and jump in. Follow the next passage to find a
double doors. Push them open and proceed a bit further to reach a pool room.
There is a trapdoor inside. Open it and jump into the sewer. Proceed almost to
the end, killing rats, until You see a crawlspace. Get in, to the end of the
channel and SAVE YOUR GAME BEFORE TURNING THE VALVE. Now turn the valve and get
the hell out of here! The water is pouring into the sewers, so You have little
time to escape with Your life. If You manage to reach the main sewer before
everything is flooded, a sink will not suck You back into the crawlspace and
You will survive. Swim back into the pool (now filled with water) and throw the
underwater lever to access the Blue Energy Crystal and the first fragment of
the Prayer Note. Get them both, and a large medi behind the shatter window.
Nothing more to do here - leave and talk to Zip. He suggests sticking the
prayer into the Wailing Wall. But You need the second part of it first. And
don't forget the laser sight - we're after it now.
Keb'up to go!
Safety drop and proceed through a dark passage nearby, fighting two bats.
Keep the same direction to find a big, empty square with some alcoves in the
distant wall. Two small on its both sides contain goodies - a large medi and
revolver ammo. To get them both, use shelves with plants. Going here, You have
probably noticed a red writing "Keb'up to go!". This is a kind of
hint - You really need to go up from there. Grab the awning and shimmy left to
the very end. Pull up, bounce off, slide down the opposite awning, bounce off
it as well, curve the jump left and grab the terrace ledge. Get on. Jump over
the fence to grab another, distant ledge. Pull up, swing a polerope on Your
right and curve left to land on the final terrace. See the bars? Yeah, those
are from that camera hint You got after picking up the revolver. To lower them,
break the window on Your left and get the Laser Sight... btw, there are also
some shells, flares and revolver ammo. The just lowered bars uncover a Holy Sepulchre Gate Key. Will be very useful in the next
level. Grab it and jump over the railing to finish this part.
Holy Sepulchre Keykeeper
That key You have obtained is to use inside the Church of the Holy
Sepulchre. Apparently, You have no way to access the church itself. You need to
go to the Keykeeper. Near the kebab shop, there is a scaffolding. Climb it. Use
the following scaffoldings, jump over a slope and climb a ladder to spot a
switch on Your right. Actually, a doorbell. Press it. Ding-dong! Have a quick
conversation, during which You will outrageously lie to the Keykeeper, and he
will trust You without any suspicions. Get a medi from his bathroom, and the Church of Holy Sepulchre Key from the table in the corner.
Bingo! You're ready for the next level.
Going THERE
Exit the flat, descend to the very ground and follow the closest
passage, killing a bat before You see some light. You're at the
church gates. Another bat follows You in here. Kill it. Climb the
scaffolding for some flares, go back on the ground and place the key. You can
enter.
CHURCH OF THE HOLY SEPULCHRE
The main goal of this level is to find 4 stations of Via Dolorosa and
put their numbers in a correct order to get the code for a keypad. Order of
visiting chapels is free. After the last one, You will get a hint allowing You
to arrange numbers of found stations. You can find the Basilica plan in the
centre of it. It is a hint, and also a real 2D plan. However, the place is a bit
rearranged (comparing to the real one), with the whole floor added - so the
Catholicon is not on the ground floor anymore, and there is no passage
surrounding it. So if You want to find the original place in the net, You can't
refer to its plan. This would be simply too easy.
Via Dolorosa: Station II
The closest chapel contains some flares and a pushblock. You need to
pull it twice and go around it. Light a flare to see the first number.
Via Dolorosa: Station IX
The remaining stations require using Holy Sepulchre Gate Key. If You
don't have it, go back to previous level and refer to "Keb'up to go!"
and/or "The Flat" chapters. If You have already found it, find a
small altar (Armenian shrine) with a book slot and go upstairs. Here's the
gate. Open it. Don't panic! It requires some time to react, so the game is NOT
locked up. Climb the ladder. With revolver or shotgun, shoot a glass case
behind You, on the ceiling. A rope unfolds. Swing on the next balcony (super swing
recommended [if You have problems, see playing tips in the beginning]). Jump
over the railing to slide down to the windows. Shatter one of them (if You are
obsessive, destroy both). Go around the Holy Sepulchre to find a jumpswitch at
the very end. Press it and the camera shows You what to do. Doing the timed
run, it's better to stick close to the left wall, as collision of the objects
may delay You in other cases. Climb the ladder and backflip on the second floor
before the trapdoor shuts.
Before You proceed, turn around and light a flare. An invisible ledge
appears in front of You. Use it to get on the Holy Sepulchre roof and take the
Cross from it (a secret). Descend on the lower floor and find a large medi
there, behind the railings. Save, as jumping on the surrounding arcades may cost You Lara's life, and hop
there. And through the railings separating the arcades from the surrounding
corridor. There's no other choice than to repeat the timed run to get through
the trapdoor.
You're in the Catholicon. Yes, this is that mentioned chapel that was
moved far upwards in the ingame version. Imagine thousands of pilgrims climbing
that ladder in real! Turn around and light a flare. Aha! A mystic platform is
here! Jump on it, and on the Holy Sepulchre dome. That cross is actually a
pickup - so pick it up! Descend on the... roof (???) and check the railings
below the dome for a large medi. SAVE, as the surrounding octagonal arcades
have a very difficult collision and this is why You're likely to fall at the first
try - You need to aim at the middle of the object. Jump on the base of these
arcades, and over the railings. Do the timed run once again to re-enter the
Catholicon. Get the torch from the pedestal, light it downstairs and set the
brass pot on fire. The door opens, but ignore it for now. It's faster to shoot
the iconostases now... and think about the Keykeeper. What will he say when he
sees his church destroyed next day he visits it??? Get the medi and some flares
from the alcoves.
Via Dolorosa: Station V
Hop on the pushable block. Jump over the fence, and the next one to
access the ledge behind the third one (in case of difficulty, You can shatter
its fragment). Go along this shelf to throw a switch. A painting is open and
You get another diary entry. Push the only available block towards the ledge,
hop on this cube and use it to get back to the Catholicon. Forget the torch and
go through the door You have opened with lighting it. Behind a short stairs,
there is a bell. Ring it to call the priest. He opens a door somewhere beneath
You an he'll keep helping You from now on. Going back, shatter a vase for some
shells. Go downstairs (same staircase You lit the torch in), throwing a switch
to open the exit leading out to the Calvary. Turn right to spot another switch.
Press it and another rope shows up. Swing it through the arcades for another
lever. Pull it and a gate is raised. Press the switch near the ladder to open
the trapdoor. This floor is complete - get down! Check the just open gate to
move the case out of its square and reveal station V.
Via Dolorosa: Station VIII
You have already done everything to unlock it, with that lever near the
bell. The painting is in the adjacent chapel - just go there, hop inside for a
medi and get the final number. Alrighty, then. Now You need to arrange those
numbers.
The Code
Before You get down and talk to the priest, You need the Pad Room Key to access the keypad. Go downstairs leading to the
corridor surrounding the Chapel of Adam. Enter the arched portal that You have
not visited yet. Save the game and escape down the slope when a rollingball
chases You. Hide somewhere on the side. Underground, kill four bats and
get the key from the pedestal. Save again, as there is
another rollingball triggered as soon as You step behind the arch on the slope
letting You out. It's better to roll on its square and sprint back into the
basement. When the boulder is away, go up the ramp and talk to the priest in
the main hall. He gives You a note with order of chapels. Refer to the building
plan to assign the numbers to their corresponding places, and put them in the
correct order: 5982. Go to the keypad lock room (behind the door the priest has
once opened), place the key to access the keypad, type the code and the
trapdoor opens. Get some shells and hop in.
Tic-Tac-Toe
The rules are quite simple: three stones in a row and You win. However,
You must never use the same stone twice in a row. If You lose, the ghost will
get Your soul, mwahahahahahah... Start with the stone in the middle. Move it
towards the ghost. After this particular choice, You are very unlikely to lose.
Anyway, pull the NE one and the S one and You win the Yellow Energy Crystal.
And the second part of the Prayer Note. Combine both and get out of here. In
the above chamber, find some flares in a shatter chest.
A thing to remember
Go around the Holy Sepulchre and find another door on the ground floor. There
is some revolver ammo in a shatter urn. And a closed trapdoor. Copy/paste it
into Your memory. For now, the level is finished. Exit the basilica through the
main door.
JERUSALEM - OLD CITY, 2011 (INTERMEZZO)
Just go ahead and left, and
You'll jump to...
THE WAILING WALL (INTERMEZZO AS WELL)
Approach the sign. It points You to all available levels. If You want to
have all secrets collected, I recommend You to follow the sign to Yad Vashem -
a Holocaust memorial.
YAD VASHEM
Get A Bunch of White Roses from the pedestal and place the flowers in
the concentration camp memorial hall (at the edge of the raised flower area,
facing the back wall). This opens the projector room - enter and watch the
Auschwitz presentation. This is a poetry, so it requires patience. After it is
finished, You can enter the last part of the main corridor and pick up the
Torah secret. The museum is about to close, so get back to the exit and leave
the place.
THE WAILING WALL
Go under the arched portal and left. Spot the stairs and follow them to
the top for a large medi. Remember what Zip has suggested You? Go downstairs,
climb the chair next to the Wall and stick the combined Prayer Note into it.
The prayer says "Show me the right way", and it is answered - a door
on the top of the nearby ramp opens. Before You go up there, check a narrow
dead end behind the ramp. Kill a rat and get a Wooden Handle from there. Will be
combined later with a Shovel to make a Spade. Now follow the ramp to the top.
And even further. On the top of the Wall, fix a green pot, raise a block and
push the blue vase on it. Lower the block. Move blue and brown vases according
to texture hints on the ground. And the door will open. Inside the room, spikes
prevent You from obtaining the last Crystal. Never mind - move the altar away
and open the trapdoor to find a spear-deactivating lever in the accessed hole.
Pull it and the Purple Energy Crystal is Yours. You have them all - get back to
Zip and fly to Al-Kashkar to put them where they belong!
AL-KASHKAR (II)
Well... Put them where they belong and fly to the past!
JERUSALEM - OLD CITY, 70 AD (residential district)
Watch the initial "carpet flyby". Ask the villager who built that
temple on the hill. He says it's Herod, but he's lying. Masha did it. Go S for
a healing herb (a small medi equivalent) in a grassy place where a sheep is
actually having a meal.
Going essential
In the bazaar to the W from here, find a Carrot, and right behind the
adjacent wall (follow it to find the opening) - a Bag of Sand. Well... You have
everything You need to enter the temple. But not so fast - don't You wanna
explore? There are three secrets to find. Also - even though You will revisit
this level later, some puzzles are already available to solve.
1st Silver Hemisphere
Leave the "patio". On Your left, there is a domed roof (the
shortest one). Climb it and hop on the following arched bridge. Jump on the
next rooftop and grab a Golden Rose from the nearby shelf. Get back on
the last roof and do a swan dive above the distant railing. Pick up the Trapdoor Key from its pedestal. Climb the plants to access
the upper bridge. Hop on the nearest dome, run across the bridge and press the
lever behind the large dome. A camera tells You it's not the only one switch
You need to find in order to open a certain gate. Yes, it's a combo secret. But
don't mind it's second part now - it will be faster to hunt it later.
Get on the ground and below the arched bridge (the one You jumped for
the rose from). Find a door on Your left and throw a lever switch there. Behind
the open door, You'll find a keyhole. Insert the Trapdoor Key
to access the room on the top of the ladder. Climb in for the Mystery Key. This is for a keylock near the carpet - go back
to the starting point and behind the arcades to find the right spot. Place the
key and go inside. Pull a switch to open another trapdoor and climb on the roof
for flares. Go back into the room and open the trapdoor to get into the
basement corridor. At it's end, the soundtrack changes. Rule of the mystery
puzzle: one flipmap per one move of a vase (no matter how long). There is no
common way to solve this. But You also can't get stuck. You have to place all 4
vases on marked squares (no matter which vase on which square). When You're
finished, You get the Silver Hemisphere. The outside torch riddle is now
available.
Some more levers
Get outside and reach the pillars by the far wall. From the pedestals,
pick up a large medi equivalent (probably a cup of ancient drink) and Rules of
this puzzle. Before You start solving it, check the nearby ladder to get on the
roof. Follow the domes to find a switch in the corner and throw it to raise a
trapdoor on the other side of the nearby gap. Use this as a platform to get
across. Hop in the inner alcove and throw the last switch. The red gate finally
opens. It's quite far away, so I recommend to solve the fire riddle first. From
the trapdoor, jump on the SW pillar and SAVE.
2nd Silver Hemisphere
Generally, standing on a square with a torch lits a torch on it, and all
torches distant two squares from this one if they are not burning. Same
extinguishes adjacent torches if they are on fire, but keeps the central one
burning. If You are mistaken, it's better for You to start from scratch than to
fix the wrong order (second option is rather a masochism). And this is why I
told You to save.
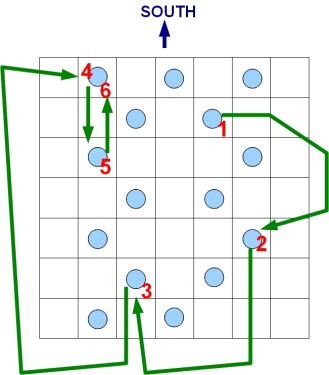
Note from Moderator: In lieu of
DJ's video, refer to José's diagram below.
When I used this diagram, two pots remained unlit, so I did some moving
around at the S end of the field until all pots were finally lit. If this should also happen to you, step on
the first three squares noted on the diagram, then experiment at the S end as I
did.
Some more secrets
Go back to the carpet and further in the same direction. Face the
stairs. On the N roof, there is a large medi. Take it and, once again, climb
the dome, hop on the arched portal and the following rooftop. The wall beneath
the open red gate is a ladder - grab it to access the room behind it, and the
next Golden
Rose. Descend to the ground and approach the temple stairs. Don't
follow them yet, but go W to find a Magic Lamp in a small sandy area. There's a
Ginnie inside. Scratch the lamp (You need to find some open space for it to
work properly) to witness a funny conversation between Lara and the ancient
ghost, who gives her a medikit. Climb the first part of the stairs. From the
place they curve right in, spot an opening in the SW arcades. Hop in for
another Golden
Rose.
Into the temple
Safety drop into the pool to find A Pail of Water. Even though looking
insignificant, this is the most important pickup of this level. And not the
last pail You will take care about. There's a hand in the wall nearby. This is
an intended way of getting out of here later, so remember it. Follow the
pathway, ignoring the arcades on Your right and watching the wall on Your left
to spot a wall switch. Press it to raise a nearby block. Throw the lever switch
at the end of the pathway to see a flyby sequence explaining what You are
supposed to do in the sliding floor challenge.
Now You have two options.
INTENDED WAY: Climb the raised block, follow the rooftops into the house
on one of them and pick up the Bronze Ball (a key to way out of this part of
the level). Get back to the lever triggering the challenge. The guy on the wall
helps You - follow his instructions to pass the trap and land on the central
altar.
SHORTCUT: Throw the challenge switch, follow the rooftops, ignore the
Bronze Ball house but jump on the pedestal containing a plant, keep running to
jump/grab/pull up on the wall surrounding the challenge zone, run towards the
altar and hop on the floor tile distant from the central altar 2 squares. Bounce
off the sliding floor and curve the last jump left to land next to the
elemental slot.
Note from Moderator: Tom has
described a much simpler way to conquer this timed run. Ready the Bag of Sand so you won't have to
fumble for it later. Stand facing the
playing field and push the floor lever.
Run forward and slightly to your right, and at the entrance jump 45
degrees to your right so that you land on the two arrows pointed to your right. Jump off the second arrow to land on an arrow
that will again turn you to the right and cause you to bump against a
wall. The wall lowers upon contact. Save your game here. Reverse roll in the alcove, turn slightly to
your right and take a running jump out of the alcove, landing to the right of
the spike trap. Immediately jump forward
with a left curve and quickly apply the Bag of Sand. Jump back the way you came to exit this area.
Use A Bag of Sand on the altar and the temple is open. Now follow the
arrows pointing towards the guy on the wall, in order to reach the surrounding
row of raising (but now hidden) blocks. Follow it E to reach a huge arch with
metal bars. Behind the ivy, there's the preultimate Golden Rose in this level. Take
it and, again, You have two options:
EITHER: Use the already described shortcut to get out of this area.
Between the temple and the stairs leading to it, find two closed red doors.
Between them, a high crawlspace is hidden, and the last Golden Rose is inside. Grab it.
OR (recommended): Use the Bronze Ball in the remembered slot (the one
mentioned in the beginning of this chapter) and take the last Golden Rose
without backtracking.
Everything is finished in this level... but for now only - You will be
back here in a matter of hours. Climb the temple stairs and talk to Osias - The
Highest Priest Of The Holiest Of Holies. This is where You are heading now...
unfortunately, without any weapon.
HEROD'S TEMPLE
This level is a skill and stealth one. I mean when You see an impassable
flyby sequence with several Herod's henchmen or tigers slicing Lara into kebab,
it's not a bug, but a way to tell You there is either another way around, or a
method to unlock the path. As You are thrown into the "deep past",
You are supposed to talk with some magical creatures - just like in case of
Ginnie from the previous level. However, outside the temple, the world
"stands on the ground" much more than here. So You can expect to meet
more surreally creative puzzles here. Thus, You need to open Your mind.
Lute
Climb over the blocks. You'll understand their purpose later. DON'T
approach the henchmen - this will trigger the first "death flyby",
with tigers being let out of their cage and killing Lara. You need something to
get rid of them. Go downstairs and open the door. The accessed corridor leads
to the music room. From there, pick up the Lute. You can use it for the tigers
to fall asleep, as many times as You wish. Go back and approach the cage to see
it work.
The Horse
The tigers fall asleep for 30 seconds - and You will find it not enough
if You don't plan what You do. Enter the cage. Climb the closest wooden
platform and do a sequence of jumps to reach the last one. Here, the tigers
should wake up, so play the lute again. Pull the jumpswitch. On Your way to the
open door, pick up the medikit near the pool. BTW: You still have A Bottle of
Kosher Wine - You can stop in the pool (neither tigers nor henchmen can follow
You here) and drink it. After You're finished, You can refill the bottle with
water... and witness a miracle when the water changes back into wine. Enter the
stable and the door shuts behind You. You have some time now. Walk to the horse
and give it a carrot to "ignite" it (Yes! It's TifaNazah's modified
jeep and You can ride it!). If You don't have a carrot, pull the lever and go
to the previous level for a while to retrieve the missing vegetable. In case of
troubles, see "Going essential" chapter. With the horse, You can run
over both Herod's henchmen. Ride downstairs (past the music room) and up the
ramp (it collapses behind You to create an alternative way up). The whole new
part of the level is unlocked - off You go to explore it!
Cage Key / Meat
"Park" the horse near the second arched storage, behind the
temple corner. Push the wheelbarrow away from its square to reveal and pick up
the Cage Key. Throw the jumpswitch where the
pathway ends, to unlock the door. Behind it, on Your right, there is an alcove
containing a wall switch. Press it to raise the next door, but ignore it for
now - this one will be useful as a quick way back of some other place. Instead,
find a wooden, pushable box in the third storage and place it below meat. Climb
the box and hop upwards for Lara to get some protein-rich food. No, it's not
for her.
Meeting the Griffin
Go back to an ornate block in the wall, to which Lara's attention was
drawn when you first rode into this area.
Push the block inside, and onto the marked square. Now You can use it as
a base for an upwards jump to grab a jumpswitch. Get a herb from the
sarcophagus and move the block two squares in order to throw another
jumpswitch. This raises a block and allows You to climb the whole stack.
Curving the running jump right, grab the ledge of the opposite stone and pull
up. Timing the spikes, hop on the ledge, bounce off to grab the ladder and
climb it to talk to the Griffin. The evil chickens have stolen its egg and if
You get it, You will receive some help from the creature. Hop over the wall the
Griffin is floating above. Open the door behind You (just in case) and the one
on the other end of the passage. Hop on the staircase and into the alcove to
the left of the door that let You in. Press a switch in there and go
downstairs, watching out for falling ceiling. Throwing the last switch has
opened the gate, so keep Your lute ready in case if the tigers found the way to
reach You. Pick up the Chicken Egg and a large medi (You may need to duck in
order to take the latter thing).
The Bull and the Chicken
Place the Cage Key in the slot near the stable.
The cage opens and You can go in. Watch out for the spikes, they have collision
larger than 1 square! Grab the left side of the platform (this way You won't
wake up the bull too early) and pull up. Walk to the opposite edge and tap
backwards once. The bull wakes up and You're almost ready for a jump... almost.
It's highly recommended to play the lute here and SAVE the game. Throw the
jumpswitch and the spikes are gone. Lure the bull in front of the door (leading
to the hen-cote). Wait until he charges and jump sideways in a proper moment to
avoid its attack. SAVE if You did it without a scratch. The tigers should be
awake now, and it's very likely for the bull to be stuck in the chicken-cote
door, so You're endangered. You must lure the bull away of the entrance before
the tigers catch You! WARNING! Playing the lute is NOT recommended here - the
bull works according to Murphy's laws and most often, it gets un-buggy when You
can't block its attack. Enter the cote and climb the sloped beams to land on a
safe height. SAVE. Now make a deal with the most distant hen: her own egg for
the Griffin's one. Drop down. Play the lute, SAVE the game and get out of here.
Use the bull to throw the switch in the metal barrier separating You from the
remaining part of the corridor surrounding the temple.
Getting rid of the animals
Run into the new part of the temple and throw a switch near the empty
cage. This opens it. Lure the bull and the tigers in, and make sure You lock
the whole six in. This is difficult, but managable with some patience and
strategy (most of strategy involves patience).
The Lion / Preparing the bath
On the right of the cage You have locked the animals in, there is
another cage, with a lion inside. Open it and put the Meat in the bowl. The lion
gets up, and - apparently - off a certain item. While the lion is feasting,
pick it up. It's a Ruby. Exit the cage (the lion won't follow, so don't mind
it) and find the pool with four switches. All of them are timed, some shorter,
some longer, so You need to pull them in the correct order, and it is E, W, N,
S. Osias appears and lights some fire to make the bath more comfortable. Of
course You will use this fire as well, but where's Your torch?
The Torch
The Griffin will give You one for its missing egg. Go back to its tower
and get it. Light it with the torch Osias has recently lit and ignite two
candles near the temple entrance. Now throw the switch far to the right of this
gate to access the last part of the surrounding corridor and find a great medi
by the kiosk. Place the Ruby in the lock. The door opens and You can enter what
is, IMO, the highest priest's house. Light his fireplace to get the Courtyard Key, find another grand medi near the cupboard and
finally put the key in the temple door keyhole to get inside.
The courtyard
See the henchmen? If they see You, the second "death flyby"
will activate. So You have to shrink vertically. I mean, crawl. Follow the
broken floor to go past the guards. When You're in an isolated corner, You're
safe. Pull up on the top of the wall and kick the gong to start the party! This
gets rid of the guards and opens the next courtyard.
Higher than the highest priest
Here, another bunch of Herod's henchmen is guarding the Holiest of
Holies. Go behind its right wall and climb the closest ladder until You're
stopped by a crack. Grab it and shimmy along to find a crawlspace with a Column Key inside. Get it, go back on the ladder and backflip
with midroll to grab the ledge of the middle shelf. Pull up and climb the same
ladder to the very top. Backflip with a midroll, grab/pull up and have a Golden Rose.
Hang, shimmy left and use the ladder to descend - carefully! The ladder trick
fails below the crevice! One more time, backflip with a midroll to land on the
lowest shelf. Place the key and a block hides, allowing You to jump on the next
pillar (You can SAVE/LOAD to disable the camera and have a better look). From
here, You can either go up, or down.
Up: The Holiest of Holies Key 1
Hop on the adjacent pillar. Backflip, bounce off the slope, grab the
ladder and climb it. Backflip with midroll to bounce off another slope, and
slide (or bounce, as this is faster) into the opening. Go through the raised
door, into the tower. A camera shows You a crawlspace. Time the
opening/shutting door and use the sandy ramp to reach the shelf. A block next
to You needs to be raised. Grab the crack above the floor, shimmy around the
corners and backflip on the opposite shelf. Hop in the crawlspace indicated
earlier by the cam. Behind the opening, slide/bounce off a slope to land in the
alcove with a switch. Throw it and watch the baddies entering. As You have a
possibility to get some fresh air, walk to the open bars and climb on the
protruding stone on Your right. Here, throw another switch and hop in the unlocked opening on Your left. Get
on the block You have raised recently. This launches the swinging baddy
sequence. You can't kill him, so climb the blocks and escape him, swinging over
the pit to land on the stone surrounded by railings. Grab a medi, throw a
switch and swing across again. The door on Your right is open and You can
obtain the first Key to the Holiest of Holies. Go back
to the pit and exit through the door to land on a shelf. Hang and descend to
the ground with help of a ladder.
Down: The Holiest of Holies Key 2
From the same pillar Your quest for the 1st key has started, either grab
a crack and shimmy around the corners or hop on the adjacent column, roll,
release and grab the same crack (the second option is faster). Hop on the
balcony and press the switch to access the corridor. A constant sequence of
running jumps, all of them landed on raised tiles, will open the door at the
end of this passage. Exit, go left (along the other part of the balcony) and
spot a ladder. Climb it, backflip, perform another bouncing sequence and press
the next switch to access the room with the last key. Pick the item up and
press the button to get out. Land on the same shelf You land after acquiring
the 1st key.
Stoning
No matter which order You got the recent keys in, a ceiling will fall
after You are done with both. Descend to the ground using the same ladder as
previously and pick up the ceiling fragment. It's called a "Stone".
The right spot to use it is next to two other stones nearby. Throw the piece in
order to distract the guards. Now You can easily place the keys in their
slots... unless You don't alert the remaining henchmen (this happens if You
step on the plant pedestal or any square on the left of it).
A new quest
Enter the vestibule and spot an empty table, and another one next to it,
containing some bread. You need to bake Yours and sacrifice it in order to reach
The Holiest of Holies. Get the Silver Ball from the opposite pedestal (it will
allow You to access the industrial district, where You can make some flour).
For now, You can't do anything else here, so exit the Holiest of Holies, go
left around it and throw a switch next to the exit to open it, what makes Your
way back to the residential level much shorter than You thought it will be.
JERUSALEM - OLD CITY, 70 AD (residential district) II
The place for Silver Balls is right beneath the Trapdoor Key balcony.
Get there, place the puzzles and unlock the finish trigger.
JERUSALEM - OLD CITY, 70 AD (industrial district)
A bread shall be baked. In this level, You can mill some flour and mix
it with water to make the dough. 4 Pyramid Keys will allow
You to get back to the residential area. Generally, You can explore parts of
the level in any order. But the first thing I will suggest is constructing the
crossbow.
The Crossbow
Crossbows are made of some wooden sticks and a wire. Go across the
bridge and pick up a herb from the oasis. Another one is in the small grassy
yard to the W of here. On the other bank of the oasis, enter the stable and
pull some Horsehair out of one horse's tail. A special animation kicks in. Go
on the other bank and follow the right wall to find the well owner. Talk with
him. He will give You something if You fix his well. You will do it later.
Enter the barn and kick a wheel standing next to the wall. It breaks. Pick up
its part and combine it with Horsehair to make a crossbow.
The break in
Throw a nearby switch to deactivate spikes on the other side of the barn
and - as follows - unlock another lever. Pull it to raise a block in the house.
Enter it (without the housewife's permission) and climb on the first floor. Up
there, shatter a chest for some more arrows and exit through the closest
portal. On Your right, there is a secret Golden Rose - You need to jump over the
railing and land on the lowest domed roof to find it. Jump over the next
railing and shatter another chest for 10 more crossbow ammo. Leave this rooftop
and go back on the first floor. This time, exit through the opposite portal
than for the first time and destroy a barrel in front of the door. Enter the
side roof garden and throw a switch to access another flat. From there, get a Pyramid Key (one of four). Now get back to the owner and fix
his well.
Well done
Break the well lock (You can target it with the crossbow), hang on the
inner ladder and safety drop to the bottom. Pick up the pail. Spot a moveable
piece of rock and push it inside the wall until You reveal a passage. Following
it, kill (or ignore) a scorpion. Kick a boulder at the end of the
corridor and watch it break the seal on the wall to flood the room. Now You can
dive and throw the underwater lever in order to deactivate spikes. They guard
the dry switch no more, so get on the bank and throw it. This opens the
underwater trapdoors (and dries the above room). Jump through one of them to
find another switch beneath. Pull it to open the side door in the well. Get out
of the water and throw the spike switch once again to flood everything for a
while. SAVE the game.
Swim into the newly accessed room and resurface in a small air pocket.
Inside, there is a Golden Rose for You. It's guarded by a cherub
(one of many in Jerusalem), and it's a fire one, so escape it to the water as
soon as You obtain the secret. Now You can dry this level again (move the spike
switch again) and move the corner pillar out. This closes the side door forever
(so if You hoped to retrieve the secret later, You can forget it and reload the
progress). Place the column under the rope and climb it to put the Pail back on
its right place. Now the well owner is happy and he gives You something. He
places it on the grass next to the well. Before You see what it is, I recommend
You to solve another puzzle - as this is simply faster than retrieving the
reward now. To get out of the well, You must flood everything again (with the
spike switch) and swim through the channel to reach the river.
The Forch Puzzle
I mean, You're about to use a torch in a forge. Follow the opposite
channel ending in a pool. Get out and ahead, then left, upstairs and turn
around. See those two misplaced vases? Make some symmetry and a trapdoor will rise
in the W wing of the building (same floor), allowing You to press a switch. Do
it to extinguish the fireplace and get Map Part 2 from it. Another cherub
will appear and chase You. Throwing the last switch has also lowered a block in
the opposite wing (still same floor), revealing some torches. Get one of them
and light it with any flame available. Return to the ground floor, drop the
torch near the E forge entrance and hop in the water to get rid of the cherub.
Dry Yourself and enter the forge with the torch in Your hand. Light three
candles and pick up Map Part 1 from the revealed pedestal (this one is not
guarded by anyone). Combine both pieces to form a Riddle Map.
The House Key / First underwater door
Before You use it, shatter a chest in the corner for a medi, go on the
opposite side of the pool and enter the ground part of the W wing in order to
obtain some arrows from another destructible chest, shoot a grate above the
fireplace and crawl in for a Golden Rose. Now You can exit through the patio
and place the Riddle Map on its pedestal. This gets rid of certain spikes, but
watch out! The spikes assigned to wrong levers are still active! Referring to
the map, pull the appropriate switches to spawn two Stone Discs. A camera shows
You where to use them. For the last time, go upstairs and place those discs in
their slots to acquire another Pyramid Key and a House Key. The latter pickup, placed in the slot beneath You,
will give You an access to the first lever switch, which, as soon as You throw
it and exit the alcove it is hidden in, triggers a flyby showing You the first
river door close. Two more to go.
The Well Key
Go back to the well owner and check what he has given You. It's a Well Key. Follow the wall of the nearby building (the one You
have entered via double doors) to find the slot. Place the key access the
second river door control switch. Throw it. Exiting the backyard, You will
watch another underwater door close.
House of the Highest Council
Behind the well, there is a building You can enter via double doors.
Push them open to find some arrows. If You are missing a torch, You can also
find some here. Light it with the lamp burning next to the oasis. Remember the
building with arcades, the one on the opposite bank? Now visit its last
unexplored row of arcades (the closest to You), light the candles and...
nothing happens. You need to follow the corridor into the empty hall with two
pillars. The left one is pushable - move it away from its square to reveal a
wall switch. Press it and a camera shows You an opening door on the other end
of the arcades. Pass through it. Upstairs, keep going through chambers until
You are in the last one, with a jumpswitch below the arch (a cam gives You a
hint). Throw it to lower a block in the previous room. Go behind this cube, get
the Pyramid Key and throw a switch behind the
fragile chest to spawn the Oasis Key on the pot in
the last jumpswitch room. Also, there is a secret behind the painted door. Go
through, watching out for the shutting/opening PRIVATE gate, to know who lives
in this ancient flat... the High Council! Seems our dear builder trio are time
travellers as well! Grab the rose, find some flares inside the shatter chest
and exit. Optionally, You can break the kettle above the fireplace in the
previous room to release a cherub. Escaping the angel into the water, shatter
the barrel at the bottom. This reveals 10 more arrows. Obtain them and get on
the bank to place the Oasis Key in the slot. A
door next to the pool opens and You can throw a switch inside the "control
room 3". Just like in all other cases like this, exit the corridor to
watch a flyby.
The Mill
When all three underwater doors are locked, the water level will rise in
the river and it will turn the mill on. The entrance is near the place You
started the game in - go there, open the door and spot a box full of grain.
Move it on the lowered raisingblock and raise it on the second floor with the
rope. Go upstairs and move the box on the trapdoor. Throw a floor switch to
move the cog away, for it not to "block the fall verticalness". Pull
the wall switch to release the box and fit it in the grindstone. Again, join
both cogs and watch them mill the grain to form some flour. Drop on the ground
floor and, watching out not to get minced by the grindstone, pick up the Flour.
The last Pyramid Key appears on the nearby basket -
collect it and mix the Flour with A pail of water. You will get the dough,
ready for baking. The "oven" is in residential district, but You need
to do something to get out of here, don't You?
Getting out
Find a torch and light four wall torches to make the floor transparent
and lower the bars. Slots for Pyramid Keys are now
accessible - place all 4 to access corresponding pushable vases. Pull 4 ropes
to bring the vases on the "surface" and move them on tiles marked the
same way as those these vases were standing on before they were teleported.
This reveals some "ice cherubs", for them to vanish them in
flames and open the Golden Ball lockup. Pick up the item. The slot for it is
right on the other side of the red grate the ball was next to. Go around it an
place the item to open the final door. Step on the finish trigger...
JERUSALEM - OLD CITY, 70 AD (residential district) III
...and watch the Romans
destroying the temple! Quickly! You don't have time! Enter the non-visited
house (the one which once had a grand medikit on its roof) and bake the bread
in the "oven"! Carry it to the temple...
HEROD'S TEMPLE (II)
...and into The Holiest of Holies (watch out for the falling stones!).
Osias is forced to evacuate, but he manages to seal the Ark of the Covenant
beneath the place. And he gives You the Bible - the one the Holy Sepulchre
priest was missing... or rather "will be" missing. Some kind of a
blessing throws You back to the future...
CHURCH OF THE HOLY SEPULCHRE (II)
...where, after receiving some hints from Zip, You are supposed to place
the Bible on the Armenian Shrine altar. The Priest shows up and he is very
grateful - he gives You his Ancient Sword. It's a crowbar. You can use it in...
JERUSALEM - OLD CITY, 2011 (IIa)
Whoah! That's a lot of finish triggers within 10 minutes, isn't it? And
it's not the end. Even though Fax the Smithy's flat is in the level You are
actually in, it's faster to go ahead and left, through...
THE WAILING WALL (IIIa)
...where You need to pass the arched portal and go left, into the second
one to the left of the green lock in order to switch back to...
JERUSALEM - OLD CITY, 2011 (IIb)
...where, after going around the initial ladder and sticking to the
right wall, You end up right next to the smithy's forge. Believe me, this is a
faster way than getting lost in the bazaar corners.
J. Fax's forge
Break in with help of the Ancient Sword. Get some flares from a shatter.
Stepping on a raised, white-mosaiced piece of floor triggers a trap. You have
to solve it counterclockwise. Without hesitating, reach the next raised square
and wait until a big flame appears and fades out. Run on the following tile and
repeat this one more time. A block is raised. Open the ceiling trapdoor with
the nearby switch and climb on the 1st floor. The switch on the wall closes the
trapdoor, so simply ignore it. Take a medikit out of the destructible vase, and
Mr Fax's Safety Plug from smithy's desk. Remember the green lock in The Wailing
Wall level? That's it.
THE WAILING WALL (IIIb)
Robbing J. Fax's apartment
Plug the plug into the slot to open the trapdoor. Climb on the terrace and
shoot Mr Fax's personal guard. See the slope? Stand 1 square away from it,
turn around and backflip to bounce off it, curving the jump right to land on
the roof. Climb another sloped (but anyway walkable) piece behind You and jump
over the railing to find Yourself at smithy's apartment door. Go inside and
attempt to search his nightstand. Even though Mr Fax gets alarmed, his dog
seems to be friendly... what is more, You find two Handfuls of Shekels. Give
the wine to the owner and the just robbed smithy becomes Your friend. Not only
he's not mad at You, but he even gives You an access to his balcony, where The
Star of David is hidden. Take it and go back on the lowest terrace. From here,
You can jump on two platforms, each of them containing a pickup: the closer one
- a bunch of flares, the distant one - a large medikit. Safety drop and give
the first Handful of Shekels to the poor man. As a reward, he gives You a key to the nearby door. Place it in the lock and finally
reach the long awaited corridor behind the Wall. From here, You can go either
left or right (no matter where first), to retrieve two Temple Mount keys.
Left: The Chapel
Go left. The soldiers are harmless... but they will go harmful
as soon as You break into the Temple Mount Key 1 lockup - so I recommend to
take precautions - draw a revolver and kill them all. Continue to the very end
of the corridor, until You spot a metal crate. This is a pushable. Move it a
bit and use it to climb the upper balcony. Notice a crawlspace on the other
side of the corridor and get in. Crawling, ignore the first opening on the left
if You want to get a secret (if You want to get this particular pickup, this
opening is intended to work as a way out). From the dead end of the passage...
well... do passages have dead ends?
Anyway... pick up some more flares and enter the second opening. There's
another pushable - move it and open the revealed trapdoor. Hop in the hole.
Lol... A TechnoEgyptians tribute?! Electric sparks tell You that the whole
grate at the bottom is deadly. What is more, timed flame emitters make the
things rather difficult. You have to bounce off the opposite slopes, curving
jumps in the right moment until You time all fire. Next grate is not connected
to the electricity, so it's safe to walk on it. Go to the very end of the
corridor, passing an automatic door, climb the ladder and pick up the Crescent
Moon from the next passage... yes, I think this IS a passage indeed. With the
previous one, I had some doubt. But this one has two ends, even though the far
one is sealed by a window... Now, if You found the Cross in the Holy Sepulchre
and The Star of David in Mr Fax's apartment, You have all religious artifacts
of this city - the Catholic, the Jew and the Muslim one. Open the trapdoor and
drop out of here. You are in a small chapel, and so named key is
lying on the pedestal next to the altar. Pick it up and raise a block with a
switch behind the bookcase. Hop on the block, and into the crawlspace that led
You in - now for it to lead You out. Roll back on the street.
Still left: Temple Mount Key 1
Go back, passing by the garden, and enter the chapel on Your left (use
the recently found Chapel Key). If You did not kill the guards earlier, they
get alerted now. Break the glass barrier, open the trapdoor above the metal
case, climb through it on the above floor and get a torch from there (it's in a
shatter chest). Bring it to the ground and light it, and the candle next to the
case. A moving flame breaks the case and the first Temple Mount Key
is Yours.
Right: Pete the Bomber
Go talk to the distant guy. For a Handful of Shekels, he gives You a
bomb. Plant it at the far end of the corridor, by the rocks. Some metal bars
open and You can get access the detonator to blast a hole in the wall. Lara
seems to be a bit shocked, but don't worry - she is alive. Enter the freshly
made hole and retrieve a Shovel from the following garden behind the double
doors. Combine it with the Wooden Handle from the other side of the fence to
have a Spade. Will be used in the next level, The Temple Mount. Exiting, Zip
tells You Pete is tweaking with a switch next to a non-visited chapel door.
Apparently, the bomber succeeds, so You can explore this place after him.
Still right: Yet another chapel and Temple Mount Key 2
Approach the chapel. Apparently, Pete has found nothing interesting in
there, so he won't sell it to You. Now it's Your turn to get it for free.
Anyway, You don't have money anymore, so You have no other choice. Enter the
chapel and bounce off a slope to grab a crack in the wall. Shimmy to the end
and around the corner. Pull up and throw a switch. A platform is lowered, with
a timed flame burning on it. Wait until the fire is about to go out, jump on
the platform (land on its right side) and turn left to take a run-up. Jump to
the other switch and press it - now the bars on the other side of the chapel
are raised. One more run through the fire and You can grab the uncovered ledge.
Pull up for a Minaret Key. It's supposed to open the
Minaret, so go to the Minaret. It's right in front of the Temple Mount gates.
Inside, You will spot a timed switch. Don't worry - You have a lot of time to
tap backwards with curving right (I mean with pressing left), turn right a bit
to have the right side of the stone behind You, backflip on this stone, bounce
off the lowest slope, land on a platform, walk to its edge and hop on the
second platform to finally jump sideways, on the trapdoor... about to lose its
horizontal position! Press the switch to open the upper bars and quickly evacuate
on the next platform! From here, jump on the last one, and into the opening.
Grab a medikit. Kill the guard on the minaret balcony and go around the
tower to find the second Temple Mount Key.
Go down the platforms and outside.
Entering the Dome Square
Place both keys on both sides of the Dome Square gates, which, after
doing so, are raised open. Wait - this is the last point of this game You can
retrieve missing secrets from this level in. If You proceed behind these gates,
there is no return. Are You sure You want to continue?
THE TEMPLE MOUNT
So this is it. Somewhere beneath this mosquee, lies a complicated net of
caverns that will probably lead You to the Ark of the Covenant... or to inevitable
death. But how to descend in there? This is what this level is about.
Into the Mosquee
Even if You took the torch from the Wailing Wall into the Temple Mount,
it vanishes from Lara's hand. This is because two different people were doing
the previous level and the present one. Don't worry - a torch is easily
retrievable. First, go right and shatter the door. There is a case containing
the Dome of the Rock Key, and it's also a
destructible one - however, not by Lara. A Roman skeleton (probably a penancing
soul of the guy who ordered to destroy Herod's temple) is guarding the place.
And he is the one supposed to destroy the case. Make him attack Lara while she
is standing next to it. The case falls apart and You can get the key. Run away
from here and don't mind the skelly - his soul is trapped in the chamber, so he
won't follow. Place the key in the lock near the Dome of the Rock door. Before
You go inside, check the other corner of the square, for a torch in a lockup
(push the double doors to find it). Light it with a candle in front of the
entrance and step in.
Barefoot
Take Your shoes off and put them to Your backpack. Light the candles to
raise a block. Climb it and throw a jumpswitch to raise the next cube. This one
allows You to pull another jumpswitch, what results in activating a double-cube
block. Hop on it, and on a pillar. From here, reach a crawlspace with the first
Stone Disc. Safety drop and go back on the corner pillar. Do a STANDING jump to
swing the pole and land on the next pillar. Grab the rope, turn right and swing
to the alcove for the second Stone Disc. Safety drop. Repeat all the way on the
rope and this time don't turn but reach the third pillar. From here, grab the
ladder (warning! a buggy one) and shimmy around its corner WITH YOUR LEGS ON
THE LADDER, AS THIS IS A BUGGY ONE AND OTHERWISE IT WON'T WORK. Backflip (with
midroll) into a cage to retrieve the third Stone Disc.
Repeat all the way on the rope and the third pillar. Do a RUNNING jump
to swing another piece of the same pole as previously and land on the fourth
pillar. Spot a switch and hop on the cage to throw it. Timed run! Hop back on
the fourth pillar and on the raised trapdoor. Don't stop but hop on the ledge
containing the last Stone Disc. From a shatter chest, get some bullets, and use
the ladder to reduce damage while safety dropping. On the ground, place all 4
discs in their slots and a trapdoor in the Rock opens, letting You into a cave.
Cave prologue
Take the boots on. Use the spade to dig through the soil and reveal a
corridor. Get some more bullets from a fragile vase and proceed towards the
light. Look up - there's a ball switch hanging below the ceiling. Aim at it
with the crossbow or with the revolver (You can try a shotgun and tell me if it
is also possible here - however, I never managed to succeed). Destroy the ball
and the cave entrance opens. Go downstairs and be aware that...
THE CHERUBIM ARE CALLING
The Labyrinth
Continue downstairs until You are stopped by the wall. Kick it apart and
crawl in the opening. Go left and kill a rattlesnake. Behind it lies a pack of flares. Go
the opposite way and, in a larger chamber, kill 2 more snakes. Find a banana, use the spade
on the rock to reveal a turn switch and open the labyrinth doors with it.
Confusing, isn't it? Open the monkey cage - the baboon will lead You. After
several hundred meters of turning, You will see some ruins among the rocks.
Watching out for a falling ceiling, kill another rattlesnake and find a medikit by
the skeleton. In one of the ceiling openings, there is a ladder - climb it on
the second floor for some shells and a torch. Throw the latter through the
opening and follow it. Pick the torch up and light it with the corner flame.
Set the wooden blockade on fire to unlock the path (watch for another part of
ceiling falling when the path is being cleared). Follow the accessed corridor
(You can kill another snake), watching out for a boulder, until You
reach a slope.
Slide down, grab a ladder to avoid some more rollingballs, and - about
two seconds later - release it and jump away to evade another stone. When the
threat rolls away, pick up a small medi and some flares. Climb the slope again
and grab the familiar ladder once again. Get to the top for a Golden Rose.
Descend back onto the slope and follow the corridor until You see another
boulder. Use a crowbar to push this rock off its ledge. It rolls down and
breaks some more rocks at the bottom of the slope. Follow.
Stoning II
Down there, give a banana to another monkey (or is it the same one?).
The baboon opens a door for You. Behind it, it stops to be comfy - a lava cave
is owned by a fire cobra! Just like in most cases of meeting MUTANT enemies,
there is no simple way to kill it - thus, You have to use something heavy. A
flyby shows You a boulder falling on a marked tile, what raises a block for a
short time. The plan is: climb the ladder (a buggy one, so get Your legs on
it), shimmy around, backflip with midroll, slide/bounce off a slope, bounce off
the next one WITHOUT sliding, run through a shelf to jump on the ladder (the
wooden one), climb it a bit to avoid firebolts, shimmy around the corner,
backflip with midroll, kill a snake on Your left, runjump on its shelf to push the
boulder, backflip with another twist to land on the previous shelf, and do two
more jumps - the first one onto the trigger square (a block raises), the second
one with Your weapon drawn in order to kill a snake and hide in its alcove. After
You wait until the cobra is stoned, You can follow the slope the boulders has
fallen through. At the hidden block, go left and jump on a standable part of
the slope. Next, hop on the rock the snake was once standing... standing (???)
on. The switch above the lava should be accessible now - pull it to open the
way out and platform into the opening (the last jump needs to be done perfectly
for You not to fall into the lava).
More caves
This time, there's no labyrinth - the only pitchfork is in the very
beginning (hop through the crack on the right for some flares, a medipack and -
a crucial thing - another bunch of dynamite sticks (You need to pull a skeleton
off it in order to pick it up). Hop back into the corridor and follow it to the
edge of the pit. Kick a column and it falls to create a bridge. Go on the other
side, ignoring the camera for now. Grab another skeleton's medi and, watching
out for a vertical spiky trap, follow down the ruined stairs to face a solid
wall. This one looks suspiciously modern. You need some dynamite to blow it up
- if You missed the last bomb, check the beginning of this chapter. Plant the
explosive and a baboon gives You a torch. You can light it several steps
behind, in the corridor. Burn the fuse and do one of three things:
- hide behind the baboon stone
- escape down the slope and hide behind a corner
- do as in the second dash and climb the staircase (the most difficult
option).
The wall blasts open and the place gets flooded. Before You leave the
corridor, follow the side underwater crawlspace near the last portal for
glasses of a skeleton indicated by the camera on the edge of the pit. You can
resurface in this hole (now flooded), but there's no way out - so swim
backwards. And through the just created opening in the ex-solid wall.
The base
Above the hole You used to swim into the cave, there is a shelf. Get on
it to dry Yourself and hop on the ledge on Your right. From here, jump
diagonally on the next rock and on the following one. Pull up on a slope, slide
down and bounce off it to grab a ladder. Climb it and do a running jump to land
on a concrete platform. Kill a worker and get some revolver bullets from the top
of the huge metal container. Go across the bridge and throw a switch on the
rock above it. This opens a trapdoor in the roof. Return on the bridge and look
in the water. Beneath the surface, in the corner of the ruined temple, a
shatter vase is placed. Destroy it! Hop behind the railing to safety drop
through the trapdoor, into the base. Find some shells, also some revolver
bullets awaiting You on the shelf, and remember a control panel near the
following, glassy passage. Use this corridor to proceed into the second room.
Find a medi on the desk and approach the distant cabinets. After a quite
alarming sound, wait a minute for a soldier to disarm the mines a Dynamite is
attached to, and pick up the bomb. There's also a Storeroom Key
on the other shelf. Take it and enter the toilet. Whoah! Open a ceiling
trapdoor above You and get out before You suffocate! Catch some fresh air and
pull a jumpswitch above the trapdoor. This turns the ventilation on. Crawl into
the vents and shatter a grate at the end. Near the edge, draw the revolver,
target the enemy
in the lockup with the laser sight and kill him. Roll out and use the Storeroom Key in the keylock, to access the shelves and find
a Crane Control on them. Take it to the control panel in the first room of the
base. Used, it makes a crane above You switch its position. Through the open
trapdoor in the second room, drop into the water.
Herod's Temple revisited
Pick up the Holiest of Holies Key
from the vase (the one shattered from the above). Swim to the other corner for
Ancient Scroll and combine it with Glasses to make Ancient Scroll with Glasses.
Plant the Dynamite on the barrel surrounded with mines.
Revelation
Go back on the crane roof (follow the same way as previously) and hop on
the crates next to it. Get on the hanging container and swing two ropes, the
last one to get on the other crane. Pick up the detonator and unfold a net
bridge with the floor... or in this case, rather a roof switch. Follow the
bridge across the waters, and hop on the cage shelf (should be open - if it's
not, You are missing a bomb and You need to search the base for it). Before You
use the detonator, visit the side shelf on Your left, for a medikit (a rattlesnake
is guarding it). Hop back on the cage platform and push the detonator to reveal
the passage.
The Holiest of Holies
Swim through and get out in a dry corridor. Push the block into the
corridor. Move it further to reveal a keyhole. Put the Holiest of Holies Key in
it "and take Your shoes off, as the ground You will step on is
sacred". Move the block below a switch on the wall. Pull it to access the Ark of the Covenant Key. Metal bars are lowered and You can
descend into the storage. Yeah, I know, the "storage" is not an
appropriate word here... Here it is, the Ark of the Covenant, inside an octagonal
cage, guarded by lots of Cherubs frozen in midair... Go around it and place the
key in the lock on the other side. A mysterious Jewish priest appears (was he
frozen as well?). I'll recommend You to save the game and simply open the Ark
before You talk to him. This allows You to watch the bad ending - IMO, much
more epic than the good one, heheh... Reload and give the Ancient Scroll with
Glasses to the priest. Unfortunately, I can't translate what he is singing. The
only word I can understand is "Israel". I'd like some Jewish friend
(Yoav?) to help me here. Watch the final cutscene and take the final pickup...
Croftmanor
This is just the final flyby, with all secrets You have found appearing
on Lara's table. I bet You didn't find them all at the first try. But I also
believe this is not the last time You play this game.