Minicube
Level by raidertom
Walkthrough by manarch2
Wake Up
Grab the Map from the pedestal in the NW
corner of the pillar.
Also, a text message appears after picking it up:
“POOL is inviting, and WRAITH seems to be interesting.”
Notice a pushable in the NE corner of the starting pillar, then drop down to
the floor of this room and run in the passage in the SW corner to reach a
toilet. Pick up the Note:
“Hey, Larry!
I have lost the crowbar somewhere above the darters room on top level and the
yellow key in the foggy cellars.
Sorry, Tom”
Let’s get started now. You are on the middle level now. The text message gives
you a hint where to go first; we need to get to the Wraith segment now. There
are three exits from this segment, take the N one. Jump into the alcove and
climb the block up, then down again and reach a new segment.
Central
In this segment, you have to do a series of slope jumps in order to reach the
trapdoors beside the exits. The aim for now is the N exit, so you need to get
on the NE trapdoor. From the entrance alcove start by jumping on the near NW
slope, to the N one and with a slight left curve as high as possible on the
next N one. Directly backflip with a mid-air turn and a grab to reach the edge
of the E slope. Shimmy far left as possible, then take a look at the trapdoors.
They raise and open clockwise, so wait until the mentioned NE trapdoor falls,
wait until all three other trapdoors were activated, and climb up the slope.
The NE trapdoor should raise now, jump on it with a left curve, immediately
turn slightly right and backflip to the exit alcove. Climb over the block.
Trophy
Ignore the N stairway down for now, and head up the NW stairs. You arrive in a
room with many timed fires coming out of the T-Rex mouths. First of all, avoid
the fires and get into the SE corner to find Shotgun
Ammo. Note that in the SW corner there is a green keyhole. Now get to
the centre of this room. Look up and find a shaft with a ladder on the W side.
You cannot get up the ladder without timing the fire, so stand one step behind
the place where you can grab the ladder, wait until the fire vanishes and step
forwards, better even sidewards and then turn, jump up and climb the long
ladder.
Wraith
Backflip at the end. Turn around and head to the NE corner, climb the block,
drop in the hole and pick up a Little Medikit.
Climb back up and jump or climb a series of blocks W, there’s no need to jump
on that central bridge as there are only three exits to other segments. Reach
the far NW block, turn left and jump on the bridge. A message appears when
heading E.
“I think, I need
these icy wraiths.”
Jump to the E ledge and a cutscene kicks in, showing you a path through various
segments, stopping at a pool. Obviously, you need to make your way to the pool
to extinguish the ice wraiths. But first, you need to release the three wraiths by approaching the left and right
pedestals. From the left pedestal, you can get 9mm
Ammo. Turn around and jump down on the bridge again, then drop on the
lower bridge and head out S. Get over the block.
Lava Cross
While still being chased by the wraiths, take a run-jump to the central tile,
it lowers while standing on it, so be quick and curve right, then run-jump to
the W platform. Climb up into the passage and up and down the block.
Stars
From the entrance directly jump left to the SW platform. If you don’t manage
this, either jump to the NW platform or drop down, run N and climb up in the
alcove, turn and jump to the platform and then S to the formerly SW platform.
Now jump SW in the dark and hardly visible alcove and climb over the block.
Pool
Jump to the near S pillar, then to the S ledge and dive in the pool, if the
wraiths were faster you even don’t have to do this as the top freezes
(defaulting wraiths however still can get and be vanished in the pool).
However, if you dropped in the water, swim through the SE exit and follow the
tunnel. Ignore the hole in the floor and swim into a wider room. Swim up the SW
shaft and use the underwater lever to ignite a bin in the Pool segment. Now
search for a hole in the ceiling in the NE corner where you can climb out.
Head to the gap and drop down in the next room, then head back W and you’ll
arrive back at the pool room. Go left and watch the wraiths’ work. Run over the
frozen pool and climb up S into a crawlspace that otherwise wouldn’t be
accessible. In the dark room find Flares, a Little Medikit and the Walther
9mm. Pull the lever and a cutscene shows a door in the starting (Wake
Up) segment opens.
Get back out of this chamber and in the pool area climb the ladder on the N
side of the SE pillar. On top drop down the S ledge backwards and use the jumpswitch
- this opens a door in the passage after the pool, so get back in the E
passage, climb the right ladder, get in the water and swim in the S passage.
When you see the hole in the floor swim down there and find the open door, swim
through the narrow passage to find Secret 1, a Bottle
of Wine. Return back all the way you came to the pool area. Get on the
lowest part of the hall and find a ladder leading down.
Mirror
Drop down onto the highest pillar of a room. Drop and run down all the way and
exit this room using the E passage. Climb over the block.
Wake Up
Jump to the central pillar and then to the E alcove. Climb over the block.
AG Transport
When you fall down in the next tasks you can climb up using the W ladder. Turn
left and jump as far as possible on the N slope (or jump on it that you slide
down backwards, shimmy right and climb up, then backflip), jump with a left
curve on the next slope, backflip with a mid-air turn on the following one,
jump on the last slope and finally with a left curve on the safe ledge. Pick up
the Bundle of Keys, run-jump on the W pillar
and then stand-jump down on the N entrance pillar. Exit this segment by climbing
over the block.
Return the way you came to the segment Stars (over Wake Up, Mirror, Pool).
Stars
Drop down. The holes in the floor are in general deadly, but not in the SW
corner. Drop down there and pick up Flares, then climb up E to find Secret 2,
a Bottle of Wine. Climb back up the blocks
and on the walkway, then head to the NE corner and climb up into the alcove,
then turn and jump on the first platform. Jump up NW into the alcove and climb
over the block.
Mafia
Slide down and kill two gangsters. Head W.
Between the boxes you can find 9mm Ammo.
Climb the E ledge and on top immediately drop back down as a boulder comes
down. Back up the ledge push the switch to release three ropes in this room.
Get up to the E alcove and turn around. Run-jump to the first rope and grab it.
Turn right and slide down the rope to the bottom. Climb up twice, then press
the Swing button withholding it, let Lara swing to the far point where she
would swing back, now you should be able to jump to the middle rope. Turn SW on
it and swing to the crevice in the wall, then jump and grab it.
Shimmy left and climb up, dropping in a dark area. Find a crawlspace to your
right and claim Secret 3, the next Bottle of
Wine, then return. Climb the block to get into a new room, pick up
Flares. If you want you can climb down the ladder and find Shotgun Ammo in a passage in the NW corner of this
room, then climb back up. Now you have to slide down the slope at the leftmost
point, curve jump left and grab the rope (the box can be both help- and harmful
at this point). Backflip onto the left hand block and turn SW, run-jump on the
slope with a mid-air turn, then jump and grab the ledge. Climb up. Jump over
the blade at the rightmost point, you will land in a gap, climb out and follow
the passage. Pushing a button triggers a cutscene where you can see a timed
door opening and closing again. When you have control over Lara push the button
again, sprint through the corridor, jump on the left hand pillar and curve
left, run-jump to the ledge with the door and sprint through. Slide down a
little bit.
Pool
Pick up the important Crowbar, then jump on
the E block. Climb up N, then over the block.
Return the way to Mafia (over Stars).
Mafia
Slide down again and head to the NE corner. Pull a lever to open the central
trapdoor. Drop down the ladder.
Poison
Immediately get up the stairs to escape the poison in this room. However, you
have to get back down. Jump down the stairs and drop down N, then directly head
to the N of the two floor levers, use it and sprint NE up some stairs and into
a safe alcove. Pick up a Little Medikit.
Turn around. Now you have more time to explore this room. Sprint downstais
again and to the far SW corner where some blue barrels stand, go to the SW one
and grab the Blue Key from it, backflip with
a mid-air turn and sprint back to the safe alcove. Now sprint down a last time,
use the S floor lever to open the trapdoor W, jump to the ladder and drop down.
Fog 3
Drop on a slope, slide a bit and backflip with a mid-air turn and a grab to get
up a ledge. Behind the window you can see an item. Drop down to the floor and
find a hole in the SE corner. Crawl in the passage and soon you can stand up.
Fog 2
Ignore the ceiling hole for now but move on and crawl further. At the passage’s
end you can find a Heart of a Damned and a text message shows up.
“Some Kind of Voodoo…”
Crawl back out of this room, then climb up left through the ceiling hole and
reach an area quite identical to the first room. Shoot a rat and climb up the block, you don’t have to move it,
jump up to the S ladder and climb up. Get through the passage and climb over
the block.
Fog 1
The third Fog segment also looks quite like the other two. Drop to the floor,
kill a rat and head to the SE corner where you
can find the Yellow Key. Go to the middle of
the E wall, under the ladder, and jump to grab it. Climb up and get over the
block.
Bib
You arrive in a library. Drop to the floor and approach the fireplace. See a
flyby and another text message appears:
“Firewraith - Access
to water is needed.”
Left of the fireplace there is a lever - pull it to open the door in it. Don’t
get in though - you will die because of the flames. Climb the ladder on the S
side of the middle E pillar in this room and you arrive on top of a bridge.
Turn around and run-jump on the far side of the slope, then jump with a left
curve onto the top of the fireplace. Pick up the Shotgun
and turn N. Jump to the opposite ladder and shimmy right around three corners,
then climb up the ladder to the top. Backflip and get in the left of the three
passages, go around the right corner and find Shotgun
Ammo at the end. Get back to the junction with the ladder and jump over
to the N path.
Open the door using your crowbar, get down the broken stairway a bit and then
jump to the right alcove. Push the floor lever to vanish the fires in the
fireplace. Jump back to the stairs, grab the ladder and drop on the bridge.
Before entering the fireplace jump up the E slope and get over the block. Use the
Bundle of Keys to open the next door, then get back to the library. Drop down
to the floor and head to the fireplace. When stepping in you will be attacked
by the fire wraith so you have to be quick.
Climb back up the E ladder to the bridge, then enter the corridor and climb
over the block, now heading through the opened door.
AG
Drop down in the room and head to the SE pool, drop in it and wait until the
wraith vanishes. Don’t stay to long in this pool though, as the electricity
will soon be deadly. Climb out and pick up the Large
Medikit from an invisible pedestal under the water pillar, then climb up
the W ladder and then over the block.
Bib
Return into the fireplace. Use the lever to open a door somewhere, then take
one of the Torches (cutscene of the lighted
bin in the Pool section where you have to ignite it), then head to the SE
corner of this room and open another crowbar door. Grab up your Torch again and
head through the passage, up the ramp. You’ll get to the unofficial 28th cube:
the Trap Cube (idea by Soul). A pair of bumpers awaits you, there is no other
way than starting to sprint when they raise. Eventually you land on a slope,
jump as a deadly spike trap is at the end of the slope. Run up the ramp and
take some Flares with. The skeleton gives a
hint of the next area; it is - again - a poisonous one. First starting running
up the ramp without the Torch, on the left side of the top you can find a Little Medikit.
Jump back to the safe ground. Now grab the Torch, run or jump back up the ramp
and take running jumps across the ledges over the lava pit. Take the left when
the path divides and jump over a big pit with the Torch, stand-jump further and
take a last stand-jump up into the alcove, run further and you have fresh air
again. Leave the Torch here, better not on the ramp as It might be invisible
then, and return to the poison area. Jump over the left pit, take a right and
find more Shotgun Ammo on a blue barrel.
Quickly return to the safe exit, take the Torch and run up the large ramp. Wait
a bit at the top before jumping on the first slope, some fires activate in the
rear part of the room, when they are activated wait 2-3 seconds, then jump on the
slope and a series of slope jumps follows, you should be able to safely jump to
the last ledge now without being hit by the fires. Run up another ramp and kill
a gangster at the top.
Find a crawlspace with a Little Medikit in a
left passage, then step on the SW sinking tile that raises a block behind you
for a limited time. Take the Torch and stand at the rightmost point of it,
backflip, you land on a slope, jump with a right curve on the next slope and
backflip on the timed block, then run-jump to the NW pillar. Turn around and
run-jump on the lowered part of the SE pillar, then run to the highest part and
jump on the bridge. Run up the little ramp, then position Lara as follows:
Start running with a little left curve, then, at the very last point before
hitting the wall, jump around the pillar, with a hard right curve, and
hopefully land at the opposite ledge. Jump up some blocks and get into a
passage. Climb the left hand passage with the big steps and at the very end
throw the Torch in the deep gap. Say goodbye for a time, then climb back down
and this time head left. Open the door with the Crowbar.
Music
Go to the NE corner of this room and push the button to hear:
“Accept - Midnight
Highway
covered by Japanese high school students band in 1982”
If you have enough,, you can push the SE button to turn the music off (thank
God). Go to the W part of this room and find a harp. Push and pull it to the
marked tile near the turn-off button SE. A trapdoor in the centre of this room
opens. Don’t get in there yet, we have something to do yet in this room. Get up
the stairs, pass a slope and get up further, behind the piano you can push a
button to hear some classic music. Run to the top of the room, jumping over a
gap. There are two timed levers to find. The left hand lever opens the door
under the gap in the middle N wall, the right hand one the door under the gap
in the middle S wall. Pull the right lever, jump over the left gap and sprint
down the stairs, then run over the left part of the edge curving right and
press Action to land in the alcove. The door closes, but you can find the Torch
you have thrown from the top of the shaft down here. Pick it up, jump back to
the alcove and up the E hole. Run up the ramp, slide down the ramp and pull a
lever to open a nearby door. Don’t climb over the right block (leads back to
the music room) but head left.
Lava Cross
Drop and take a one-step running jump over to the sinking tile in the lava
(walk, then run) or run with a curve and jump to the tile. Either way jump to
the opposite W ledge.
Return to Pool (over Stars).
Pool
Drop down, then jump on the corner of the pillar with the bin. Light your Torch
here and see a cutscene of the place where you can light something with the
Torch. Climb back up and jump to the N alcove, then over the block.
Return to Wraith (over Stars, Lava Cross).
Wraith
Get on the bridge, then jump right (E) and get in the alcove. Climb over the
block.
Grave
Drop into the hall. Get to the S wall and light the pot to raise a N block.
Climb the SE blocks and get up to the grey one. Jump N over the blocks and in
the corner turn left and jump up to the raising block. Turn left and jump up,
grab the ledge and climb up to the roof. Find the
Rose of a Damned in the grave and make your way down again.
Return to Mirror (over Wraith, Lava Cross, Stars, Pool).
Mirror
Jump to the ramp and run down. Use the Yellow Key NE to open the left hand
trapdoor. Jump down in the cellar and follow the passage, ignore the hole
(leads back to Fog 1). Notice a non-pushable white block in this room, and
remember its exact location in this room. Follow the SW passage in another room
with a big mirror. You can find a marked tile in the reflection. Now search for
an invisible block on the point where the white block in the previous room is
located. Push it onto the marked tile N to open a door high up in the first
part of the Mirror segment. By the way, the gap in this room is empty. Return
all the way to the trapdoor, climb up the ladder and backflip. Run up the ramp
to the top, find the open door and at the end of the following passage you can
find the Green Key. Return and get down to
the floor level. Head through the N passage and climb over the block.
Storage
There are three different levels in this segment - when coming from the Mirror
segment we are on the middle level.
Middle level: Find a keyhole in the SW corner and insert the Blue Key to open a
nearby door. Pull the block in the just revealed passage six times, then go
around it and find a ladder in the passage. Climb it and get in the crawlspace,
drop out of it at the end and push the block in the passage once. Return to the
last room using the crawlspace and the ladder, find a jumpswitch over the exit
and this opens a door in the N passage, climb the ladder there, backflip and
climb the next ladder and get into the narrow passage, crawl to the end to get Secret 4,
yet another Bottle of Wine, then crawl back
and climb down the ladders again, head out of the passage and get back to the
storage. Pull or push the box on the marked tile E, which is an inactive
raising block. Now climb either the ladder or the N ramp (for the latter, jump
to a ledge behind you).
Highest level: Go to the middle S wall and push the box twice on the raising
block. Search for a button on the last W row of blocks, push it to raise the
block with the box in this room. Find a Little
Medikit on a block NE. Drop down to the middle level and through the W
hole.
Lowest level: Kill a gangster and his dog, then search for a button SE. Push it to raise the
block with the box on it from the middle to the highest level. Now pull out the
NE box and this reveals a switch. Push it and another block on the highest
level raises. Push the box beside you on the W tile - another raising block -
and climb up to the middle level using the SE ladder.
Middle level: Push the switch on the ladder pillar to raise the block with the
box from the lowest to the middle level. Climb up to the higher level.
Highest level: Go E and pull the box from the raising block. Climb up SE using
the box and push the box from the raising block to the far SE corner, another
raising block. Get down to the lowest level.
Lowest level: Use the NE button to lower the raising block in the far SE corner
of the highest level, and the SE button to lower the block from the highest to
the middle level.
Middle level: Push the box from the SW to the NE corner, onto the lowered
raising block, then get down again.
Lowest level: Use the SE button to raise the box you just pulled on the raising
block in the middle level. Get up.
Highest level: Climb in the SE corner, drop in the gap and push the box onto the
marked tile. A beige block raises near the NW corner. Climb back up and get to
the N part of the room. The dark box right of the hole is movable too, so move
it W of the lower beige tile. By there there should be two other boxes on this
level, pull the first one on the beige tile, then pull the second on the wooden
tile on the other side of the gap, opposite the beige tile. The first brighter
block raises up, climb on the darker movable block and pull it on the wooden
block in the NW corner, climb on it and monkeyswing S to the alcove. Get the Star Crystal and get down to the middle level.
Exit this segment through the E passage and climb over the block.
Central
Jump to the NE slope, grab the ledge and again wait until the trapdoor raises,
climb up and curve jump left to the trapdoor, turn slightly right and backflip
onto the balcony. Head out N and climb over the block.
Trophy
Before going downstairs head up to the fire heads again and avoid them to get
into the SW corner. Use the Green Key to open a door somewhere else. Now get to
the lowest level of this segment to reach a cellar. Find some Flares in the SE corner. Find a pushable in the NW
corner, pull it out and use the switch. Two gangsters
appear so kill them. The switch has opened a door behind a NE crawlspace, so
get in and find the open door and in the passage behind Secret 5, surprise, another Bottle of Wine. Return to the last room and pull
out the NE box, near to where you found the Flares.
Behind it is a walkthrough wall, get through and find the door you opened with
the Green Key, leading you to the unofficial 29th cube: the Ventilation Shaft
Cube.
Get through the corridor and find a crossing. To your right (N), there is a
closed door, ahead (W) is a lever and a flame, and to the left (S) is another
corridor. First of all go left (S) and at a junction kill a dog and a gangster.
Ignore the box for now and go around either left or right, then pull or push
the box, get back and push the first box to get Shotgun
Ammo. Return to the crossing and go left (W) now. When approaching the
fire it wanders in the far gap, preventing to pick up the Lasersight. Pull the
lever that opens the N door at the crossing, return there and head through.
Avoid the fires, time the run over the spike trap and avoid another fire. Get
up the ramp and get to another junction - there are two right passages. The
first one only leads to a ramp you can jump up, you can jump on a bridge and to
a jumpswitch, use it, climb up again and get through the open door to the
Obelisk segment, but this doesn’t help you now.
Take the second passage instead (the one far N) and jump over the fire gap, run
up the ramp, eventually you will trigger a spike ball. Turn and either sprint
down the whole ramp or jump to a safe ladder that serves for something else:
Climb to the top, then around two corners and find a jumpswitch.. Drop down,
return all the way to the crossing and go right. Jump in the now safe pit and
get the Lasersight. Now return again and get
up to the ramp’s top. There is a closed door that has to be opened now so head
around the corner and find a jumpswitch on the wall. Run-jump and grab it.
Activating it opens the door, head up and find the Red
Key, guarded by a timed fire, so wait till the fire goes out and then
quickly grab it and jump back. Find a high jumpswitch to your left, use it to
open the door in the last E passage. Get through the corridor and arrive at a
ramp leading down, but slide down when the bumper behind the ramp is going
down, then jump from the very last point of the ramp to survive this trap. The
next trap is easier through - simply sprint through the two right bumpers when
they go up. A dog at the end of the passages
tells you to draw your weapons - when approaching not only he, but also his two dog friends appear.
Kill them all and climb through the SW crawlspace.
Music
The area around the piano is spiked now so you have to drop to the lowest
floor. If you haven’t done already push the W harp on the SE tile and drop down
the ladder in the central (placing the harp opens the trapdoor).
Walls
You land on a slope, soon you will drop on a short second slope, on its end you
have to curve jump a little right to grab a jumpswitch. Drop to the floor. The
jumpswitch released a rope in this room, but this only helps to place an item
we don’t have yet. So keep that in mind for later and run around the central
pillar until you find a ladder N of the structure. Don’t drop down yet, but
first climb the N blocks and get in the passage, open the door with the Bundle
of Keys (for later). Now you can go back and climb down the ladder.
Obelisk
Drop on a slope, grab the edge and drop on a pillar (if you drop down during
the next actions, just climb the ladder ahead and backflip on this pillar).
Turn SE and run-jump on the ledge, then jump on the W slope to get carried in a
passage. Climb over the block and use the Bundle of Keys to open the red door.
AG
You arrive in the segment where you vanished the firewraith. Dive in the SE
pool again and find a lever on a SW pillar that raises two blocks in AG
Control, use it and climb back out quickly because of the poisonous water. Jump
into the water pillar to get transported up.
AG Control
There are two jumplevers NE and SW to open the two exit doors W and N. Go in
the SE corner, if you want to return to AG jump down in the shaft surrounded by
fences. But if not, climb up the left hand blocks and climb the ladder, turn
around and jump to the SE slope with a right curve so that you slide forwards,
then curve jump left with a grab (to not get blocked by the pillar) and you
land on a balcony. Jump up the W block and to the NW corner block. Shoot the
box and pry the Electrictric (power cables)
off the wall and drop back down. Climb up the W raising block, get in the
passage, climb up the left hand ladder, slide down and enter the right passage.
Climb on the block.
Music
Slide down and run upstairs to the two timed levers. Use the left one and jump
over the right gap, sprint down and run over the right part of the edge with a
left curve and pressing Action to land in the left alcove. Climb over the
block.
Grave
Drop down and go to the S pillar in this hall and insert the Bundle of Keys to
open the central trapdoor. Drop down the ladder.
UW Control
From the ledge you are standing on jump SW to the platform. This activates some
timed platforms, so immediately roll, run-jump to the E platform, stand-jump
slightly left, then run-jump N, stand-jump NW and run-jump to the NW, where you
can place the Electrictric to open an underwater door. Run down the stairs to
the bottom and find the Harpoon on a SW
pedestal. A wraith appears - jump in the pool in
the central part of this room.
UW 1
Two crocodiles appear, and the wraith is still
chasing you. You don’t have enough ammo for the Harpoon to kill them yet, so
just avoid them at first. In the NE corner you can find Harpoons on a high block. Swim through the W passage.
UW 2
Swim through the broken floor in the rear part of this pool, then into the NE
corner where the wraith will extinguish at the cross. Pick up some Harpoon Ammo on a nearby box and some more on a box on the opposite wall. Swim up
and find Harpoons N and SW, then swim up a
shaft in the middle of the room to get some air. Kill the two crocodiles - one
of them can still be in the last underwater room.
UW 1
Swim back there and kill it, then take some air and swim in the NW corner to
find the open door, pick up a Large Medikit on
the floor left of the door. Swim though and activate the timed switch to see a
cutscene of the door that closes very soon. So - use the lever again (maybe
take some air before), swim back to the W underwater room…
UW 2
…and to the W timed door before it closes. It might be that you get stuck in
the door, but thankfully it normally opens again then. Pick up the Walls Crystal that you might have seen from the
other side, and head back to the last underwater room, swim through the E
passage.
Return to UW Control (over UW 1).
UW Control
Climb out of the water and run up the stairway. For a secret don’t exit yet,
but run up the stairs SW, then run-jump back to the platform that activates the
timed run. Do it again over all the platforms, but at the end don’t jump to the
alcove with the cables, but to a left alcove. Turn and spot a high jumpswitch
here, jump up and use it. Drop down (it’s possible to jump directly in the
pool) and swim down.
Return to UW 2 (over UW 1).
UW 2
Find a open door NW and swim through the narrow passage to find Secret 6,
the next Bottle of Wine.
Return to UW Control and climb out of the pool.
UW Control
Exit through the SE passage, run up more stairs and find an open door (if you
have opened it from the other side with the bundle), otherwise you have to
travel a bit and jump back to the ladder to Grave. Climb over the block.
Walls
From the pillar you stand on jump SE to the slope, then to the E structure.
Climb it to the top using the slope as a boost, turn and jump to the rope.
Swing NW to the pillar with the receptacle and place the Walls Crystal to raise
one block (of three) in the Fog segments. Climb down, and up the NW blocks,
then exit through the W passage back to Central.
Return to Wake Up (over Central).
Wake Up
Remember the block from the very beginning? Jump to the central pillar, then
pull it to the SE corner and climb on it. There are two gratings SE and SW,
shoot them. If you need some health push the block SW then jump to the ladder
and get in the crawlspace to get a Little Medikit,
then get back out and push the block back SE. Jump to the SE ladder (from the
block) with a little left curve, get up, shimmy right around the corner and
climb into the crawlspace. Find Flares and
get out of the crawlspace soon, drop down and head through the open door, climb
the right block, turn and jump to activate the jumpswitch.
A trapdoor can be heard somewhere, so climb back up the first step, turn and
jump to the block left of the closed door and then turn again and jump to the
exit, get in the crawlspace and take a left. Drop in the hole at the end and
duck to get in another crawlspace, drop out at the end and find the third
crawlspace opposite the last, get in and push the button to open the door in
the previous room. Get back out via the crawlspace, take a right and drop in
the bathroom where you found the Note at the very beginning. Get out and climb
back up the central pillar where you started this level, then up the block and
re-jump in the SE corner, grab the ladder, get in the crawlspace and drop out
left again, get down the blocks and head through the open door to find the Obelisk Crystal. Climb back up W using the blocks,
get in the crawlspace passage and drop out right. Get in the N passage and
climb over the block.
Return to Obelisk (over Central, Walls).
Obelisk
Drop on the slope, grab the edge and drop on the pillar. Turn SW and jump on
the middle of the slope behind the ledge, then curve jump left and bounce back
and forth, always curving left, and at the end you have to curve jump onto the
high SW block. Climb up W, then turn around (E) and jump on the slope, only
wait a moment, then jump and grab the monkeyswing and get to the end, place the
Obelisk Crystal to raise another one of the three raising blocks in the Fog
segments and slide down the N slopes.
Return to Stars (over AG, AG Control, you have to get through the passage
between AG Control and Music, Lava Cross).
Stars
Jump on the left hand (SW) platform, to the SW alcove, then on the NW platform.
Stand-jump NW, then turn E and jump to the highest block. Again turn and jump
to the SE platform, climb up and insert the Stars Crystal to raise another one
of the three raising blocks in the Fog segments. Return to the W passage way
down and climb over the block.
Lava Cross
Jump to the central sinking tile and curve right, then jump to the S ledge,
turn left and jump to the SE block. Turn N and jump to the platform, thereon to
the NW block and to the NW corner block. Turn around and jump to the block on
the rear part of the central structure. Turn SW and jump to the next corner
block, grab the left crevice and shimmy around the corner until you can stand
up. Get 9mm Ammo in the right passage, a
hint what to do next. Combine the Walther 9mm and the Lasersight (also possible
with the Harpoon though) and crawl through the narrow passage.
House
Take out the combined weapon and press Look to be able to aim manually. Shoot
at the top of the red canisters to let the right one of
the two sentry guns explode. Get back through the crawlspace.
Lava Cross
Get back down the way you came and exit through the E passage, climb over the
block.
Return to AG Control (over Music using the right of the two timed levers).
AG Control
Climb up the W ladder and climb over the block.
House
Take out the combined weapon again and switch to manual aiming mode by pressing
Look, then shoot the red canister of the second sentry
gun to let it explode. Jump to the left ledge above the house entrance
to get Shotgun Ammo, then shimmy to the
other side of the roof to get 9mm Ammo. Pull
the lever. Until now three skeletons should have
appeared, so carefully drop down and lure the skeletons to the middle gap, then
shoot them into it. Get Shotgun Ammo NW,
then open the S door with the Red Key. Inside the house kill three gangsters on the lower stage and a demigod on the higher stage (with a harder weapon like
Shotgun or Walther 9mm).
The demigod can be shot best on top so climb the NW ladder and kill it. Be sure
to have health resources with you, on top you can find another Little Medikit though. Get down and place the
Heart of a Damned on the E side, the Rose of a Damned on the W side of the
block. Climb back up to the top and climb into the opened picture door W. Get
in the right of the two passages and without sliding jump in the left alcove
(try doing this with starting to jump right and doing a hard left curve) to get
Secret 7,
the last Bottle of Wine. If Lara still is
able to stand despite all that wine, drop downstairs and find another slope NW,
slide down and jump to the vertical pole at the end and slide down a bit, then
backflip into an alcove. Slide down the next slope backwards, grab the edge at
the end and drop, then immediately grab again and crawl in the passage. Slide
down after crawling.
Fog 1
You land in the SW corner of the Fog segments. If you have placed all three
crystals, you now can jump over the N platforms. Jump over the first platform
and then in the N alcove…
Fog 2
… then over the second platform and then into the next N alcove…
Fog 3
… and finally over the third platform and in the last N alcove. Get through the
passage and a last text message with good news appears:
“Daylight - I have
found an exit.”
And indeed - when you approach the ladder in the next room you have made it!
THE END
Appendices:
Appendix A: How to get around in the Lava segment (never had to go
there though) - this works only clockwise:
Drop down the ladder at the rightmost part onto the sinking tile, sideflip
right on the slope, after sliding and landing on the second sinking tile
backflip with a midair turn and a right curve on the next slope, from here
backflip on the next sinking tile and run and jump up the ladder.
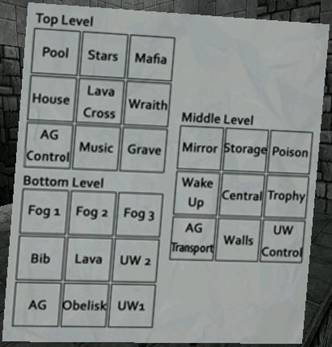
Appendix B: Segment What's What
|
Segment |
What you need to do … |
To… |
|
AG |
Water Pool - |
Vanish fire wraith Raise blocks in AG Control |
|
AG Control |
- Crowbar |
Open paths to House and Music / Lava Cross Electrictric |
|
AG Transport |
Lever in Pool segment |
Bundle of Keys |
|
Bib |
Crowbar; level in fireplace |
Open path to trap corridors and get Torch |
|
Central |
- |
- |
|
Fog 1 |
- Raised block |
Yellow Key Way to finish |
|
Fog 2 |
- Raised block |
Heart of a Damned Way to finish |
|
Fog 3 |
Raised block |
Way to finish; Finish |
|
Grave |
Bundle of Keys Lighted Torch |
Open trapdoor to UW Control Rose of a Damned |
|
House |
Walther 9mm / Harpoon; Lasersight Shotgun Heavy weapons Heart of a Damned; Rose of a Damned |
Shoot sentry guns Shoot skeletons in hole Survive final battle Open door; Secret |
|
Lava |
- |
- |
|
Lava Cross |
Walther 9mm / Harpoon; Lasersight |
Find a way to shoot the sentryguns in House |
|
Mafia |
- Lever |
Open path to Pool Open trapdoor to Poison |
|
Mirror |
Yellow Key |
Green Key |
|
Music |
Place harp Levers on top |
Open path to jumplever in Walls segment Open temporary to Grave, AG Control; get Torch again |
|
Obelisk |
Bundle of Keys Obelisk |
Open path to AG Raise block in Fog segments |
|
Poison |
- |
Blue Key; Path to Fog 3 |
|
Pool |
Ice Wraiths Open path from Mafia |
Freeze pool Crowbar |
|
Stars |
- Stars |
Secret Raise block in Fog segments |
|
Storage |
Blue Key |
Stars |
|
Trophy |
- Green Key Bundle of Keys Bundle |
Secret Path to ventilation shaft; Red Key; Lasersight; Path to Obelisk Open path to UW Control |
|
UW 1 |
Electrictric in UW Control Open door |
Open door Open door in UW 2 |
|
UW 2 |
Open door (from UW 1) Jumpswitch (from UW control) |
Walls Secret |
|
UW Control |
- Electrictric |
Harpoon, Secret in UW 2 Door in UW 1 |
|
Wake Up |
- Walther 9mm / Harpoon; Lasersight |
Start; Map; Note Obelisk |
|
Walls |
Bundle of Keys Walls |
Path to UW Control Raise block in Fog segments |
|
Wraith |
Trigger ice wraiths |
Freeze pool in Pool segment |