CRYSTAL
OF LIFE
Levels by Sabatu (Vaclav Socha)
Walkthrough by
various authors identified at the beginning of each level (or group of levels)
EGYPT
LEVELS
Walkthroughs by
Phil Lambeth
Level
1: TEMPLE IN SAKKARA
Begin standing on a
ledge in front of a pool. Jump into the water and swim forward through
the opening. Loop around to the right and locate an underwater
lever. Pull it to open a door near the opposite corner of this
room. Go back for air if necessary and swim through the opened
doorway.
Follow the passage
into a new outdoor area. Pull out to your right, climb up onto the higher
block and jump up and down while firing your pistols to kill the tiger. Before moving forward, jump into the
water to the right of where you pulled up. You'll hear the chimes of SECRET #1. Swim down for the shotgun ammo and pull back out at the same place
you did earlier. Jump forward into the area where the tiger's body lays.
You can see a small
pool down below, but first go behind the pillars for SECRET #2. Pick up the small
medipack and slide down into the
water. Find the shotgun ammo on
the jackal tile and swim through the passage into the next section. Turn
left and locate the small medipack
on the ledge. Swim through the opening to which that ledge is pointing
and emerge in an outdoor area. Swim diagonally to your right toward the
rocks and climb out at a flat area.
Don't drop down
into the trench, as there are spikes below. Jump to the ledge that spans
the trench and hop down the other side where there are no spikes. Turn
around and walk carefully through the spike field, pausing for shotgun ammo and the SHOTGUN.
Pull down the wall switch to open a door in the previous area. Sidestep
right or left and jump up to grab the ledge. Pull out and take a running
jump forward to grab the ledge ahead. Pull up and run forward for a small medipack.
Turn left and run across the bridge to a sandy enclosed area. Hop onto
the Pharaoh tile and pick up the KEY.
Jump into the
water. Swim back through the passage and locate the opened door to your
right. Enter and swim to a hole in the back right corner for SECRET #3. Pick up the shotgun ammo
and uzi ammo, then locate and pull the underwater lever
in this room.
Locate a small medipack at the
other near corner, then go back out, get some air and swim across the room to
the opened door in the far wall (to the right of where you first
entered). Pull out into an ornate room guarded by a tiger. Hop up into an opening in the far
wall and jump down into a sandbox. Pull up to your right and hop over two
spike pits. At the third spike pit, hang drop to a safe area. Walk
across for SECRET #4 and pick up the uzi ammo. Be sure you jump up to grab the
ledge from which you dropped, as the other one is too
high for you to reach (except in the middle) and you'll fall back down to be
skewered.
Pull up onto a
higher ledge and go left into a barren room. In the far wall is a block
you can pull out. Do so, push it aside and pick up the large medipack in the
revealed alcove for SECRET #5.
Locate another moveable block in an adjacent wall. Move it to reveal a
wall switch. Pull it to open a door in the previous room. Return to
the ledge to find a third moveable block. Push it forward once or twice
to give yourself room to jump across to another ledge with the opened doorway.
Follow the fenced
passage to another wall switch. Pulling it opens an underwater
door. Return to the ledge, safety drop to the room where you killed the
tiger and jump into the water hole. Swim back to the large underwater
room and turn right to locate the opened doorway. Swim inside and get air
if necessary but don't pull out here yet. Instead, swim through the opening
to your right and follow the whitewalled passage into
a new area.
Swim left around
the central structure and locate a hole which gives you entry. Swim in
and down and pull the underwater lever. Exit, swim around to your right
and locate another opening in the side of the central structure. Go in
for SECRET #6 and a large medipack.
Swim up for air and pull out onto the central structure. There's a
moveable block in one of the corners. Move it to the other side of the
central structure so you can reach the two openings in the far wall.
Jump first to the
opening on the left. Hop over the pit to trigger a boulder, then simply
hop back and grab the edge (it helps to be in a corner) while the boulder drops
harmlessly into the pit. Pull up and run up the slope. Pull down
the wall switch and you hear the sound of a door opening. Get back to the
central structure and use the block to access the wall opening on the
right. Hop over the pit and use the same trick as before to evade the
boulder. Pull up, run up the ramp and exit through the opened door on
your right.
Follow the passage
and slide down into a large outdoor area that you explored underwater
earlier. Hop onto the ledges (without falling into the water, as you
can't climb back out here) and loop around to the right to locate a
keyhole. Insert the Key you're carrying and you'll hear a loud noise.
Now it's safe to
get back into the water. Do so and swim through the opening directly
underneath the ledge you jumped from. Swim across the pool and pull out
on the other side. Enter the opening and follow to a room with steep sand
dunes. Climb up the sand and enter the high opening. Follow the
passage and kill two tigers at the other
end. Continue to an opening and slide down the slope to end the level.
Level
2: SANCTUARY SERAPEUM
Slide
down two slopes and drop down through a hole. Land on another slope and
grab the edge to keep from falling into the water below. Pull up and back
flip to a ledge. Turn around and locate the wall switch. Pull it
down to open a nearby door. You can probably hear a tiger prancing about down below. Kill it from up here
if you like. Locate the opened doorway in a corner of this area and
follow the passage to a small room with a water hole.
Jump
in, swim down to the bottom and pick up the KEY.
Swim back up and pull out. Return to the ledge and drop down into the
water. Locate the underwater passage and follow it to a place where you
can pull out. Use your Key in the nearby keyhole to open the door to your
left. Locate the slope inside and allow Lara to slide all the way down to
a sandy area with water and a wall opening.
Hop
into the wall opening and jump down the other side to kill a tiger. Pull up onto the ledge for uzi ammo
and shotgun ammo. Jump into the water and pull the
underwater lever you'll find in a corner. Pull back out and return to the
previous room. Jump into the deeper water and swim into the
passage. Turn right at the end and go through the opened doorway to pull
another underwater lever. Go back to find that the previous room has
changed.
Don't
attempt to climb the steep sand dune. Instead, locate the nearby opening
and jump down into the water. Swim along the wide passage to find at the
end a block leading to a ladder and a nearby opening. Pull up into that
opening and run forward quickly into the opening to your left to avoid the
boulder. Pick up the shotgun
ammo and go back to the water. Use the block
to access the ladder and climb up to a sandy area.
Follow
the passage to an alcove off to your left, where you'll find a wall switch that
opens a nearby door. Go there and turn right to see the boulder poised up
ahead. Turn around and hop back until it's triggered, then run forward
and duck back into the connecting passage. When all is clear, go up where
the boulder came from and come out onto ledge overlooking some water.
Turn
right and jump into the opening. Follow over a grilled area to another
opening. Hop up and follow to a new area with more water. Wade in
and loop around to your right to find an opening. Swim down and follow to
an underwater cavern for SECRET
#1. Pick up the UZIS and the uzi ammo,
and note the grill overhead. Go back and swim to the opposite
corner. Pull out to face a series of block steps.
Climb
the blocks and continue around the upper ledge in a counterclockwise direction
(jumping over a spike pit along the way) until you reach an opening.
Follow up a ramp, but don't fall down ahead into the water. Turn right
and walk up to the highest point, then take a running jump across the water and
grab the pillar. Pull up for a small medipack, then drop down
into the water.
Swim
through the opening and turn right to find an underwater lever. Pull it
and follow this wall to your left until you come to the opened doorway.
Pause for the nearby small medipack, then
swim inside and quickly veer left to avoid the oncoming boulder (or simply swim
over it). Go where it came from and pull out. Look to your left for
the shotgun ammo, then pull up into an area
that overlooks a picturesque block building surrounded by water.
Before jumping over
to the building, turn around and climb the tall block. Continue climbing
a series of block steps (a boulder will be triggered along the way, but it
should bounce harmlessly over your head if you don't stand still after pulling
up) until you reach a wall switch. Pull it and get back down to the
ground. Take a running jump across the water to the building, run to the
far end and jump into the water there.
Swim down and find
the doorway undoubtedly opened when you pulled the wall switch. Enter the
building and pull up onto the facing ledges for shotgun
ammo and a large medipack.
Then pull up onto the third ledge and locate a wall switch. When you pull
it a cut scene shows another boulder rolling out from somewhere.
Exit the building
and swim back through the doorway in the far wall. Pull up the blocks as
you did earlier and jump across the water to the roof of the block
building. This time run to the far corner, get on the highest block and
jump up to grab a hole in the ceiling. Pull up into a higher area and get
ready to do battle with a pair of tigers.
Look for a high opening in the wall and pull up into it.
On the other side,
slide down the middle of the slope (to avoid a spike trap) and fall down a long
distance into some water. Swim toward an ornate pillar (after noting the
closed underwater door in a corner) and pull out to the right of it. Make
your way clockwise around the water with a series of jumps and grabs, until you
finally reach a wall switch to the left side of that ornate pillar. When
you pull it a door opens, but not the underwater one.
Turn left at the
switch and pull up. Follow the ledge around to some uzi ammo.
Safety drop from there to the sand and slide down into the water. Swim
across to the other side, pull out and shoot a tiger.
Locate the opened door from the cut scene in a corner and run up two
ramps. Emerge in a high open area guarded by a tiger. Run across to the other side for a small medipack while beautiful ethereal music
plays. Go up to that ornate wall and run along it to the other
side. Locate a hole near the corner and hop down for some shotgun ammo.
Go back to where
you found the medipack and look for a block where you
can climb up. Climb up the right side of a taller block and take a
running jump diagonally to your left. Vault up onto a high ledge against
the wall. There are a number of blocks arranged in a row up here.
Two of them have wall switches. The nearer one opens a door down
below. The next one opens that underwater door you saw earlier.
Get back down the
same way you got up here and locate the opened door near the corner of the
ornate wall. Go inside to find a small pool guarded by a tiger. Go to the sandy end for a small medipack.
There's a hole in the canal floor that leads to a larger body of water, but for
now exit this room via the doorway and jump into the water far below.
Locate the opened doorway in the corner and swim inside. Follow the
passage to a bright room where you can pull out.
Go around the ledge
to your left and push the block into the corner. Get around to the other
side and pull it back twice. You can now access the alcove
overhead. Get up there, hop down the other side and find a KEY on the corner block. Go back and jump
into the water below. Go back through the passage by which you arrived
and emerge in the large chamber. Turn left and follow the wall until you
can pull out left into the area with a dead tiger and many pillars.
Go through the
opened doorway in the back corner and go up the ramps until you reach the area
with the ornate wall. Enter via the opened door in the corner and follow
to the room with the small canal. Swim down through the hole in the floor
and follow to a place where you can pull out. Kill the waiting tiger and go behind the tall white pillar for a large medipack.
Take a running jump with a swan dive into the water on the other side from
where you pulled out. Your momentum will take you down to where another KEY lies on the lake bottom.
Surface, pull out
and kill another tiger. Jump from a
sandy ledge across the water to a flat rock in the corner. Turn left and
take a running jump and grab to a higher block. Pull up, turn right and
pull up still higher. Run forward for SECRET
#2 and grab the uzi ammo. Jump back into the water, pull out
onto the sandy area and go to the corner opposite from where you used the ledge
to jump across the water earlier. Pull up onto a block, vault up right
and climb two more blocks.
Take a running jump
forward and grab the tall pillar. Pull up and turn left to pull up still
higher. Vault up right and take a running jump over the sloping sand to
land on a flat ledge. Jump forward diagonally to your right and follow
the wall until you reach a steeper slope in the sand. If you step on it
you'll slide down to your doom. From the edge, take a standing jump to
the flat rock below. Turn left and jump to the flat rock against the
wall. Turn left and climb the two white blocks. Turn left and pull
up onto a higher ledge.
Follow to an
opening in the wall and jump across the gap. Follow the rock ledge to a
bridge. Go across and pull down the wall switch at the end. Turn
right and take a running jump to a block. Run forward and pull up right.
Pull up left two times to find yourself in an area you visited earlier.
Run past the dead tiger and jump into the water hole. Swim to the opening
in the floor of the canal and pull out. Go outside to the ornate wall and
locate the opened doorway in the other corner.
Run down the ramp
into a small room. Pick up the shotgun
ammo, then use
your two keys to open the door. Pull up the cliff face, then locate a sloped opening. Slide down to complete
the level. According to the level stats I missed two of the four secrets.
Level
3: EGYPTIAN MASTABA CAVES
You're facing a
steep slope with spike traps down below. Turn around to see three poised
boulders. Pick up the shotgun ammo, then run near the
edge of the slope to trigger the boulders. You can easily jump to safety
by using either ledge. Then slide down the slope. Another boulder is
triggered to your left, but it's harmless. You come to a stop on a flat
surface at the fringe of the spikes. Side flip
over them with no loss of health.
Climb the pillar to
your right for shotgun ammo and a rather obvious SECRET
#1. Get down and run across the bridge while you gain an
appreciation for the vastness of this room. Jump off the right side into
the water far below. There's a small opening in the corner leading to
another area, but for now swim in the opposite direction and locate the
underwater entrance into the central structure. There's another opening
just above the water line, but that's for later. Get some air, then swim
inside and locate the underwater lever in a far corner. Pull it and swim
back out.
Turn right at the
entrance and go around one corner. Pull out facing another structure on
dry land. Run around it to the right and flush out a tiger. Run toward the direction it came from
and pick up a small medipack
near the wall. On the way back hop up onto a block near the wall and pick
up some shotgun ammo. Return to the water's edge and take a
running jump toward the small medipack
in the central structure for SECRET #2.
Venture further inside for some shotgun ammo.
Jump into the water
(opposite from where you killed the tiger) and locate that passage you noted
earlier. Swim through the passage into a new area. Go under a
couple of bridge abutments and locate the shotgun
ammo near the far corner. Swim back and surface on the
abutment that juts out of the water. Step forward and climb up onto the
block, then onto a higher ledge. Go around to the right and locate the small medipack and the shotgun ammo in two of the alcoves.
Return to the ledge
where you pulled up, then enter the passage on the right. When you reach
the top of the stairs and approach the far wall you'll trigger a boulder, so
back flip to safety. Go back down the stairs a bit and jump up to grab
the crack in the wall. Shimmy left a long distance until you can pull up
into an alcove. Step forward and pull down the wall switch. There's
a similar crack in the opposite wall. Use it to access the alcove for SECRET #3 and some uzi ammo.
Safety drop to the
floor, exit to the ledge and enter the passage on the left. Go up the
golden stairs, jump over the gap and follow the passage until you hear the
approaching footsteps of two tigers.
In the next room climb up on the shorter pillar, then take a running jump and
grab to the taller pillar. Pull up and jump forward onto the ledge.
Go through the opening on your right to emerge on a high bridge. Run to
the other side and loop around to the left to find a wall switch. Pull it
down and slide down to your right into the water.
Swim around to the
other side of the structure and pull up on the sandy shore. Run forward
into the other structure and locate the opened hole in the ground. Hop
down and follow the passage. The branch to your left leads to a dead end,
so save your game here and slide down the slope. When you hit bottom a
spike wall comes toward you from the left, so dash through the opening before
you're skewered.
Your troubles
aren't over. The next room has spike walls on both sides. They're
not triggered until you actually enter, however, so take an angled running jump
to gain some precious real estate. But be sure to stop as soon as you
enter the next room, or you'll topple over the edge into a spike field.
Take a running jump and grab across the gap, pull up and follow the passage to
your left. The door ahead opens automatically, so vault up, squeeze past
the previously triggered boulder and climb the block steps to an upper area.
Step forward and
drop down through the hole to pick up a KEY.
Of course, when you do so a door opens to release three tigers. After peace has been
restored, go where they came from and pull out of the hole. Run toward
the water and loop around to the left into the other passage. Hop down
into the hole and push the block forward three times to reveal a passage to
your left. And a seeming dead end.
However, there's
another moveable block in there (opposite the false wall switch panel).
Pull it back twice to reveal a face tile. Go around to the first block
and pull it back twice. Now you can run over the face tile and loop
around to the right to find a revealed passage. Run to the other end and
drop down onto a ledge. Hop into the occupied alcove for SECRET #4 and pick up what appears to be shotgun ammo, flares
and a small medipack (you get them all with one grab).
Don't simply drop
down to the floor from here, or you'll fall through a phantom surface and start
sliding down a slope (sneaky). Jump from the alcove down to the floor and
pick up another KEY. Step into the
alcove and pull down the wall switch to lower three trap doors. Now you
can slide down that slope, which is fully visible. Before doing so,
however, turn around and note two poised boulders. Hang drop between them
and start sliding. Start jumping to your right as you slide, as there's a
spike field dead ahead.
After the first
spike field is cleared another one looms ahead, so jump to the left to avoid
it. When you hit the next slope another boulder is triggered to your
right, so run forward to the far left corner where you'll be safe when the
boulder hits beside you. Enter the crawl space and emerge in a ramped area. Run to the far right corner and pull up
into another crawl space. Climb the blocks until you reach a golden
passage. Continue climbing until you reach a wider ledge with an opening
down to your left. Turn around here and note the higher opening.
Jump there for SECRET #5 and uzi ammo and shotgun
ammo.
Hop back to the
ledge and down through the hole. Follow the passage to a face tile which
opens the door ahead. It closes again as soon as you pass it.
Continue to the block puzzle area and veer right to run over the face
tile. Pull out of the hole and run forward to jump into the water.
Swim around the structure to the left and enter the underwater passage.
In the next room get on the beam jutting out of the water and climb up to the
ledge as you did earlier.
Run into the
passage on your left, up the stairs and jump the gap. Continue until the
passage narrows. Climb up onto the block to your left, a running jump and
grab to the taller pillar ahead and finally a jump to the ledge. Go
through the opening and run to the other end of the bridge. Pull up left
onto the block and climb up still higher to get on the roof of the
bridge. Note the spike traps and turn around. Find the crack in the
cave wall and take a running jump and grab to it. Shimmy right until you
can drop down onto a sandy ledge.
Run past the
structure to the far wall as Lara's theme music plays. Find a block where
you can pull up, and continue to the bright corner wall. Turn around and
jump to grab the ledge. Pull up and continue along the bridge. Jump
to a block on the roof of the central structure and continue along the other
end of the bridge and around the wall until you reach a wall switch. Pull
it down for a cut scene that tells you absolutely nothing.
Turn around and
jump back to the bridge, then drop down to the roof of the structure. Slide
down to the sandy floor and enter the structure (the door is now open). A
tiger is waiting inside. Use your
two Keys to open the trap doors between the receptacles. Drop down to end
the level.
Level
4: ESET TOMB GODDESS
You're standing in
front of a slope, flanked by two boulders. Run forward to trigger the
boulders, which pose no threat. Turn around, hop back and grab the
edge. Release onto a slope. Slide down and grab the edge. You can
see a spike trap fall below. Pull up and back flip. Jump off with a right
or left curve to land on a face tile. Jump to the other face tile to open
a door up in the corner. Go there and jump into the water hole at the end
of the passage.
Swim forward
through the opening and follow the sloping passage to a large room. Go
around to the back of the central structure and locate an alcove. Swim
inside for SECRET #1 and pick up the shotgun ammo. Surface, turn around and
climb out onto a ledge. Pull up left onto the block and take a running
jump and grab to a higher ledge. Pull up and run around to the
left. Take an angled jump into the opening and immediately back flip to
evade the boulder. Jump back into the opening and ignore for the moment
the two openings on either side of this room. Drop down into the hole and
pick up a KEY.
Pull back out of
the hole and take the opening to the right of the entrance. There's
another hole at the end of the short passage. Hang drop onto a sloped
pillar and slide to the floor. Go around the near corner and locate an
alcove with a wall switch. Pull it down to open a nearby door. Go
across the room to alert a tiger.
Climb three blocks onto a higher ledge. Take a running jump and grab
across the gap to a facing ledge.
Pull up and find
the shotgun ammo in the far
corner. Climb the blocks in the other corner and enter an upper
room. Run around the hole in the floor and locate another KEY in the corner. Drop down through the
hole and find yourself in a familiar passage. Return to the connecting
room and get back onto the ledge over the water. Go around and take a
running jump and grab to the facing ledge. Pull up, jump to the next
ledge and carefully trigger the boulder as you step to the opening.
Enter the sandy
area and climb up to your right. Go out onto a bridge to trigger another
boulder. Jump diagonally left or right to evade it and pull up onto a
ledge. Use your two Keys to open the door. If you use the left
one first, the door opens before you get to the other receptacle, but use the
second Key anyway to be on the safe side. Use the sprint key to dash
into the next room, as multiple boulders are triggered. Drop down through
the hole in the floor and turn to face the near slope.
Jump over the slope
near the wall so you'll miss the spikes down below. You're rewarded with
the chimes of SECRET #2. Pick up
the shotgun ammo and pull back
out. Follow the slope to an opening on your right. Drop down into a
room with a wall switch in the far corner. Pull it down and climb out of
this room. Turn right and follow the passage around a loop and engage two
tigers. Continue forward and slide
down a long slope to land in an area with water and a central structure.
Jump into the water
and swim under the structure. Loop around to the left and locate an underwater
lever. Pull it and continue swimming to the far side of the pool.
Pull out onto a block in the right corner, facing an opened doorway. Go
in and pull up into a passage. Kill a tiger
and locate a wall switch in the next room. Pull it down to open an
underwater trap door in the structure. Go to the ledge in this room
facing the water and take a running jump down to a block in the right corner,
across from the structure. Pick up the large medipack and jump into the water. Pull out
onto the same block as before.
This time, run
behind the pillars to the far wall. Climb up onto the shorter pillar and
take successive jumps to the higher pillars. Finally, pull up onto a
ledge jutting out of the wall and step forward to pick up a KEY. Jump down into the water far below and
locate the open trap door underneath the structure. Pull up into a room
dominated by crocodile designs on the wall.
Pull up onto the
ornate block and pull up higher through the hole in the ceiling. Pull up
onto the block next to the hole, and from there onto a higher ledge.
You're now going to have to embark upon a painstaking journey around the
perimeter of this large area. Start by going away from what appears to be
a faraway wall switch.
When you reach a
wall, look to your right to see the poised boulder. It won't be triggered
until you're well down the ramp, so simply keep running as the camera angle
changes and jump over the gap. Continue around the corner and follow the
passage until you emerge outside once more. When you reach the gap, try a
running jump and grab from the right side. You'll likely miss, but no
harm done. Simply jump up to grab the ledge, pull up and continue.
Climb up a few
blocks, jump across another gap to the facing ledge, pull up and grab a small medipack.
Continue toward the ornate wall, jumping another small gap, and take an angled
running jump into the opening. What appeared from a distance as a wall
switch is actually a door, which is opened with your Key. Don't barge in,
however, or you'll be crushed by a boulder. Hop back into the opening, then run back out as the boulder rolls by.
In the next area pick up 2 x shotgun ammo,
a small medipack
and a large medipack. Continue toward the water. This is a very
lovely room, but there's apparently nothing to do here. Jump to the
nearest face tile and hop into the opening on the other side of the
water. If you take the opening to your right you'll go through a passage
and wind up on the upper tier of the water room. Again,
lovely but nothing to do - at this time.
So take the opening
to your left and emerge in an obviously booby-trapped room. The ceiling
tiles purportedly provide the clues to the safe path across, but the builder's
video took a completely counterintuitive path. The key lies in the strip
of tiles to the left of the far wall switch, as you face it. Most of the
floor ahead consists of a phantom surface with deadly spikes down below.
Sidestep one square left of the wall switch and take a running jump to the
first safe tile. A standing jump to the next safe tile and a running jump
to the wall switch alcove. Piece of cake.
Pull down the switch to raise the blocks in the water, and get back the same
way.
Return through the
passage to the hub room and continue across to the other passage. Climb
up to the upper tier and jump across the raised blocks toward the savegame crystal in the far room. As you approach it
the level ends.
GREECE
LEVELS
Walkthroughs by
manarch2
Level
5: TARTARUS
You'll start this
part of the game by sliding down a slope. Dive into the water pool and search
for a passage that leads away from the room. When you notice a closed door
ahead, swim in the right passage and eventually find an air hole. Climb up some
blocks, then (back in the starting room) use the lever to open the underwater
door. Return there, swim through the tunnel and the door closes behind you.
Swim right and spot an underwater lever ahead, use it and a door on the other
side of the central structure opens. Enter and swim for air, then climb out and
get up some blocks.
The marked tile
triggers a boulder behind you – quickly sprint through the corridor, then slide
down the slope and at the very last moment (break the camera using the
"look" button) jump to the opposite ledge. You get SECRET #1 – a Small
Medipack, a Large Medipack and Shotgun Ammo. Drop down from the ledge in the
deep water pool, light a flare and search the lower section for another
underwater lever in one of the corners, and a Small
Medipack on the ground and Shotgun Ammo on the first floor. The lever opens
an upper door, so swim in the open doorway and climb out. The door to the right
is yet closed, so head left and kill a tiger.
Pick up the GRENADE GUN and head further
to find a pushable block in a passage. Push and pull
it outside and onto the marked tile in the corner, this opens the door in the
other end of the hall. Head in and follow the passage until you can go right
onto another trigger tile, another boulder runs down so quickly head into
either the left or right opening.
Pick up a Small Medipack and Shotgun Ammo, then head up the ramp and use the
lever, which opens another door. Head out of the boulder passage, then head
right and spot the open door around the corner. Kill the next tiger, then go left, climb up the block, turn and
jump onto the roof. Use another lever, then get down again and safety-drop into
the pit. Follow the caves to the end, climb out and use the lever behind the
opened door to flood the previously passed caves.
Dive into the
water, then swim back in the last room and search the ceiling for a shaft you can
swim up. Climb out of the water, follow up the ramp and dodge a boulder, then
head up to a new room with a lot of spikes. First kill a tiger, then climb the block row to the left, then
jump on another block in the rear part of the room and pick up Uzi Ammo. Jump back on the safe floor and
push/pull the block onto the marked tile near the door. There is also Shotgun Ammo in the spikes near the marked tile
so be sure to pick it up before you leave through the open door.
When you get a
camera shot of a boulder rolling down, run-jump to the ledge ahead of you and
before climbing up wait until the boulder has passed. Now climb up and head up
the ramp and the blocks to arrive in a new area. Dive into the pool deep down,
climb out and kill two tigers. Back in
the water swim in the left underwater passage looking from the entrance, at the
end find a Small Medipack
in the room and further an underwater lever near a fence. Swim back all the way
to the main hall, get some air and swim into the opposite opening.
You'll arrive in
another larger room; the door ahead never opened for me, but there is a hole in
the ceiling when swimming left. Get up there and climb out of the water. Loop
around to the right and use the timed wall lever. Immediately backflip, then jump over the pillars to the other side and
use the timed lever which opens a door back near the pillars. So turn, jump the
pillars to the right platform and dash into the door. Head up the ramp and drop
into the pool at the end. Look for an underwater lever behind the far right
pillar, then climb out at the ramp and run to the top, then run-jump into the
doorway.
In the next room
use the floor lever and immediately duck to avoid being caught by the boulder,
then dive into the water. You'll get carried away by the current, at the end
swim up the shaft and climb out of the water. You don't need to pull that next
lever (it only closes the door beneath) so simply drop down to an already
visited place. Don't slide down the slope again but drop down the blocks and
dive into the water. Search for an open door and swim through. Climb out, use the lever and the level ends.
Level
6: PALACE OF HADES
The lever you used
in the previous level obviously has done its job since the door is open (but
it's also broken). Head through the passage and caves and eventually drop into
a pool. Swim further and search the ceiling for a shaft you can swim up. Get
out of the water and use the lever to open an underwater door. Drop back in the
pool, follow the caves and come to a temple entrance. Before entering through
the opened door pick up Uzi Ammo in the
far right corner, afterwards swim inside, follow the passage and at the
junction swim straight on for a Large Medipack, then turn and follow the other passage
to an underwater lever which opens the second door back at the temple entrance.
Return there and
follow the passage until you can climb out. Get up the block, kill a tiger and run up the ramp, when the boulder starts
rolling down turn and head away from the ramp. After the boulder has passed
head upstairs, follow the path until you can drop down a hole, and in the next
room beware of two more boulders. Pick up Shotgun
Ammo and Uzi Ammo where they
came from, then use the lever in the alcove to open a door back at the start of
the level. Retrace your path there and when you eventually have passed that
open corridor, you'll arrive in a large area. Pass that natural structure in
the middle of the room and jump to the backside of the block in the rear of the
room, climb up and jump to the top of that structure.
From here take a
run-jump to the platform, head right and pick up a Small
Medipack. Return to the place where you
run-jumped and head on straight to be able to run-jump onto the roof of the
building. Pick up another Small Medipack
and activate the lever. You can hear a door opening but the door to the
building shown in the camera stays closed. Drop down and search the area for a
passage leading away from it and a boulder at the end. When the boulder starts,
turn and head back to the previous area, dodging the boulder and killing two tigers.
Retrace your way up
the ramp and come to a large area with an underground river. Kill a tiger and follow the right path, jump over the
river and climb into an opening on the other side. In the next room climb the
block in the left corner, turn and run-jump to the block in the opposite
corner, then stand-jump up to the block where you can use the wall lever – this
one opens the door to the building you visited earlier. Drop down and head back
in the river area, then back to the building which is now open.
Kill two tigers and enter, pick up 2x Shotgun Ammo and a Small
Medipack, then push/pull the block onto
the marked tile. The river in the other area gets drained, so return there and
drop down into the empty riverbed, spot and enter a passage. Slide down several
slopes and come to another pool. Dive in and spot a Small
Medipack in the far right area, then climb
out of the water, climb the blocks, head to the right corner and jump over to
the middle platforms, then to the ledge with the lever. Using it opens the
underwater door, so dive in, enter and swim up the large shaft.
Climb out of the
water, search the area for Desert Eagle Ammo and Shotgun Ammo
to both sides of the key receptacles, then head up
either stairway behind the openings to get to the second stage. Head right and
get to the right side of the hill, climb the block and jump over the more even
parts of the slope so that you eventually reach the left opening. Head into the
next room, go around the spikes and use both levers – after activating the
right one duck to avoid the boulder. You actually don't have to use
the right lever, as it doesn't do anything, but it's fun to see if you can
avoid getting yourself squashed. I was able to do it somehow by standing
to one side of the switch rather than directly in front of it.
Afterwards climb
the block and then up to the second stage, pick up a KEY and use the lever. Drop down and head back in the previous
hall, drop down the pillar and head to the other side of the room. There are
two open doors; the left one has a Large Medipack and Desert
Eagle Ammo for SECRET #1
(the door was opened by one of the three levers); the right one leads you to a
larger room.
Head in and kill
four tigers that attack, head to the rear
part of the room and spot a passage in one of the large alcoves, in the end
kill another tiger and use the wall lever.
Back in the larger hall go around the right pillar to spot the open door, head
in and kill four tigers. Pick up the KEY in the alcove and head back all the way to
the hall where you climbed out of the water, on the lower level, and use the
two Keys to open the door. Head in to finish this level.
Level
7: OLD WATTERGRAVE
Before diving in
the pool, head in the corner with the block and spot a wall lever you can use.
Now jump into the water, follow the passage and climb out in the larger room.
Climb the block and turn to the slope construction on the near wall. Jump to
the platform in the middle, then backflip onto the
first slope, jump on the second and from here up to the top stage. Follow the
walkway and jump to climb the ladder that looks like a door. On top you can
find SECRET #1, a Large Medipack and 2x
Uzi Ammo.
Drop back to the
walkway, jump to the other one and drop into the opening in the corner. Use the
lever and run-jump on the walkway on the middle stage (you can also drop in the
water and use the blocks therefore) and head into the open door. Jump on the
marked tile, then immediately back to avoid a boulder. When it has dropped in
the hole jump over it and sprint through the passage,
triggering another boulder. Dash to the end of the passage
and head into the right passage to dodge the boulder, jump over the gap and
pick up Shotgun Ammo and a Small Medipack.
Back over the hole
run onto the ramp and directly back in either left or right passage to avoid
the last boulder, head into the next room afterwards (up the ramp), exit
through the right passage (this door opened with the very first lever in this
level) and avoid another boulder. In the passages in front of the pool room
search for a lever that opens the next door near the pool, get in, follow the
caves and at the end dive into the pool. Swim down through the hole in the
floor into a large underwater cavern.
Swim down to the
floor and to the temple entrance. To its left, you can find Uzi Ammo, but also to the right, which actually
counts as SECRET #2. Don't swim into
the temple yet, but to the other side and search for a small hole in the
ceiling underneath the left rocks sticking out of the wall. Use the underwater
lever and get out; the lever has opened a door in the upper part of the cavern,
so swim there, enter the door and climb out at the end of the passage. Pick up
a Small Medipack, then exit this room and arrive
in a room with many spikes.
Kill a tiger, then climb up to
the walkway behind you. Jump over the walkways to the other side, then to the
crevice in the wall, shimmy right and climb up to use the wall lever. Drop down
and walk back through the spikes, head back and dive back in the water, to the
cavern, and swim down again. Still don't enter the temple but the natural
tunnel. Climb out at the end and follow the tunnel to another building with the
door that opened with the last lever, at the end of the ramp save and dive into
the water.
Try to keep as far
to the left wall as possible while navigating around the left spike wall, but
you'll most likely lose a bit of health. When you eventually made it you can
use the underwater lever behind the spikes, the current is deactivated and the
previous rooms are flooded as well. Return to the entrance to this building,
swim up and climb in the alcove to find the first KEY
(of three). On the other side you can find 2x
Shotgun Ammo and a Small Medipack – afterwards dive into the water and
return to the main cavern.
Now, finally, swim
into the temple and climb out of the water on the large platform; enter the
tunnel that leads you into a very large cavern. Dive into the water and
underneath the central structure, you can climb out of
the water here and on the near left pillar you can find the second KEY. Dive in the water and looking from the
entrance, you can use an underwater lever to open a door somewhere else in the
far left corner of the area. Dive down to some ruins and spot the third KEY.
Swim further in the
underwater cavern and through the door you just opened, climb out of the water
above the entrance to find SECRET #3, a
Small Medipack.
Jump to the other side and use all three Keys to open the door (although the
door opens after you use the first key and step into the alcoves facing the
other two receptacles), drop down in the shaft and slide into the hole to
finish this level.
Level
8: AFRODITA'S GARDEN
After dropping into
a water pond, swim to the bottom and follow the tunnel into a larger outside
area. There's an underwater lever to your left behind a fence you have to reach
– so first pass this area and come into an even larger area. Swim right around
the corner and spot an underwater lever; in this area you can also find Uzi Ammo on a pillar.
Follow the passage
on the wall opposite of the one with two tunnels leading to a closed door;
after some swimming you can use that underwater switch you saw at the start.
This opens the door behind the two passages back in the previous area, swim
back all the way there and enter. Take the stairway to the right,
grab the crack and shimmy-pull up for SECRET #1
- Uzi Ammo and a Large Medipack. Drop,
climb the staircase further into the room on the walkway, where you can find Shotgun Ammo and Uzi
Ammo in one corner and a wall lever near another corner which opens
a door down in this room.
Dive in the water
and swim into the opened passage. Climb out of the water in the next room, use
the lever and jump back in the water, through the next open door, and climb out
again. Follow the larger corridor in the next room, find Uzi Ammo
in a left passage and then follow the right passage. Push the block once, use
the wall lever. I don't know if pushing it all the way against the marked wall
tile near where you climbed out of the water did anything, but I did it anyway.
Head through the now open door into a larger courtyard.
Kill two tigers and search for a lever on the small block
row where the path turns right which opens a very high door for later. Find Uzi Ammo at the passage's end, then climb the
block and jump up to the higher stage. Use the lever to open the door on the
floor level, drop down and enter, kill a tiger
and get upstairs. First go left to find Uzi Ammo,
then in the other direction and around the right corner to use a lever.
Turn and climb up
where the ledge lowers a bit; head into the opened door and the second door
opens for you. Sprint to the end of the passage with the spike wall on your heels, pick up the KEY
and the door opens. Head out to fully avoid the spike wall. Follow the walkway
(again, I don't know if running on the marked pad does anything, but better do
it) and drop down to the open door. Go right and drop in the pit, use the
lever, step back and jump up before the boulder catches you.
Sprint in the open
door, avoiding another boulder, then down the ramp and run into the right
passage to avoid the third and last boulder. Hop back for a Small Medipack, then
follow the passage and pick up a KEY in
a left alcove (the exit door opens). Head out, kill a tiger and climb back up to the first stage. Use
the two Keys to open the door, follow the passage in another courtyard and
shoot the next tiger.
Loop around the
right corner and pick up 2x Shotgun Ammo,
climb the blocks, turn and jump to the walkway above the entrance. Run onto the
marked tile, this opens the door on floor level for a short time, so drop down
and sprint into it. Climb up the block, run upstairs, turn around and jump to
the ledge for Desert Eagle Ammo and 2x Harpoons. Back on the stairs head up and on
top of the previous courtyard, head to the end and use the crevice to get to
the wall lever behind the block. Use it, drop down into the yard and climb back
up the blocks, this time head into the open door and dive into the pool.
Swim through the
exit and into a passage with dolphin textures, climb out of the water and find
yourself in a large hall. Kill two tigers,
then search the left of the two passages surrounding
the building with the fence for a Large Medipack. Head around the pool, use the blocks
to climb up to the walkways and jump to the other side for a Small Medipack. Back on the floor search the
opposite wall for an opening, you'll reach a high room.
Look down and spot
a platform sticking out of the wall, drop down and use the lever. Climb up and
this time make your way to the other end of this walkway, making run-jumps over
the slopes. At the end of the walkway head into the passage leading back in the
previous room, but before dropping down pick up the Large
Medipack for SECRET
#2 in the left alcove. Drop down and head to the other end of the
area (looking from the pool), to the right side, climb the blocks to the top
and jump up the left slope.
Drop in the gap to
the left and use the floor lever, drop down to floor level and run down the
ramp in front of the structure you just climbed. Kill a tiger, head into the open door right and push/pull
the block onto the other marked tile. This opens the door opposite to the room
you just entered, follow the passage and if you used the lever in the large
room the door here is open, use the lever to open another door back in the
previous larger area, head back there, pass the pool to the right and enter the
door at the end of the right passage.
In the building
pick up the KEY on the elevated tile in
front of the fence, return to the other end of the room, climb back up the
right blocks and jump up the slope. Use the Key in the receptacle and the large
pit where you used a lever on a platform over it gets flooded. Return all the
way there, dive in the water; I found nothing in the pit, so simply swim to the
other end of the pit and through the doorway, then climb out of the water.
Run onto the tile
with the second CRYSTAL (also restores
your health) and the right door opens. Head through and jump over the first
pair of boulders, but don't run further (that would trigger them). The boulders
to your left roll away, so drop down left, head carefully through the slopes
and head into the next room. Sprint down the ramp, being followed by many
boulders, and stay left at the end so that you can reach the safe slope that
carries you down to the end of this part of the game.
The default option
after completing this level is to go on to the Atlantic-Titanic levels.
However, you have the ability by using the arrow keys to select other
areas. Therefore, it is strongly recommended that you next play the Tibet
levels as documented below. After you've played all the Tibet levels,
your only option appears to be to proceed to the Atlantic-Titanic levels,
raising the likelihood that you would have to play them twice if you elected
the default option here.
TIBET LEVELS
Walkthroughs by snork
Level 9: OLD PENAL COLONY
Into the water and a long dive through the cave until
the end. When you see a submerged rusty structure, to the right of it in the
ceiling is the exit from this flooded cave. Facing the water,
look up to your left for a crawlspace. Pull up inside for SECRET #1 and grab the pickup (not sure if this secret really exists).
Before going on with the level, there is a secret to get: from shallow water,
jump up and grab the edge of the rock formation on the right, shimmy all the
way to the right, pull up and collect SECRET #2:
a big medipack.
A Canyon
Back to the main course - follow the path until you exit onto a small
platform above a canyon. Enjoy the view, but ultimately jump into the water. To
the left is a small tunnel through which you can get onto dry land again. On
re-entering the canyon, look to the right and down, on a shadowy ledge you can
see SECRET #3: Uzi ammo and a small medipack. On to the next tunnel, be prepared to
meet a giant snowball. Walk through the spikes and the door will open on
approach.
Into the water, through a tunnel and emerge in a basin with rusty
structures. Make your way to the top, go on and find yourself back at the
canyon. Climb the snowy blocks to the left, and on to a room with a closed
door, and a neighbouring room with some boxes and a
way to the right leading to a submerged lower room. Pull out and move away the
middle box to find another closed door. Get into the flooded lower rooms and
pull the UW-lever to open the door you found behind the boxes.
In the other part of the flooded room you can find a pack of Desert Eagle ammo on a box in a far corner -
better not try to gasp for air under that grating, Lara cannot breathe there
but may get stuck. Back out of the water, and through the newly opened door.
From the box in the far left corner, jump to the alcove on the far right side
to pull the switch there. Now pull either the rightmost box or the box you just
jumped from so that you can use it to jump back out of this room. You'll find
that the very first door is now open.
Caves
In through the cave tunnel, and when you reach the edge to a bigger
cave, hop onto the elevated rocks on the right side, from there a diagonal
standing jump will bring you on top of a rusty column, one side of which is
equipped with a ladder.
Notice the key on a high column to your right and some goodies on a
lower snowy block to the left of the cave. Climb down the ladder to meet a
Tibetan tiger. Find the closed door and
jump up to grab the edge above the entrance to the closed door. To the left is
a switch opening that door and releasing a tiger.
To the right is a ladder, climb up and from the top run and jump to the high
column. Pick up Solomon's Key. Go on to
collect those other goodies you saw. You
can play this safe: slide down backwards the last bit of the grey structure,
grab the edge, pull up and jump with a turn to grab the edge of the snowy block
with SECRET #4 on top : shotgun shells.
Now back down and through those doors into the...
Undergrounds of the Penal Colony
Meet two more Tibetan tigers, go
down some more to find a room full of boxes, several of which can be pulled and
pushed. Let's start on the right side of the room :
pull out either box to reveal a flooded room, that for the moment holds nothing
but a closed trapdoor. So back over to the other boxes.
Pull out and stow away the second box on the right side and find SECRET #5 : Uzi
ammo and a small medipack.
On the same side, but on the second level under the box in the far corner
there is more Uzi ammo to find - SECRET #6. Now for the left
side group of boxes. Pull out and move out of the way the next-to-last
box, and then the box behind it. Pull the switch to open the underwater
trapdoor. Into the water, follow the tunnels and find the door that needs the
Solomon's Key. Go through and get to...
Level 10: COLONY VORKUTA
Remark : This level has several overly dark
areas, but from here on Lara can safely use flares, since finally there will
also be some to pick up.
You start in a yard - pick up the shotgun ammo
to the right and get into the opening in the wall in the far right corner. In
there, notice the closed door to the left but go right. After the passage
curves, notice a high crawlspace on the left and pull up for SECRET #1 - a large medipack. Drop and proceed to a room with a
basin. Dive right in and pick up a small medipack and some shotgun
ammo. To pick up the latter, first use the UW lever and see that
door from seconds ago open. So head there, dispatch a tiger and pick up the "op"
key.
Now back to the room with the basin, up the stairs and on the left side
of this upper floor is another small medipack lying on the floor - SECRET #2. Jumping to the other side is possible
only from the slightly lower right side of this upper floor. On that other
side, meet a tiger and find a closed
door. Before opening that door, move the box into the shadowy corner and pick
up the large medipack
where the box was. Light a flare to see a high crawlspace that holds SECRET #3: shotgun
ammo, a Desert Eagle and 42 rounds for it.
Open the door, the next room has Uzi ammo
lying on the floor to the right and to the left. Nothing else
to do but a short dive to the next room. From
the ledge with 10 Desert Eagle rounds on
it do a simple running jump to the upper walkway, and
from there hop into that corridor. Go up the ladder to the left into...
The Shadow Rooms
Now for some really dark rooms with boxes. The first room holds nothing of interest but when you
enter the second room, despite the darkness you should be able to straight
ahead see SECRET #4: 2 grenades.
Pushing Boxes
Move on and find a room with a closed door and lots of pushable boxes: those hide a switch. Pull out the box on
the right and move it all the way down into the corner past the door. Pull out
the box behind that 3 times. Now Lara can access the
switch to open the door. You can move most other boxes if you want, but I found
no reward for doing so. Instead go through the now open door and before you
step out into some caves, there are 2 grenades
to the left. Kill the tiger and slide
down the slope to the next level :
Level 11: GOLDEN LAKE
Prepare to jump across a spike pit, and pick up a big medipack
and flares. Drop through the hole, jump off the slide or fall into the water.
From the next room you can see a river of molten gold. It is of course deadly
terrain for Lara, but the walk button does not keep her from stepping right
into it, so watch out.
Use the left window to jump across the golden threat and push the yellow
block two times. From the top of the block jump to the stairs
leading to and through the open door. The door will close behind Lara
and her next step will release a rollingball. The
only way to avoid certain death is taking cover by the higher step ahead - so
get there fast. Next Lara reaches a ringshaped room
with three pushblocks and a tiger.
Lara needs to move the floor-level blocks so that she can push the
higher-level block to the left (seen from the entrance) and get into the high
opening. Move on, and before jumping into the water, pick up shotgun ammo and Uzi
ammo. On the other side of the water,
climb the block and pull that switch to open the golden underwater door.
Rollingballs
Dive into an underwater cave, keep the
direction from swimming into the cave to find a big
medipack on a ledge, SECRET #1. Get out of the water, in front of you
is a cave with a keyhole. Turn around and go to the end of this cave near
the ice wall for a small medipack.
Now go to the cave with the keyhole and left through the tunnel into a room
with a platform full with spikes and rollingballs.
The spikes can be walked through and the rollingballs
will trigger when stepping on certain tiles.
First do a running jump to the blue tile on the left and let some
rolling balls roll. Now walk into the nextby spikes,
more rollingballs will roll off. Walk into the spikes
to the right and then a little bit towards the far side. The middle tile where
the "qr" key lies
will trigger three rolling balls that will all roll across this middle tile. So
turn towards the blue tile you first jumped to, run across the middle tile and
jump onto that safe tile. Now Lara can safely pick up the key. For SECRET #2 go to the far side, have Lara hang
from the edge and shimmy to the left until you hear the secret bell. I found no
way to actually pick up the big medipack,
though.
Some trickier rooms
Back into the cave and use the key to open the underwater door. Dive to
the next area, follow the path, pick up a small
medipack and
get to a room with deadly liquid gold you'll need to traverse. Light a flare
and jump to the platform behind the column on the left side, hop to the next
and the next to pull a switch there. Now return to where you started the
jumping and head left into the shadows. Through an opening to the left, pick up
a pack of flares and in the far side of
these rooms now is a hole in the ground. Have Lara hang from the short side,
let her drop and grab the next edge.
Pull up and find the switch, which opens a trapdoor that blocked a
ladder. Back to the main room, repeat the jumps for the first switch, but once
there do running jumps first to the slightly elevated "solid" gold
tile, and then to the platform behind the column on the other side of the room.
Once there, save the game. Maybe preload the Desert
Eagle, but in any case light a flare. Now with an angled standing jump grab the
ladder on the wall. Climb up and when Lara climbs out of sight jump off and
draw guns - two tigers will attack.
In the dark corner opposite the ladder a pack of flares is to be picked up. Just run down into a
hallway with a closed door at the far end, two rollingballs
are right behind Lara and a switch hidden in the shadow midways, on the left
side. When Lara touches the blue tiles on the floor, first a spiked wall and
then also the rolling balls will start moving, so sprint towards the switch,
pull it, go through the opening door into the water and out of the way. There
is enough time to correct Lara's positioning with the switch should it not be
perfect.
When diving into the next room, in the far left corner behind the column
is SECRET #3: a big medipack. Surface
and see three tigers patrolling the
ledges around the water. On one side you can see a hallway - that has a safe spot
in the end. Either shoot the tigers from there or
ignore them altogether and just go down that hole there.
In the next room in the water you can collect two packs of Uzi ammo and a small medipack. The underwater lever seemed a red
herring to me, I do not know how to survive it. There are two ramps and the
door on the second ramp can be opened by either moving the pushblock
onto the yellow tile, or by jumping onto the boulder
ramp - this will of course release the boulder.
Through the opened door pull a switch to access the golden
river and lake. A running jump straight ahead, another one into that
tunnel, out of that tunnel, up the ladder and follow the the
pieces of rock that stick out of the golden river, pick up a pack of shotgun ammo on the way. A short rock cave
transition then leads to the golden lake. Turn to the right and run/jump and
grab into the small cave behind the gold-fall. Continue to make your way to the
building.
On entering, jump across the spike pit and immediately jump back again,
there are rolling balls all around. Release the next one by touching the ramp.
When that boulder has passed, take a few steps into the ramp, pull up to the
right side and find SECRET #4, a large medipack and 2
packs of shotgun ammo. Continue with
releasing the boulders and escaping them until Lara is at the top of the ramp.
First move up onto the even higher ledge and from there use the first monkeyswing in the game to access SECRET #5 - two packs of shotgun ammo and 10 rounds for the Desert Eagle.
Monkeyswing back, drop to the ramp, and run/jump and
grab the gap on the other side of the room. Shimmy all the way to the left and
pull the switch there to drain the golden lake, revealing another building.
Safety drop back onto the ramp and get out of the building. The only
safe way down I found is to hop to the single red ledge to the right, turn Lara
mostly to the wall and then either just run off at an angle to the right, or
since Lara sometimes may not want to do so : from that
single red ledge run/jump to the nearby rocks, and from there jump to the only
elevated piece of rock below. Both ways cost some health, so make sure Lara has
enough.
Follow the road (walk) and eventually you should find a hole in the
middle of the revealed structure. But before dropping down there for the next
level, go find SECRET #6 on the rocks
in the corner of the lake : 2 packs of Uzi ammo and a small medipack.
Level 12: GOLDEN ENTRANCE
Let the golden boulders pass, then into that room and
sharp around the corner to the left is the only SECRET
in this level - 20 rounds for the Desert Eagle.
Stepping into the next room will release more boulders, so be ready to hop
backwards. In the alcove to the left is the switch to open the door (the
ammunition there - it seems impossible to pick it up). Next to the exit door is
some Uzi ammo. Into the water and
surface in a room with some blocks holding switches. As soon as Lara pulls out
of the water four tigers will appear, but
with those safe blocks around, it is not as dramatic as it sounds. Once the
tigers are dead pull all four switches to open the door to the next Crystal of
Life. Pick it up and the level ends.
ATLANTIC
OCEAN LEVELS
Walkthroughs by
Phil Lambeth
Level
13: TITANIC
Slide down onto a
ledge. Jump into the water and swim forward to attract a frogman. Return to the ledge and climb
out. Kill the frogman when he appears, then pick up two bundles of harpoons and a small medipack before jumping back into the water.
Swim forward until
you see the hull of the ship on your left. Pull out right onto a ledge
for more harpoons. Pull up left
for a KEYCARD TYPE A. Jump back
into the water and locate an opening at the ocean floor opposite the
hull. Pick up the harpoons and
swim forward into the next area to alert a crocodile.
Swim back, pull out onto the ledge and eliminate the croc. Return to the
new area, where you see another derelict - or is it part of the same one?
Find the opening
near the ocean floor and swim into the derelict. Pull out and find a
moveable block. Move it to reveal more harpoons.
Continue moving the block around the corner, so you can use it to access the
higher passage. A thumper is activated, so time you way past it and use
your key around the corner to open the door.
Push the block
ahead once, then push the one to your left two times
to reveal a passage. Turn left and hang drop from the edge to the ledge
below. There's an opening in the floor of the shallow pool, but it's
blocked by a transparent trap door. There's uzi ammo
in the pool. Get on the nearby ledge and step on the raised tile at the
other end. Jump up to grab the crack in the wall and shimmy all the way
to the right. Release to drop onto the higher ledge.
Pick up the harpoons on the way to a
wall button that lowers the trap door in the pool.
Jump down and swim
through the opening. Enter the alcove on your left in the passage and
pull the underwater lever to open the exit door. Continue to a large area
guarded by a crocodile. Swim
forward toward the derelict and bear right while looking up. Locate the
hole in the ceiling and pull up for air and SECRET
#1. There's also a large stash of harpoons.
There's no way into
the derelict from here, so grab the flares
from a nearby shelf and swim through the large opening in the wall opposite the
derelict. Swim up the tiny shaft at the end and locate the underwater
lever. Swim back down, find a small medipack on the ocean floor, and return to the
derelict. Swim to the right wall and look for an opening you can swim
down into. Follow to a shaft in the far corner and pull out into the
derelict.
Run up the ramp and
grab the flares in the far corner.
A soldier is alerted, and he drops a small medipack when you
kill him. Go down the passage from which he came and note the hole in the
ceiling as you round the corner. Climb the ladder there and light a flare
after you back flip into the dark upper room. Pick up the uzi ammo, then pull down
the wall switch to open a door in the area ahead.
Get back down and
follow the passage to a room filled with crates. Draw a weapon and kill
two soldiers. One of them leaves
the HARPOON GUN, the other a bundle of harpoons. Check the crates on this lower
level for a small medipack
and a large medipack.
Use an upper crate to get on a surrounding ledge. Locate the door you
opened with the wall switch (while noting another closed door) and pull up into
the opening. Hop down into a small room and move the crate to the
opposite corner with the distinctive tile. The door in the far wall
opens, so get up onto the block and pull up into the opening.
Step across onto
the ledge to your right and push the button to open that door you saw
below. A soldier is released, so
kill him from up here before dropping down to the ledge. Go through the
open door (which closes behind you) into a block puzzle room. Pick up two
bunches of harpoons and survey the
terrain before you start moving blocks around. There's an opening in the
ceiling that you can see will be accessible only from the top of a three-tiered
stack of blocks, so that's your objective here.
Start by moving a
second-tier block next to the only three-tiered column. Hop down and move
one of the blocks in this section over to the other section to form a bridge
linking the two sections. Move the second-tier block near the other end
of this bridge, so that it's now one block away from the row with the
third-tier block. I won't try to continue this verbal description, as it's
likely to become hopelessly confusing. Suffice it to say that you must
move that second-tier block next to the first one you moved, so that you can
move the third-tier block underneath the opening. When you have
successfully done this, none of the blocks will still be against the wall
opposite from the wall against which the third-tier block now rests.
Before leaving,
indulge yourself in another block-moving exercise where you move aside all the
blocks in what used to be the three-tiered column to reveal an alcove.
Step inside for a hard-earned SECRET #2
and 2 x desert eagle ammo.
Now get up onto the
third-tier block, pull up into the higher passage and vault over the
ducts. Slide down into an immense cargo hold that leads out to the open
ocean. Before going there, however, swim to your left into a small room
and up through a hole in the ceiling. Pull out for SECRET #3 and what looks like shotgun ammo to go along with a large medipack (it's
hard to tell when they're bunched together like that).
Now swim up and
outside toward the inky blackness. Go right by the crocodile (unless you wish to engage it with your
harpoon gun) and you'll eventually come to another derelict. There's an
opening at the far left corner where you can swim down into a shaft. Follow
to a place where you can pull out. As you move forward a door will open
upon your approach. When you approach the second door the level ends.
Level
14: THE FIRST CLASS
Pick up the healthy
supply of desert eagle ammo at your
feet, then move forward and take a running jump with grab over the barbed
wire-filled pit. Jump into the water to attract the attention of a frogman. Take him out and swim through the
opening where he came from (I have no idea what those floating metal bars are
intended to represent).
Pull out into the
derelict's swimming pool area. Find a small
medipack in
one corner, then go up the stairs and wait at the intersecting halls until two soldiers arrive. Stay on this level instead
of going further up the stairs, and you'll find a couple of grenades around the corner near the clogged
passages. On the way back to the intersection you'll see an opening with
large steps leading up to another room, but that's for much later after you've
found three keys.
I don't suppose it
makes any difference in what order you do things here, so when you reach the
intersection turn right and go up the stairs. In the hallway, pick up a small medipack and wait
for a soldier to arrive. Through
the window you can see a swimming pool filled with debris of some kind.
Continue down the hallway and follow a ramp to the upper deck where barbed wire
abounds. Go across the bridge to the swimming pool and kill two frogmen.
Side flip over the barbed
wire into the pool and locate a crawl space near the floor. There's a small medipack near the
corner to the right of it. Swim into the crawl space and up a
shaft. Pull up into a passage and jump over the barbed wire. Jump
into the water on the other side, look for a gap in the right hand wall and go
inside for SECRET #1. Get the uzi ammo
and a small medipack,
swim back out to your right and follow to a ceiling hole where you can pull out
onto a block. Take a running jump onto the beam, which activate three
swinging contraptions. You can't make the jump across from the obvious
place, so you need to make your way past two of the contraptions. Lara
can't shimmy around the corners here, so you can't do it that way,
either. You have to time a jump past the contraptions to the far
corner. Or, if you wish to take the easy way out, you can avoid
triggering the contraptions by jumping to the beam from the block and walking
forward and left to the corner. According to Dutchy,
you can reach the beam across the room with a running jump and grab, although I
fell short every time I tried it.
Once you're there,
jump across to the other beam and enter the next room. The hole in the
floor leads to the swimming pool below, so jump over it into the alcove and
pick up the first LAUNCH CODE PASS.
Safety drop into the pool below and swim out over the
steps on either side. Leave the pool area and cross the bridge to the
other hallway. Turn right at the wall and turn left at the connecting
passage. Go down to yet another swimming pool and shoot three soldiers.
You'll find a
couple of grenades behind a column in
the far corner. There's a small medipack in the deep end of the pool.
Enter the opening on the far side of the pool. Push the block to reveal a
passage, and follow to a room with two soldiers.
Find the large medipack,
then move the block here to a far corner where you can
see an opening in the ceiling. Above completing this tedious task, pull
up into the alcove for some flares and
the second LAUNCH CODE PASS.
Get down and exit
this room as well as the pool beyond. Head up the ramp and back to the
hallway. Turn right and follow to the intersection. Turn left and
follow to a room overlooking previously explored territory. Move the
block away to reveal a button. When you push it a trap door drops
somewhere.
Return to the main
hall and follow it all the way past the pool and down the ramp. Continue
down the stairs until you reach the intersecting passages. Continue
straight across and go up the next stairs. Follow the passage to a
flooded theater.
Go down the left
ramp and locate a deep shaft near the stage. Swim down into a lower stage
area and locate the desert eagle ammo at
the other corner of the room.
Swim down to stage
level and locate the opened trap door. First, look around for harpoons in the far corner, shotgun ammo on the stage and a small medipack in the
seating area. Then swim down into a large storage hull with more floating
metal bars. Take the third LAUNCH CODE PASS
from the top of the lone crate. There's an opening in the ceiling where
you can get air and pull out into an alcove (which unfortunately is
empty). Swim back up through the opened trap door to the lower stage area
and up the shaft in the corner to the higher stage area. Go up either
ramp and exit to the hallway.
Go down the stairs
and turn right at the intersecting passages. Enter the doorway you
bypassed earlier and kill a soldier. Follow to the water, jump in and
swim to a hole in the back corner where you can pull out. Use the three
Launch Code Passes in the receptacle to open the door. Enter to end the
level.
Missed both secrets
at first, but Dutchy later pointed out the one
documented above.
Level
15: THE DECK B
You start with a
cut scene of a soldier on patrol. When camera control is restored, vault
up onto the ledge and drop down into the water far below. Pull out onto a
flat spot across from the hull, vault up left and take a running jump over the
gap for a couple of grenades.
Slide down into the water and swim through the opening in the far wall.
Follow to another section of the hull and surface. Pull out and kill a soldier.
Note the closed
door in the structure to your left and go across to the structure on your
right. Locate two stacked blocks. Nearby are two other moveable
blocks, which you must use to form a bridge so you can pull the upper block
away from the wall. Get down and pull the lower block away from the wall
as well, revealing a button. Push it to open an underwater door
somewhere. Before leaving here, you could move the lower blocks to create
a bridge perpendicular to the first one, then move the upper block so that you
could use it to climb up to the second story. The problem is, there's nothing up there. A lost
opportunity for the builder.
Get down and go to
the other side of this area. The door there is still closed, but you can
use a block in the right corner to gain access to the second story. Shoot
a soldier there and pick up the small medipack he
drops. The pool is empty.
Get back down to
the deck. Facing the block puzzle area across the way, locate the blocks
in the wall to your left that you can use to ascend to a large opening high up
in the cave wall. Follow to an immense water-filled area. Jump into
the water to attract the attention of two crocodiles.
Swim back, pull out and kill them. Back in the water, swim to the rusty
metal structures (there's no place to pull out) and locate the crates on the shore
to your right. Pull out, kill the soldier
and pick up the harpoons and uzi ammo on the other side of the crates.
Jump back into the
water and locate the underwater door across the way that you opened
earlier. But first, turn to your right and swim to the far wall.
Locate a small triangular opening on the left side near the bottom and enter
for SECRET #1. Pick up 2 x shotgun ammo and uzi ammo,
then swim out and into the opening in the wall that's now to your right and
surface. Pull out onto a corner ledge and jump across to the other
side. You can see something on top of the rusty structure in the water,
but it's too far to reach from here. Locate the nearby opening and follow
to a room with an icy slope. Use the flat surfaces to get up there and
follow through the opening. Continue to a lake. Swim across to the
other side after grabbing the small medipack from the lake floor. Pull out in
the left corner and kill the crocodile if
you wish.
Follow to the next
room, where you'll find a hole in the floor. Safety
drop to a block and pick up the HUT KEY
that you saw from afar earlier. Jump into the water and swim back to
where you entered this area. Pull out and return to the large opening
looking out over the deck area. Get down onto the highest block, the one
you used to jump up here. Face the wall and jump up to grab the
crack. Shimmy left until you can pull up into an opening. Follow to
a lower area guarded by a soldier.
Locate a hole leading into the derelict and climb down
the ladder. Use the Hut Key to open the door.
Jump into the water
and swim along the passage to a room filled with crates. Pull out onto
one of the floating ones and jump to the crate flanked by two ledges.
Pull up onto one of them and use the crate to access the upper bridge.
Run across into the next room and do battle with four soldiers. Search the corpses for desert eagle ammo, uzi ammo,
shotgun ammo and another HUT KEY. There's nothing else of interest
in this room, so use the key to open the door in the far wall and approach the
save crystal (Crystal of Life) to end the level.
Missed two of the three secrets.
CHINA
LEVELS
Level
16: FLOATING HEAVENLY TEMPLE
Walkthrough
by snork
Run out
of the starting room and notice three main floating islands. On the one to the
very left, from here you can see the one secret this level holds. The floating
island straight ahead shows a closed door that leads to the next level.
The
floating green blocks at the highest level cannot be accessed.
Just
run ahead, and when Lara starts to slide take a jump to the lower green-glowing
rocks (which will cost a small amount of health). Turn left and after jumping
two more gaps it takes one more running jump to the right to arrive at the
middle floating island. From the elevated block jump up and grab, pull up into
the building and pull the switch to open the door to the next level.
But
first let's go for the secret. Run/jump out of the opening next to the
switch to the green ledge ahead. Turn left and follow the green floating blocks
until there are no more. Turn right and do a running jump towards the building,
across the lower slope. Lara will slide down to the SECRET
place where she can pick up various ammo, medipacks and flares.
To get
out of there, Lara needs to jump to the slope behind the right one of the red
columns. Place Lara to the right side of that column, angle
her at roughly 45° to the left and then a standing jump onto that slope.
If you keep the jump button pressed, Lara should land on one of the lower rows
of green floating blocks. Now head for the remaining, unvisited floating
island, through the now open door and at the end it takes a leap of faith
towards the lower grey platform that will transport Lara to the next
level.
Level
17: LOST TEMPLE KIRIN
Walkthrough
by snork
The
whole level is a twofold maze, so instead of writing lots of right- right-
left- right- instructions I just drew maps.
Enter
the upper floor maze and turn to the right. Pick up SECRET #1,
Desert Eagle ammo, and continue on the right side of the
maze in search for the switch that will open the exit trapdoor. Once you've
pulled that switch, return to the entrance to the maze, but now explore the
other side to find the trapdoor to the lower floor maze.
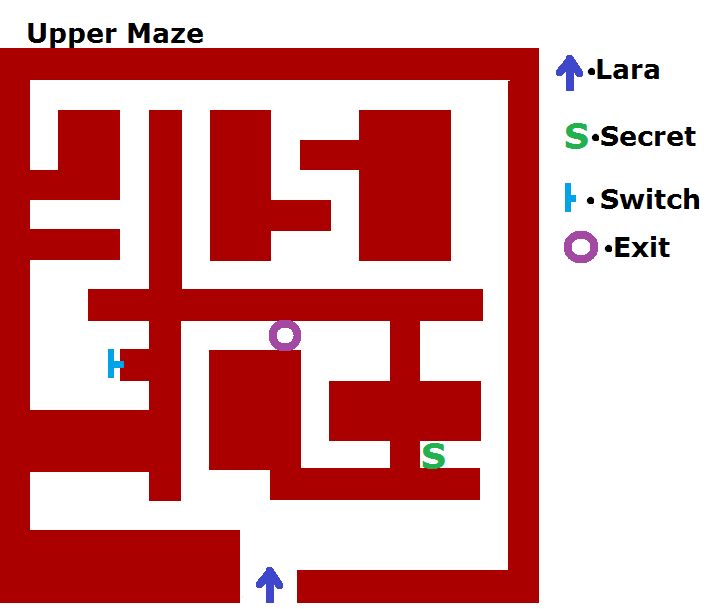
In the
lower floor maze get out of that inner part, and when you can see grated
windows, remember that place, because one part of the wall (by pulling a
switch) will vanish. Looking at the window, turn left and
explore that side of the maze to find this switch, and also SECRET #2 - Uzi ammo.
Now
back to that window, and a part of the wall will have vanished. Go through
there, but before dropping into the hole in the floor that exits to the next
level, find the grenades nearby. Maybe they were meant to be
another secret, but they did not ring the bell when picked up.
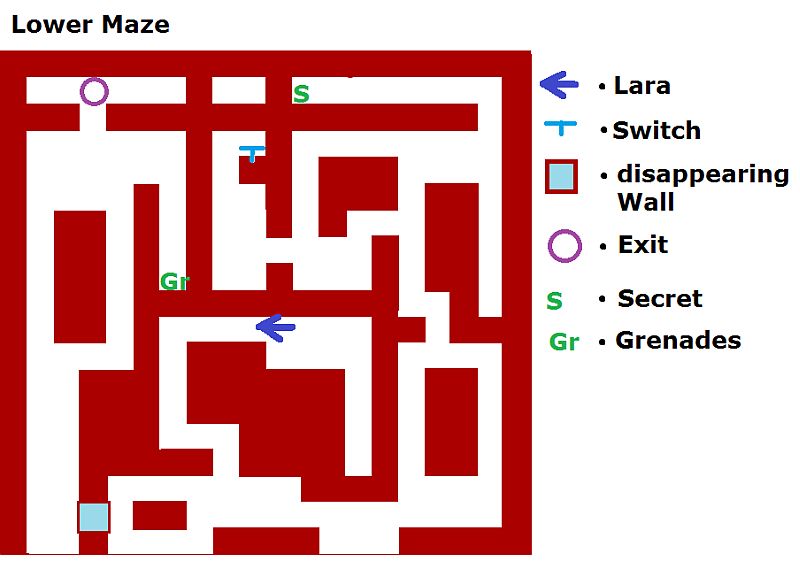
Level
18: SACRED KIRIN
Walkthrough
by Phil Lambeth
Slide down into a
small cave. Locate the hole in the floor and climb down a long
ladder. Jump into the water and look for 2x uzi ammo around the central column on the way to an
opening where you can wade out facing an Oriental temple. Deal
with two tigers, then
pull out the ornate crate so you can use it to jump up to a flat spot.
Hop down into
another cave and follow down the winding slope until you reach an area where
you need to climb up. Make your way up the ramp to trigger an apparent
boulder that I never saw. Emerge on a block overlooking the water and
dead tigers. Jump left to the roof and explore it for grenades, uzi ammo,
a small medipack
and a large medipack.
Jump back to the previous block and continue with a running jump in the same
direction and grab a block in front of a ladder.
Climb to the top,
shift left and release to drop into an alcove. Go to edge, turn around,
hop back and grab the edge and shimmy left and pull up into the opening.
Follow the passage around the corner and run across a rock mound into a facing
passage. Continue to a wall switch. Pull it down to open a door
nearby. Go back to where you shimmied and simply drop down into the water
below. The doors to the temple are now open. Enter and locate a small medipack in the
next room. Move the lower crates to form a bridge so you can pull back
the second-tier crate. Use that higher crate to access the upper passage.
Walk a short
distance up the ramp and turn around. Hop back onto the ornate tile and
run forward and left to avoid the boulder. Go back up the ramp and into
the upper reaches of an ornate room. A tiger
is prowling about below. There's a closed gate in the wall across the
room. Hop to the second wooden bridge and locate the ladder on the far
side. Climb down, kill the tiger and mind the spikes down here.
Walk carefully through the spikes and find a small medipack. Continue to the other side of
the room and find an opening in the wall. Pull up into it, walk forward
and pull up left to find a wall switch. Pull it down and walk back to the
ladder.
Climb up to the top
of the wooden bridge, hop back across and find that the gate has lifted.
Go there and pause at the entrance to the next room while a boulder rolls
by. Run forward and take the KEY
from the raised tile. Search the corners of this room for flares, a small medipack and uzi ammo.
Return to the bridges, hop over to the other side and use the Key to lift the
gate.
Go inside and shoot
the tiger. Continue into the next
room and jump into the water at the far end. Swim forward and wade out
into a cave. Locate the uzi ammo in an alcove up and to your left.
Continue along this side of the cave and you'll come to some flares. Farther along is a lake area where
two tigers are basking. You'll find
shotgun ammo at the bottom of the
lake. Pull out of the water and go to the wall that's left of where you
entered this area.
Find a block and
pull up onto it. Run forward and climb a second block. You can't
climb onto the third block, as the slope is too severe, but you can get there
by using a little trick. Simply stand in the corner facing the block and
jump up a couple of times. You should land the second time on the upper
block. Hop down the far side and take an angled running jump into the
opening. Follow past a small room and continue along the passage to a new
area.
Run across the
bridge and pull up left. Jump across to the far corner and pick up the KEY. Slide down to the bridge, turn right
and retrace your steps to the block where you made the tricky jump. Turn
left and take a running jump and grab to the wooden structure. Pull up
and locate the shotgun ammo ahead and to
your left. The doors on the other side are closed, with no key receptacle
in sight, so look for an opening in the wall, to the right of where you
entered, and jump there.
Follow the passage
to a clearing where you'll find desert eagle ammo. Pull up onto the block in the
other corner and back up the ledge until the boulder is triggered. Run
forward and hop down to safety. Climb back up (shimmy past the boulder)
and continue up the ledge. Pull down the wall switch and return to that
wooden structure. The door is now open, so enter and use the Key to lift
the second gate. Go inside and kill two tigers.
Exit via the passage in the far corner and face a large ramp, ideal for a
boulder trap.
Indeed, three of
them are triggered when you start running up, so retreat and find
shelter. Then continue up the ramp to a room with a large pit. Hang
from the edge and drop down into the water. Swim through the opening and
pull out into an outdoor area. Take a running jump and grab to the ledge
across the spike trench. Pull up and walk forward. If you take a
running jump to the raised platform, it will lower as you approach, and you'll
land on a slope and slide down to end the level.
Missed the secrets
again, all three of them.
Level
19: DESTRUCTION
Walkthrough by Phil
Lambeth
Pick up the 3 x grenades and large
medipack at your feet. Sprint
forward along the passage as spike walls close in on you from both sides.
Veer to the side as you enter the next room, or you'll step into a lava
trench. The door closes behind you, barring any retreat.
Go to your right
and left for uzi ammo and desert
eagle ammo. As you
venture further into the room, two shivas are awakened. One of them
drops the VAULT KEY. Use it to
open the door and slide down into the next room.
This time four shivas converge upon
you. The pool contains a healthy supply of ammo
and medipacks.
Two of the shivas will each drop a VAULT KEY. Use them to open the door
between the receptacles.
Slide down onto a
platform surrounded by lava. Four more shivas await.
As you might suspect by now, two of them are carrying a VAULT KEY. Use them to open the door, step
forward and hop down into a passage. Run through the Crystal of Life and
slide down the long slope to end the level.
BONUS LEVEL
Level 20: ANTARKTIDA
Walkthrough by manarch2
If you found all the secrets in the game (59 of them) this level loads
after the end statistics. In case you didn't find them all, it's still possible
to play this level: Rename "secret.tr2" to "egypt1.tr2" and
start a new game (after deleting or renaming all your existing savegames).
Lara drops down into a cave. Head forward and pick up the DESERT EAGLE and Desert
Eagle Ammo. Drop into the water, follow the passage and climb out at
the end, get up the block and use the lever around the corner to open a
trapdoor further in this corridor. Drop down and kill a Tinnos wasp.
Head down the ramp, arriving in another pool area, shoot another Tinnos wasp coming out of the
small hole in the opposite wall, then dive in the water and use the underwater
lever near the entrance to open the left of the two doors.
Climb out of the water, then run into the open
doorway (avoiding the fire pot). In the next room use the timed lever on the
rear side of the marked block, then jump over the two pillars whose fires are
deactivated (you'll have enough time for this) and reach the other side. Use
the next lever (this one opens the second door in the previous pool room), turn
and jump onto the rocks above you. Use the ledges to return to the entrance,
drop down and exit this room, take care of the swinging pots, and enter the
second passage.
After arriving in the next room kill another Tinnos wasp.
You can already push/pull the block so that you can jump up to the walkway
later, but before going up there you first need to open that high door. Climb
the ladder right of the exit of the room, kill two Tinnos wasps
in the next room and take the first SCIMITAR
(Tinnos mask) which is in the narrow pool with you.
Climb back down the ladder and this time exit the area and head to the
dark passage with the swinging pots, not forgetting the Flares lying around. Inside the dark area you can
find two levers – one of which opens the exit door, the other one opening the
high door in the previous area. Head back there, climb the block and then up
the walkway, grab the crevice and shimmy right until you can climb up. Pick up
the GRENADE GUN, Shotgun Ammo and Uzi
Ammo, then drop back down and re-enter the
dark passages, this time head to the end and left to spot the exit door.
Climb up the ladder, head on and flip the switch in the left alcove to
open both doors further in the passage. First go into the right one, arriving
on a high balcony, jump to the pillar ahead and then to the ledge with a health
crystal, Desert Eagle Ammo, Grenades, Flares
and a Small Medipack. Return to where you came from
and this time enter the other door. Climb down the ladder at the end of the
tunnel, search for a lever in the opposite corner to open the door and head out
to arrive at the bottom of the area you visited earlier.
Head to the right part of the icy wall opposite the
one with the doors to spot a passage, head in and drop into the water at the
end. A trapdoor hides the way back, so swim further, into
a room with those rotating machines. Pass the first one and swim around the
block on the ceiling to spot an underwater lever which opens the left of two
doors behind you. Swim in avoiding the machine, use the next underwater lever
(the right door opens) and swim up for air before swimming into the right door.
Here you can climb out of the water.
In the next room take the second SCIMITAR
with you and the door leading you out of this room opens. You'll enter some
caves; around the corner the right one of two doors opens and you have to kill
a Tinnos monster before entering it and using the lever to
open the left of the two doors. Head into the newly opened-up passage, into a
pool room, and dive in. Search for Desert Eagle
Ammo and a Small Medipack
on the floor, then for an opening you can swim through.
Climb out of the water, then up the ladder to reach the top of the pool
area. Jump to the central structure, take the RESERVE
KEY with you and jump into the opposite cave. Follow it, jump up a
slope and follow another passage until you eventually drop down onto the
trapdoor that closed some time ago. Follow the passage back to the large
snow-covered room and search the area for a double door you can open with the
Reserve Key.
You'll arrive in a room where you can place four masks, but since you've
got only two you first have to run up the ramp and climb the right ledge to get
to the top level. Immediately drop down again to avoid some rolling barrels,
climb back up when they stop and head on the bridge. You can choose between the
left and right passage for now.
Left passage: Head in front of the door and it opens. In the next room there
are several fire blowers and half-invisible blocks. Run-jump to the first one,
climb up when they are just about to stop spitting fire, then quickly run-jump
to the next block, shimmy right and at the same time as in the first sequence
climb up and run-jump to the far left block. Climb up and stepping on the tile
opens a door on the opposite side.
Do the same technique as before to reach the block you used to jump to
the trigger tile, then quickly run-jump to the ledge and enter the doorway. Use
the button to deactivate the fires in front of the exit door. Get there over
the last block (same as before) and push the two buttons to open the door.
Enter the next room, pick up the third SCIMITAR from the elevated block and the next
door opens. Follow the passage, sprint down the ramp escaping from the barrels
behind you into the left passage, and head on to return to the bridge above the
mask receptacles.
Right passage: Head in front of the door and it opens. Follow the passage, use
the lever at the end to open the door and get armed because you have to fight a
Tinnos monster in the next room. Find a Small Medipack in the
near left corner looking from the entrance, then enter
the left passage where the monster came from, avoid another swinging firepot,
pick up a Large Medipack
and push the button at the end to release another Tinnos monster.
Kill it, return to the previous room with the cages and enter the open cage to
your left. Pick up a Small Medipack
and Desert Eagle Ammo, then use the lever to open up the last cage (no monster this
time). Grab the fourth SCIMITAR and head
all the way back to the bridge room.
After you found both masks on the top level head back down and place all four
Scimitars in their receptacles. The central trapdoor opens; drop down, slide
down the slope and head on a bit to finish this level and the game.
THE END