Jungle Ruins
5 – Revelation
Levels by GMac
and Raider X
Walkthrough by
G&D Productions
Watch
the opening flyby.
Return to
the Hag’s Lair.
Go straight and a bit to the left into the opening there.
The door opens and you can see the guide waiting. You goal is to collect some
Serpent Stones.
Serpent Stone
#1.
Go
straight to the guide that is waiting there and all the way in the back and a
bit on the right (near a wooden fence) you can find a Large Medipack (red flowers).
Turn
around (E) and go to the pillar with stone carving on it. Just right around the
pillar you can grab and hoist up onto the stone walkways. Go to the SW corner
and pick up Serpent Stone #1.
Safety
drop to the floor (facing E) and you see where to place that Serpent Stone (to save you going through the place twice, you better
place that one last, so keep the Serpent Stone with you for now).
Serpent Stone
#2.
Turn
around and go NW, to the edge of the platform, near a fence and roots coming
through the ceiling, look for a bridge below and drop down onto the bridge
(losing some health), roll and go straight to the island W where you can see Serpent Stone #2, to the left. Get that
and return over the bridge to the rock. Go into the passage in the rock and
find a receptacle for one Serpent Stone, use it and go through to a bridge to
the E island. A bit to the right on the E wall is the next receptacle; use the
last Serpent Stone you have with you.
Serpent Stone
#3.
Jump
S to the ledge and follow these ledges timing the flames to get to the pedestal
with Serpent Stone #3. Jump to the
island NW and go over the bridge to the rock. Go left and grab the edge of that
rock and shimmy around. Drop down, go inside and get a Medipack there.
Shimmy back and go to the wooden fence at the other
end, and stand left and side flip or just jump through the opening in the fence
to a ledge there. Pull up left and find Secret # 1, a
Secret Skull. Drop down and jump back through the opening at the fence.
Keep right and jump up the slope into the passage in the rock (N) and follow
through to another bridge, on the island at the end of it is another Serpent Stone #4. Take a step back and
grab up to the ledge above, shimmy to the right to where you can pull up.
Follow and go up one step to where you’ll find a receptacle for a Serpent
Stone, so place the third. Climb on top of the pillar and jump over to the
platform.
The Skull.
Go
to the SW corner and place the last Serpent Stone in the receptacle we saw
before, a Skull is now available on top of the structure. Go to the NW corner
where you can climb back up from the higher ground as before.
Go
left and jump up to grab the Skull.
Place it at the nearby receptacle (E side) and the earth rumbles as new ground
rises from the lava. Get down and safety drop onto the bridge at the W side and
take a right towards the guide that is waiting.
Go
over the stone bridge and wait for the guide and follow him. Go to the far
corner on the left (NW) and slide down.
Elders
Cave.
Watch
the flyby
“I want you to kill her”
The Snake
Stone.
After
Lara came down, shoot a bat and walk straight ahead to a gate and a keyhole
(remember this).
Go to
the right towards the stream and take a left after the flyby. Go left again
after the waterwheels and down into a lower passage and up some steps, keep
going straight down more steps. At the pit with the caged skeleton stand in
front of the pole, jump back once, take one step forwards and jump to grab the
pole. Keep Ctrl down and use only Alt to climb on top of the pole and jump off
to grab the crack in the wall. Shimmy to the right around the corner, drop one
crack and jump backwards (down arrow) and grab the ladder. Climb up to the
ceiling and use the monkey swing to get into the opening (Lara will grab the
monkey swing herself). Drop down and at the wall in the end take a left and
pick up theSnake Stone.
Use the Snake
Stone, Push Puzzle.
Be
ready to shoot a snake and pick up a Medipack
in the grass near the pedestal. Go back and stand
on the tile on the left (skull tile, find all 3 for a Secret) then leave
this place, drop down and jump onto the corner ledge where the cage is hanging.
Grab up N, leave this area (N) and go to the stream. Take a left and under a
walkway on 3 poles, behind some green plants left, is a nicely hidden
crawlspace (you have crawlspace roll, duck and sprint). Use the Snake Stone and
go over the now safe tile and crawl out (W). Go left and straight into an
opening with a hanging plant. On the left in between the grass is another
crawlspace. Go through and pull away the cage there at least two times.
Go
back through the crawlspace, go right and take the next one (behind the grass)
you came from before, go right at the “fire tile” and push the cage two times.
Go left into the new passage and use the lever there (opens gate). Go back to
the fire tile, right through the crawlspace. Go straight (E) and near a tall
pillar with a ladder, watch the flyby and shoot the natives (there’s also one
up on a ledge N). One will leave Flares.
Go N down some steps into the lower passage (a bit further than the ladder on
the left (N) wall) as the gate there opened (another native might show up here
from behind). Follow through, passing a cage with a skeleton (there’s a Key
under the cage) and when you exit the hut, take a left up a slope to the rock
ledge above. Another pick up you can find is go to that tree S. At the tree,
jump to the ledge on the hut and climb even higher. Then take a running jump to
the rocks at the W wall and a bit further on the right get the small medipack. Just run off the ledge
to the stone bridge.
The Cave Key.
Go into
the opening in the wall (E) through a small passage and take a right into the
cave and immediately left (E) into a wooden hut. Jump in and at the other end
up (another Skull tile for the Secret) and
go back out to the cave. Go into the passage left and on the right is another
opening to a hut. Get the Shotgun ammo
in the right hand corner and when you leave you can spot a small medipack (herbs) in between the grass (closed gate S). Take a
left (N), through the passage and leave through the opening at the end on the
left. Hop down onto the rock ledge and take another left and continue this path
up stone steps to the closed entrance of the wooden building. Climb up on the
left and follow through right, shooting a native on the steps.
Behind
the bloc, left on the steps (S wall) is a wheel, turn it and see that caged
skeleton being hoist up. So back we go, and if you want another pick up, when
you reach the back of the hut, jump to a block on the left and from there onto
the steep roof of the hut; grab the edge. Shimmy all the way left and back
jump, go down (W) and pick up a Medipack.
Hop back to safety drop down to the ground floor and loop around into the hut,
under the cage is the Cave Key.
Use the Cave
Key, the Silver key.
Leave
going S and once back at the stream and go straight towards the place where you
got the Stone. Go down and up some steps and then loop around to the right
behind the fence and use the Cave Key there. Turn around and shoot the snake
then go into the opened gate on the right (W).
Take
a right and climb up the ladder, shoot a bat and pull the skeleton away for the
Silver Key. Look to the right, see
that lever; there is where you are going now because the passage ahead has a
deadly trap (you can try though…).
Push Puzzle
with Spike Traps.
So
turn around and take a running jump to the ledge under the burning wall torch
and another one just around that block to the ledge SE. Go straight and then
loop around the fence to the left (NW) and from the stone ledge jump up to the
N wall. On the left is a crack so grab it and shimmy to the left around. Drop
and use the lever, you get to see a camera shot from the passage where the trap
is now disabled. So safety drop down and up the ladder again.
Now
you can go through that passage behind the skeleton safely. On the right is a
lever with a small pit in front of it; we need something to fill that pit
there. Go left and immediately to the right. Through a passage and cross that
wooden bridge. At the end go around to that small wooden fence and use the
floor lever.
A
platform goes up, so retrieve your steps over the bridge, through that passage
and at the intersection go straight (S) and around two corners; pull the cage
over the trapdoor. The cage has to go to that small pit under the wall lever,
start pushing and pulling the cage around so you can use the lever. There is a
native roaming around so be aware.
After
using the lever you see another platform going up.
Go
out (S) and jump over to the S side ledge again and on the right in that
passage is the platform you saw. Pull the block out at least once or if you
want as far as (as you have to use it on the balcony but can’t get it there
now).
Go
back out and take a right, past the bridge and jump over to the green rocks
where the sun is shining through (E). Grab the edge and shimmy left, pull up
and turn around and jump into the opening SW. Go in and around the corner stand
to the left then jump over the gap in the floor. Ignore that Medipack for now,
turn around, stand in the middle and take two steps away from the end (face E),
jump and grab the jump switch hidden in the ferns to disable a spike trap over
the Medipack. Turn and go up the steps (N), kill a native then go left through
the gate up, the ladder again, turn around and jump to the S side. Go pass the
passage with the pushable cage and jump to the green ledge and from there into
the opening of the wall. Go over the pit again and this time you can pick up
the Medipack as the spikes are gone.
Jump
up the slope and push the crate out of the passage. Sorry to say but you have
to do this run all over again to push/pull the crate to the W side (OR just
jump through the corner of cage and wall). After pushing, climb on top and take
a running jump to the block SW and turn around jump to grab the edge from the
rocks E and shoot the snake.
Line
Lara up with the rope NE and take a running jump to grab it, turn a bit to the
left and swing to the wooden platform (N), climb up and use the lever there.
You’ll see a burner being turned off on top of the huts. Safety drop down (face
W and hop backwards). Slide all the way to ground floor.
Cog Wheel 1,
Lower Bridge 1.
Leave
(N) towards the stream again. Go
straight (N) into the cave again, under the cage and go straight towards the
end. To the left is a well hidden opening behind some tall grasses. Inside pick
up some Flares around to the left
(SE). You can use the Silver Key on the right. Once inside kill the native then
pick up the Shotgun in the passage
up on the left and use the lever up on the right (gate opens).
Go
out of the hut to the cave and loop around to the right, up the slope there to
the rock ledge and make your way up the path to the left of the wooden hut.
Climb up twice as before and into the passage on the right. The gate at the top
of the steps is open now. Jump up a slope and get the Cog Wheel from the pedestal there. The trapdoor behind Lara opens,
so she can climb down a ladder. Climb down another ladder to the stream and go
left to place the Cog Wheel. This opens the gate behind it and the lever you
find in there; lowers one side of the bamboo bridge.
The Bronze
Key.
Now
we have to go to the hut again (a bit to the W to that tall pillar and into the
N passage) and go left up the sloped path to the rock ledge, over the path left
of the huts and climb up left again, OR climb up the two ladders and get down
the steps, you end up behind the hut. Jump and grab up to the top of the roof
on the left side. Crawl through straight ahead and lower yourself at the other
end. Jump over to the opposite walkway and use the wheel on the left. Go back
and drop down, the fire near the wooden gate (E) is gone, crawl underneath and
pick up the Bronze Key.
Use the Bronze
Key, the Hut Key.
Crawl
back, go left (S) and back down to the stream; head E passing the waterwheel
and into the area SE, on the right is the key lock for the Bronze Key.
Climb
the ladder next to it; slide down and turn right to use the jump lever up on
the N wall, this disables a spike trap. Jump up to the pedestal and get some Shotgun ammo and the Hut Key from the pedestal. A gate
opens. Slide down and jump up to the opening.
Back to the
Huts.
Go
out, right to the tall pillar in the stream find a ladder to the left of it (on
the N wall). There is also a bat flying around. Go into the passage straight,
jump up the slope and take a left at the huts. At the end use the Hut Key and
get the Torch from the pedestal.
Igniting the
Torch.
Go
back out and right between the huts to get back to the main cave. Drop down to the
lower level and go into the lower cave passage opposite the tall pillar to the
hut (N). Go up the sloped path on the left to the rock ledge and jump into the
opening in the E wall. Take a right and see that bright light? That gate there
is open now. You are above the main cave. Go left a bit and slide jump to the
bamboo platforms and then to the triangle on the right (best is to stand at the
corner and just hop over). Go right and jump to the stone ledge there (next to
the waterwheel). Slide down at the other end, cross over the bamboo bridge and
take a left into the passage (S). Cross over the bamboo bridge in the cave with
the rope and take a right. Leave the Torch somewhere safe and pull the cage
back so it is under the wall torch. Pick up the Torch and jump on the cage to
ignite it.
Using the
Torch, the Bamboo Key.
Go
back N over the bridge and coming out of the passage loop around left and
ignite the wall torch there. The gate nearby opens but we don’t have the key
that is needed there. So carefully jump down with the Torch and go to the hut
(through the lower N cave). Go up the path to get behind the left side of the
hut and throw the Torch underneath the bamboo fence. Climb up behind you and
jump to grab up to the roof of the hut, crawl over and lower yourself at the
other end as before. Drop down and crawl under the fence like before and get
the Torch. Throw it out W and crawl back. Pick it up and go straight to the
other part (W). On the left is another wall torch, so ignite that one as well and
a gate a bit back opens. Get the Bamboo
Key and leave this place and leave the Torch too.
Use the Bamboo
Key, Second Cog Wheel.
Go
E, take a right between the huts, go down to the stream and into the lower cave
N, back to the other hut. Up the sloped path and climb in the opening (E). Go
right and all the way to the end (bright light). Slide to the bamboo and jump
over to the corner and hop over. Slide down and follow through over the bridge
and into the gate you opened before with the Torch. Use the Bamboo Key and see
a cage with a skeleton being lowered. Go out and take a left, the cage is
straight ahead (N) Jump and climb up the cage, turn left (W) and take a running
jump with Ctrl to grab the next cage. Then jump to the ladder on the right
(mind the low ceiling) and once on top jump to the stream (W). Get the Second Cog Wheel and see a trapdoor going down. (For
the Secret) Opposite find the third tile with a skull on it.
Use the Second
Cog Wheel, Lower Bridge 2.
Go out and climb down the ladder where the water goes
down and safety drop down to the stream. Take a right (E) and again a right. Go
to the burning wall torch on the left, there is a gate that opened by stepping
on the 3 skull tiles, inside is Secret #2, a Golden
Skull.
Go
down the steps (S) and up again, go to the right through the open gate to the
Cave and up the ladder as before, jump over the skeleton and head into the
passage (N). Go left and then to the right, over the bamboo bridge and to the right
is that lowered trapdoor. Jump to the corner and then up the walkway there. At
the end use the two swing poles. Take a running jump to the first one, stand on
it (ALT) then swing to the ledge ahead. Loop around and place the Cog Wheel.
Turn around and retrace some steps and jump over the
gap into that alcove where the gate opened. Use the lever and see the second
side of the bamboo bridge going down. Safety drop down through the gap behind
you, get down to the stream and go W. Then to the left into the passage, the
bridge to the right is down now. Follow through and jump down through the
opening in the floor.
Revelation.
Lizard Stone 1
Watch
the fly by then go down and to the left. Keep going left and find some Shotgun ammo at the end (E).
Go back
to the opening in the fence and slide down backwards, shimmy a bit to the right
and drop down. Jump to the left (or right) and slide to the ground floor.
Go
to the W side and stand behind the pillar. Jump backwards on the slope and grab
the pillar and grab the Lizard Stone 1.
Get
down and run the other side (E), go around the corner and find the receptacle
for the Lizard Stone on the right.
The Skull.
Enter
and go to the right and be ready to so some jumping over slopes. Sorry to say
as this you have to do a couple of times. When you are safe on a ledge prepare
for the next jumping sequence. This is a bit tricky as almost at the end of
this sequence is a bluish monkey swing and that is your goal (best is to try
and grab the block below and do the ledge up jump). Once you are hanging follow
it to the end, drop and grab the ledge. Then climb up the ladder and climb off
on the left. Shoot the two villains and go through the gate (W) that will open.
Go to the left and jump down to that pillar. From the pillar take a jump to the
cracks in the wall (W). Jump up three times, shimmy around the corner and back
jump to the roof. Walk to the end of the roof, face W and jump to the next
crack. Shimmy to the right and at the end jump back to get onto the next roof.
Get the Skull from the pedestal and
safety drop down to the water.
Opening of
Gates, Lizard Stone 2.
Go
the other side of this area (E). On the left of that entrance with the fire
pots you’ll find Shotgun ammo and on
the other side you have to place the Skull. Go in the now open gate and on the
right behind a fence get more Shotgun
ammo.
Go
down some steps and the gate opens at the end. Jump down and head into the
opening on the right. In the next room take a left and you meet two thugs, kill
them but watch out for the spikes. After they are dead, go back to that passage
(N) where they came from and loop around to the left, there is a wheel to turn.
Go
back out and in the NW corner you can jump up twice to an alcove N and get a Medipack. Walk to the end of the ledge
and face W to jump up that pillar. There is another wheel to turn. Drop down to
the ground floor and see the gate S has opened. Pull/push that crate over the
dormant spikes to the wall (N). Push it towards the passage N on the dormant
spikes there. Pull (and don’t push) the cage all the way into that passage and
climb on top. Use the wheel and the gate on the left opens. Go around and push
the cage one more time, climb on top and take a running jump into that
structure and fall down into a pool. Climb out of the water and grab the Lizard Stone (W wall).
Back in the water and swim through a narrow tunnel N
and climb out to get Secret #3, a Secret
Skull.
Swim
back to the other pool and get out the water. Jump to the other side and go up the
slope, two villains are waiting so kill them. Climb the corner block and use
the cracks (W wall) to get up. Then jump into the opening in the wall, follow
through and the gate will open when you approach. Leave straight ahead and
climb up on the left in the next area, the gate will open. Go straight and
climb up on the left in the next area, the gate will open.
Raptor Key and
Serpent Stone.
Shoot
that nasty guy and pick up a Raptor Key
#1 from the pedestal on the right (get a camera shot of a gem). Go out W to
the outdoor area, all the way to the other side (W) where that pool is and loop
around the left into a small passage to get the Serpent Stone.
Go
back to the E side, right around the corners and into the door opposite the
fire baskets entrance you just came from.
You
are back for jumping the slopes again and I hope you do remember that monkey
swing. Go up the ladder and through the gate straight ahead. Now go to the
right, jump down and jump up a bit further, get the small medipack and jump down again.
Jump
up at the end and use the Lizard Stone to enter. Get the Raptor Key #2 on the right and when going
down the steps two villains attack.
Use the
Serpent Stone, the Maze, Raptor Key 3.
Afterwards
go into the opening on the other side (E). Follow through and end up above the
open area. Climb over the block on the left and get a Medipack. Climb back up the block and even higher onto the roof of
the building. Go to the left and find the receptacle for the Serpent Stone
opposite some steps.
Turn
around and go up the steps then jump in the water. Get out at the other side
and you get a fixed camera for what looks like a maze area.
Follow the path and time the burner, go left towards that
pushable statue and pull it twice. Turn around run over the spikes and time the
burner again to go straight. Follow through around the corner and go straight
to the end (S). Go around the corners and end up at the middle of the three
pushable statues
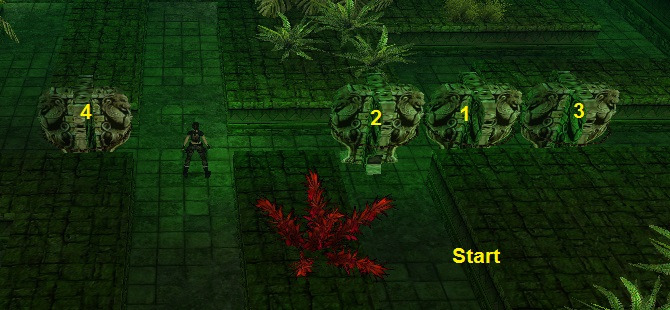
Run around to pull #1 back into that passage, then
turn around and go around to the two statues that are left. Push #2, then turn
right, run around and pull #3. Run around, push #2 again
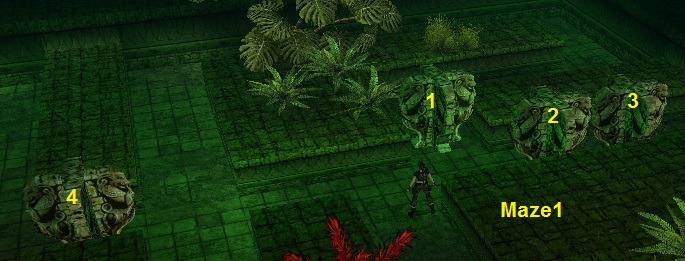
And now go around to push #1 out and by going around a
few times, move it into the passage N. Turn right and pull #4 once, go around
and pull it to the S so the intersection is clear
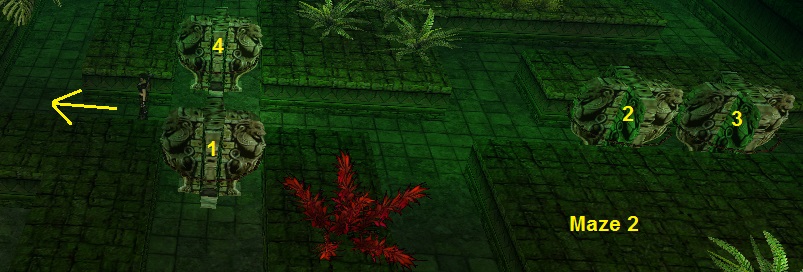
Then go around to get into that passage E where that
last statue was and come to a flame that goes back and fro. Pass that one to
the left (E-Lara’s right).
Follow
through to the next statue and pull that one twice to the N, to the spikes.
Turn around, passing spikes and go in that passage where the statue was. Follow
around right till you come to the next statue, pull that one back twice and
turn go around it and now avoid that flame (use that area you created near that
statue).
At the next two statues pull #1 out, go around and
push it once, go around it and push it to the W. Go around and now pull #2 one
out of the way ....
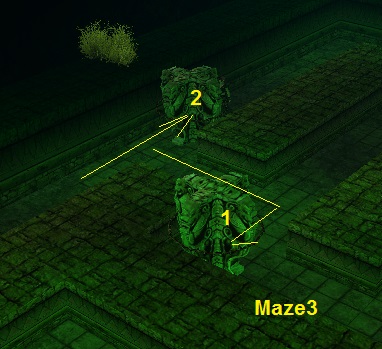
... so you can go around it and finally get Raptor Key #3.
You
have to go back the way you came, just pull some of the statues out of the way
so you can go back to the waterhole and swim back to get to the roof
Serpent Stone,
for Raptor Key 4.
Go
left around to the other side of the roof (W), notice the raptor statues on
your way there and pick up another Serpent
Stone. A camera shows you where to use it, all the way on the ground floor.
Go to the N side and do safety drops down, ending up right in front of the receptacle
for this Serpent Stone. Roll and go straight into the gate.
Take
a running jump or dive into the water and climb out at the
N side. Go straight to the back and into a passage hidden by some hanging plants.
Turn the wheel at the back of the room (camera shot of disappearing spikes).
Scaling the
Walls.
Go back to the pool and use the crack in the left side
pillar to get onto the arch. Turn around and jump to the slope left or right.
Shimmy to the end, pull up and backflip to another slope, slide and jump a few
slopes to get into the opening of the building (N).
Climb
the pillar and face E standing back on the edge, back flip over the W wall and
grab the edge. Shimmy to the left to get to the place where the spikes
retracted. Easiest way is to just continue the shimmy around the corner and
drop down on the corner ledge there. Start climbing the ledges and then grab
the edge of the roof on the left (W) and shimmy around the corners till you can
pull up. You are on top of the roof, take a running jump SW and grab the edge
to pull up on that ledge.
Take
a running jump to the ledge with the spikes and rolling ball and grab the edge.
Shimmy around to the left and behind the spikes pull up. Wait a sec for the ball
to rumble and jump back grabbing the edge and let the ball pass. Pull up again
and follow through over a wooden bridge. At the end take a step away from the
edge and run down when the spikes are still up and immediately roll. You’ll
lose less health this way. Go to the end and jump to the crack on the right
side. Jump up one crack and shimmy left to hoist up on the ledge. Slowly
approach the ball and hang from the edge when it starts rolling. Walk to the
end and grab the crack in the wall on the right. Jump up to grab another crack
and shimmy to the left and pull up. Slowly walk towards the ball and be ready
to jump and grab the edge when the ball starts rolling down. Walk to the end
and take a running jump and grab the edge of the burning ledge. Pull up in the
corner and when the flame is down jump up. Then take another running jump to
grab the next ledge on the left.
The
next one is a somewhat curved running jump when the spikes pop up, keep running
and a jump plus grab to the next ledge.
Next
one is a bit more difficult as there is a burner as well as spikes, but start
run when the spikes are still up and jump plus grab the next ledge. On the next
one with the burner shimmy to the opposite corner and hoist up, turn around and
when the flame is down take a running jump to the one back N. Then make a
sequence of slide/jumps to a save ledge in the corner.
Push Puzzle
with Spikes.
Jump
over and there are three pushable statues, one goes to the one tile E wall and
two to the different looking tiles in the S side.
SE
statue; pull once, get behind it to push it on its tile; spikes lower for the N
statue.
The
spikes at the other side are down so now you can move the statue N to the one
against the right (E) wall. Now you can move the last statue on its tile.
Go
back to the second statue you moved (NE) and this one has to go all the way to
the opposite corner (SW). This lowers the spikes on the ledge on the left (S).
Take running jumps to the next ledges. Hang from the last, drop down when the
spikes are about to go down and immediately back flip. Drop down some more and
then cross the bridge. Jump to the crack on the left (S) shimmy to the right,
drop and keep shimmying to the right and then jump up and crawl in. Follow
through, turn around and climb the ladder.
Hang
down from the end and jump up to grab the crack above and shimmy to the left to
hoist up and then get up the ladder.
Jump
up to grab the monkey swing and get to the opening in the wall, avoiding the
burner. Get Raptor Key #4 and hear a
door opening up. Go up the steps and through the passage and straight ahead, go
to the fenced off area on top of the open area. We have to get onto the
opposite roof (S).
Use the Raptor
Keys, defeat of the Lizard Queen.
Lower
yourself carefully to the ground floor. Go left to the E side, around the
corner into the gate right and inside take a right. Jump W to again perform the
tricky sequence jumping (for the last time) to grab the monkey swing at the
second sequence. Get up the ladder and off on the left. Go into the opening and
take a right, jump down an up at the end, into the gate you opened before. Get
down the steps, over the pool and into the opening straight ahead, follow
through and go left up the block and climb upon the roof area. Place the 4
Raptor keys in the SE corner. Go N and safety drop down to the ground floor. Go
left and around the corner to the now open gate:
The Guide says…..This is where we must say
goodbye, good luck and farewell …
Lara: Hey I like the look of this
Lizard Queen: So you finally caught me, I
guess this is the end…