The Cursed Castle/Le Chateau Maudit
By Bernard Collett
This walkthrough is meant as a general guide only. It
may not include every pickup or secret. There may also be alternative ways of
approaching situations within the game.
- Pickups and Items
- Enemies
- Secrets
WALKTHROUGH by Lizard Queen
Mountain Cliffs
The level begins at the bottom of a
large mountain range. Run forward and take a running jump up to the small stone
structure ahead. Arm weapons and shoot the 2 warthogs
running about. Climb the ledge and the block above and face west. Take a
running jump to the sloped tile. Jump up and grab the slope above and shimmy
right as far as you can. Pull up, angle to face north/east and take a standing
jump to the column ahead. Face west and take a standing jump and grab the
slope. Shimmy right until you can pull up. Turn right (north) and take a
running jump to land on the flat block ahead. Face south, jump back and grab
the ladder on the inner side of the column and climb down. Jump up and grab the
jump switch and climb back out. Take a standing jump to the slope and slide
back down to the valley floor. Head to the small stone structure and drop into
the alcove in the floor. Pickup the flares and
enter the darkened corridor.
Dark Maze
Head down the corridor, turn left and drop down. Lower into the
crawlspace, reverse roll and climb into the next crawlspace. Crawl through,
stand up and lower into the next crawlspace on the left. Drop down into the
next corridor. Turn right (south), climb the block and crawl into the
crawlspace ahead. Pickup the Pharos Knot and
exit. Head north, turn right and drop down. Move ahead, drop down and turn
right. Turn left, pickup the flares and climb
the ladder (the wall ahead is climbable). At the top, turn left, climb into the
crawlspace and lower out the other end. Pickup the flares
and exit. Head south, enter crawlspace. Jump up and grab jump switch, watch a
cutscene of a block raising in another room and exit. Return to the ladder,
climb down and head west. Turn left, crawl through the crawlspace and enter a
red lava room. Take a running jump and grab the block in the middle of the lava
pit. Take another running jump and grab to the other side and exit via the door
in the east wall.
The Fortress
Climb the blocks on the west side to the top and place the Pharos Knot
in the wall receptacle near the gold doors. Enter through the newly opened
doors and dive into the water. Pickup the Shotgun
and pull out. Shoot the chests around the perimeter and pickup 3 Shotgun ammo enclosed within. Climb the stairs,
pickup the small medipack and enter the
fortress. Follow the corridor right and turn left at the first alcove. Arm
weapons, shoot the bat and pickup the Shotgun ammo. Exit the alcove and turn left. Head
down the corridor, turn left and climb the wooden stairs. Turn left at the top
and then right. Enter the room on the left and pickup the Crowbar on the raised block. Exit the room, timed to
avoid the blades that are now active and turn right. Turn left and head north
to the end of the corridor.
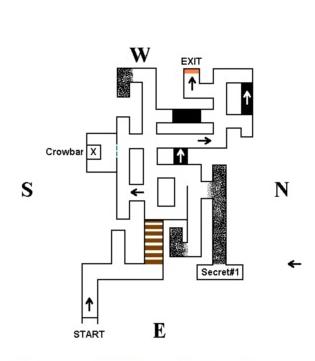
Secret #1: Head towards the darkened alcove in the
north wall and arm weapons. Shoot guns to see and turn right. Shoot the bat and drop into a hole in
the floor. Crawl through the crawlspace, into Secret #1. Pickup the Crossbow ammo, large
medipack and Shotgun ammo in two corners of the room. Open the sarcophagus
and pickup the Crossbow and exit through the crawlspace. Climb the block, head
through the corridor and turn left back into the maze.
Follow the right wall and take a standing jump west over the gap. Follow
the right wall and take running jump and grab west over another gap. Follow the
right wall and take out the skeleton with
explosive crossbow ammo, that is if you went for Secret #1. If not, then return
to the gap and shoot him into the abyss with the shotgun. Open the door with
the crowbar and watch a cutscene of the next area.
Outdoor Courtyard
Take a standing jump to the ledge ahead. Angle to face south/east and
take a standing jump and grab the reddish foliage on the wall (it is
climbable). Climb to the lower ledge and take a running jump and grab to the
next ledge. Arm weapons and take out the 2 golden
harpies. Enter the corridor and use the crowbar to open the door. Shoot
the chest and pickup the Shotgun ammo in the
south/west corner. Climb the bookcase and jump up and grab the ladder on the
inner north wall of the hole in the ceiling. Pull up at the top and jump up and
grab the jump switch on the wall. Watch a cutscene of a block raising
somewhere. Climb back down the ladder, exit the room back to the ledge outside
and dive into the mossy pool below. Pull up out of the water and descend the
stairs in the north wall. Shoot the chests in the north/east and south/east
corners and pickup the large medipack and Shotgun ammo.
Jump up and grab the jump switch in the east wall and watch a cutscene of a
door opening in the pool outside. Climb the stairs out and drop into the pool.
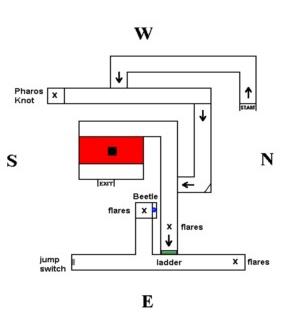
Underwater Maze
Swim down into the hole in the floor and follow the corridor south, then
right. Follow the left wall around and swim through the opening in the north
wall. Swim right, follow the left wall around and swim into an opening in the
south wall. Swim right, follow the left wall around until you reach a hole in
the ceiling and swim up. Swim north, then right (east) and follow the corridor
until you reach an air hole in the east wall.
Secret #2: Face north and swim to the end of the
corridor and turn left. Follow the corridor around and up to surface into
Secret #2. Pickup the small medipack and 2 Shotgun ammo in three corners
of the room. Drop back into the water and follow the corridor right, eventually
facing south back to the air hole.
Facing south, swim forward, to the right and up to surface in a darkened
room. Pull out of the water, climb the block at the west wall and use the
crowbar to pry off the Black Beetle.
Immediately jump up and grab the monkey swing above as a swarm of beetles emerge from the hole in the wall.
Turn around and swing forward, then left into an alcove in the north wall. Run
through the blades and pickup the Winding Key
inside the sarcophagus. Turn left and pickup the Shotgun
ammo in the alcove on the left. Exit the room, timed to avoid the blades
now active and jump up and grab the monkey swing. Swing as far forward and then
left (south) to avoid the beetles below and drop back into the water. Swim
down, left then up back to the air hole in the ceiling. Face west and swim
forward past the first alcove on the right and turn right. Swim to the end of
the corridor, turn left and a sharp left and down through the hole in the
floor. Swim left, then left to the wall, then right. Follow the corridor and
turn left into the opening in the north wall. Turn right, follow the corridor
around and turn left into the opening in the south wall. Turn right, follow the
corridor around and turn left into the opening in the north wall. Swim north,
up and surface back outside.
Outdoor Courtyard - Revisited
Pull out of the water and head to the north/west corner of the
courtyard. Use crowbar on the door, drop into the hole in the floor. Quickly
wade left (west) and pull up onto the block on the right before the flames
along the slopes hit the water. Use the crowbar to pry off the Black Beetle from the wall. Take a standing jump to
the flat section of the slope and angle to face north/east. Take a running jump
to the ledge and pickup the small medipack.
Take a standing jump to the other ledge and pickup the Shotgun
ammo. Drop down and pull the jump switch, opening a way somewhere. Climb
the block and take a running jump and grab (to change trajectory) to the alcove
in the south wall, which has now converted the slope to blocks. Climb the
blocks back up to the room above. Climb two blocks in the south/west corner
into another room. Head to the small slope in the south/east corner and climb
the block. Turn right and take a running jump and grab to the column ahead.
Pull up, turn right and take a running jump to the slope. Jump off the slope
and grab the ledge ahead. Pull up, turn right and take a standing jump and grab
the block ahead. Pull up and use the crowbar to pry off the Black Beetle from the wall. Drop back into the hole
in the floor and turn west to face the slope. From the middle of the block,
take a standing jump and grab the edge of the slope and drop to the ground
(minimal loss of life). Drop down into the hole in the floor and climb down the
next block back into the previous room. Exit back into the outdoor courtyard.
Backtrack for the 4th Beetle
Head to the south/east corner of the courtyard, jump up and grab the
reddish foliage on the block and climb up. Angle to face south/west and take a
standing jump and grab the edge of the ledge ahead. Pull up and climb the
reddish foliage on the south wall up to the ledge on the right. Take a running
jump to the opening in the east wall. Navigate through the inner maze back to
the wooden staircase and back outside the fortress. Climb down the stairs and
exit through the gold door in the east wall. Arm weapons and shoot the golden harpie. Climb down the cliff and exit through
the door on the left (north) back into the lava room. Take a running jump and
grab the block in the middle of the lava and another to the ledge on the other
side. Exit right through the crawlspace and light a flare. Turn right and head
to the end of the corridor and climb the ladder. At the top, turn right and
right again to the end of the corridor. Use the crowbar to pry off the last Black Beetle from the wall. Exit back to the ladder
(left and left again). Head west, turn left, crawl through the crawlspace and
re-enter the red lava room. Take a running jump and grab the block in the
middle of the lava pit. Take another running jump and grab to the other side
and exit via the door in the east wall. Climb back up the cliff and through the
gold doors at the top. Climb the stairs back through the indoor maze to the
exit (see map). Take a running jump to the ledge
and climb the reddish foliage on the left down to the lower ledge. Angle to
face north/east and take a standing jump to the lower block. Climb the foliage
on the end of the block back down to the floor of the courtyard. Climb down the
stairs in the north wall and place the four Black Beetles into the centre
pyramid structure. Pickup the Mechanical Scarab
and return to the stairs back to outside courtyard. Head to the south/east
corner of the courtyard, jump up and grab the reddish foliage on the block and
climb up. Angle to face south/west and take a standing jump and grab the edge
of the ledge ahead. Pull up and climb the reddish foliage on the south wall up
to the ledge on the right. Take a running jump to the bridge, combine the
Winding Key and Mechanical Scarab and use it on the south tile to deactivate
the spiked corridor.
South Entrance
Head down the corridor, pickup the Mechanical Scarab and enter the next
room. Walk over all four raised blocks and three Lara clones materialize. Do
not shoot them as you will deplete your own life. Enter the new opening in the
east wall. Take a running jump to the first slope and run forward. When the
spiked boulder falls, sideflip right to the next slope. Immediately sideflip
left to the previous slope and continue up. Repeat for the next two boulders
and return to the bottom of the slope. Use the shotgun to shoot the skeleton into the deadly water. Drop into the corridor
between the slopes and pickup the large medipack and
Shotgun ammo. Climb the slope to the next room. Arm weapons and shoot
the Minotaur Guardian. Enter the south/east
area, shoot the chests and pickup the small medipack
and Shotgun ammo. Climb the ladder in the east wall and backflip to the
ledge behind. Pickup the Hathor Effigy and
climb back down the ladder. Return to the room with the small pools and exit
via the opened door in the north wall. Slide down the slope and exit the
corridor. Turn left and up the wooden staircase back to the interior maze. Make
your way back through the maze to the exit (see map). Take a running jump to
the ledge ahead and another to the bridge.
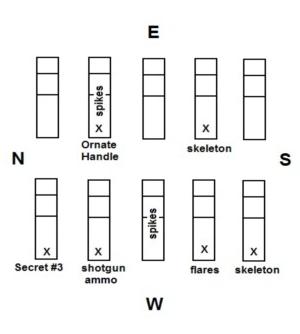
North Entrance
Head north and use the Mechanical
Scarab on the tile to deactivate the spiked corrior and enter. Turn right, head
down the corridor and turn left. Arm weapons and shoot the Minotaur Guardian. Climb the ladder on the south wall
of the centre structure and pull up. Jump up and grab the jump switch and watch
a cutscene of a graveyard. Head around the perimeter and pickup the Shotgun ammo. Return to the ladder and climb back
down. Head east down the stairs into the graveyard. Pickup the flares on the grave to the left and shoot the two skeletons back into their graves (or wait until
they're together and take both out with one explosive crossbow arrow).
Secret #3: From the grave with the
flares, drop into the hole, light a flare and enter into Secret #3. Pickup the Shotgun ammo and climb out.
Head to the 2nd grave from the
north/east corner, drop in and light a flare. Use the Mechanical Scarab to
deactivate the spikes. Open the sarcophagus, pickup the Ornate Handle and climb out. There are two pickups, Shotgun, flares and two
skeletons in the remaining graves (see map). Exit the graveyard west and
climb the stairs to the gold door. Combine the Ornate Handle and the Hathor
Effigy and place the Portal Guardian in the
pedestal. Head through the door, admire the treasure, climb the stairs to the
throne and the level ends.
The End.