GUARIDA
Level by Scourge05
Walkthrough by Phil Lambeth, assisted by Doggett TV's video walk
Begin in a dark cave. Nearby is a large medipack. Follow
the E passage to a small room and exit N into an outdoor area. Shoot two ninjas and go through the E opening for uzi ammo and the UZIS.
Vault up S and the door ahead opens. Jump over the lava pit and enter a pool
room. Jump into the water and swim down, then up in the corner. Pull out and
face a lava pit.
Jump the platforms in a clockwise direction until you
reach the other side. Pull up E into a room with ledges and platforms. Hop to
or pull up onto the lower SE platform and pull down the wall switch to open a
nearby door above you. Climb the ledges to find the open S door and pull down
the nearby wall switch before entering. Blue lights start flashing.
Slide down S and take the indoor path on your left. Go
to the W wall to find a button on either side. Push them both. The one on the
right raises a block that you don't really need in order to get on top of the
wall (you can pull up onto a ledge at the entrance),
the other starts red lights flashing. Scale the wall to arrive at another pool
room. Jump into the water to find STAR KEY 1
on the raised NE slab.
Surface, pull out and find two assassins waiting for you. Dispose of them and
step on the trigger tile in the NW alcove to open the nearby door. Enter the
next room with a suspended dude and shoot the jars for uzi ammo
and 2 x shotgun ammo. The face blocks in
the alcoves all look alike, but three of them are pushblocks.
First, move the SE block to access a small room with flares, a small medipack and a large
medipack. Avoid the flaming barrel. The NE
block seems to serve no function. Moving the NW block
allows you to reach a fourth pushblock.
Pull it into the room and re-enter the passage to find
yet another pushblock. Pull it into the room as well.
Follow the same passage around the corner to find, yes, another pushblock. Push this one as far as it will go, and to your
left is a final pushblock. Pull it once to reveal a
passage. Go around and follow to a wall switch. Pull it down to open a door
somewhere and return to the previous small room.
You're not through with pushblocks
yet. Move the most recent block into the E wall switch passage to get it out of
your way. At the entrance to this room, in the N wall, is a pushblock
we haven't yet used. Pull it two times to reveal a short passage with another
wall switch. Pull it down (no cue as to what may have
happened), then return to the small room and push the most recent block back
into the N wall switch passage to get it out of your way. Finally, pull the NE
block back and move it aside to reveal a new passage that takes you down to the
lava room with the helpful platforms.
Hop down and jump the platforms E until you reach the
room with the ledges and platforms. Get up to the top ledge as before, slide
down S and this time take the outdoor path to your right. Go around the central
building to find an opening in the S wall. As you enter a fixed camera shows
flames appearing on the pillars jutting out of the water. The flames on the
face tile pillars are harmless, however, so jump from just those two pillars to
the ledge on the far side, which acts as a trigger tile that opens a door
somewhere.
Jump or swim back (you can pull out on the lower
block), exit this room and find the door you opened in the far N wall. Torches
are lighted as you step into a deep room with platforms and ledges. Hang from
the middle portion of the ledge you're on, drop and grab the ledge below, pull
up and hop down onto the gray SE platform. The drop and hang trick doesn't work
here, so you need to hop back from the edge and hit the action key just as you
clear the edge so you'll glide down and land on the block below. Push the
button to raise three barriers block and drop down to the floor.
Vault up onto the now-accessible S ledge to raise a
block outside. Find the wall switch near the NE corner and pull it down to
raise a platform behind you. Pull up onto the raised platform, jump W to the
ledge and pick up the SHOTGUN. Hop to
the NW corner ledge and find that both walls there are climbable (but this
phenomenon affords no advantage). Take a running jump to the S blocks, climb
them and jump to the E ledge. Take a running jump to the central N structure
and pull up to the uppermost ledge.
Jump across to the horseshoe ledge and exit via the
opened S doorway. The block you raised is ahead, but run past it to the dark SW
corner. Light a flare to find a paper-thin ledge you jump up to grab.
(Alternatively, you could go the long way around by climbing the block at the
entrance and going around in a counterclockwise direction.) Pull up onto the
ledge and go around to pull up onto the corner block. Take a running jump N to
grab the raised block, pull up and turn left to pull up higher. Hop down SE to
find STAR KEY 2.
Get back down to the ground, exit NW and loop around
right at the entrance to find a column with a climbable surface. Climb up and
shift right to drop down onto a ledge. Go around to find
receptacles for your Star Keys. Place them both to
open the E door, enter and follow to a small room for the only SECRET and the GLASS
HAND. On the way out, hop onto the face tile in the W alcove to open
the E door behind you.
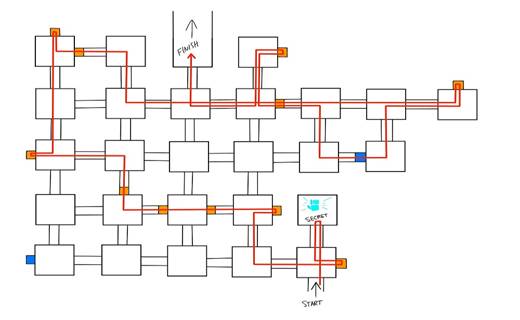
At this point you may wish to consult the map below provided
by DoggettTV to help you keep your bearings:
Go E into the next room and pull up N into the
opening. (If you go all the way E to the last room, encountering a ninja along
the way, you'll come to a wall button that's apparently does not need to be
pushed. In fact, doing so may do harm, so best stay away.) Hop down into the
next room, turn right and step onto the trigger face tile in the W alcove.
Reverse roll, hop down, step on the trigger face tile in the E opening and hop
down E into the next room. Draw a weapon before hopping up E onto the trigger
face tile to open the door.
Continue E into the next room and expect a ninja to attack from behind. Turn right to hop
into the N opening with the next face trigger tile. Hop down N into the next room,
turn left and go through the E opening into the next room. Step on the trigger
face tile in front of the closed door ahead and, hop down and up into the N
opening where another ninja attacks.
Continue N through the next room, through the opening into the NE corner room
and up into the N alcove with the trigger face tile.
Hop back to the floor, turn right and hop into the W
alcove with the next trigger face tile. The door ahead opens, so hop down, turn
right and up through the S opening into the next room. Turn left and go through
the next five rooms until you reach the last W room. Turn
left there and hop up into the N alcove with the trigger face tile. Hop
back down to the previous, return to the previous E room and shoot another ninja. Turn left in this room
and go through the S opening to the next room, turn right and hop into
the E alcove with a trigger face tile and a button to push.
The door to your right opens, so hop down E into the
next room, turn right and go through the N opening to the next room, turn left
and go through the E opening to the next room, turn right and go past the
opened door through the N opening to the next room, turn right and hop into the
W alcove and the last trigger face tile. Hop back to the floor, turn right and
go back through the S opening to the previous room, turn right and go past the
opened door through the E opening to the next room, turn right and find that
the N exit door is now open. Go on through into the darkness to end the level.