THE MYTH OF KHONSU
Levels by Igor Gois
Walkthrough by Phil Lambeth, with the indispensable assistance of Doggett TV's video walk
[Note: For some unfathomable reason, there's no compass in this game, so I'll do my best to provide intelligible directions. Also, be forewarned that the initial portions of the game are intolerably dark, so conserve your flares to the extent possible. Finally, the select screen inexplicably lists the levels out of order. You'll naturally want to start with Level 1.]
Level 1: KHONSU RUINS
Drop down into a fixed camera with an ornate tile at your feet. The only way to go is left (the other paths lead to dead ends), so for a few quick pickups proceed past a blocked opening on your left, turn the corner and continue past a decently lighted intersection on your left. Turn right at the wall and go all the way past another dead end to the next wall. Turn right and go to the next wall for shotgun ammo (note that you already have the shotgun in your inventory). Reverse roll, go back the way you came, continue past the dead end and the intersection and find some much-needed flares at the next corner.
Turn left at this corner and go down past the intersection and up a short ramp at the far wall. Note the opening up in the wall that's presently beyond reach. Hop back a few times, draw your weapon of choice and wait for two jackals to make their appearance. At the wall you can go either right or left and arrive at the same place on the other side, but let's save that for later.
For the present, turn around and go back to the intersection. Turn right, then right again and find the opening in the wall ahead. Enter and follow the dark passage to the far wall and beyond to alert two bats and get them out of your hair. Keep your pistols out and fire them continuously to provide some extra light. Ignore the pushblock you see at the end of the passage, go back the way you came and around the corner, and enter the first side passage to your right. Continue to the wall, turn left and find a pushblock in the left side passage just before the next wall. Pull it once, continue to the wall and loop around left to find a second pushblock. Push this one twice, turn left and push the first block into the hallway.
Reverse roll, loop around right and pull the first block once. Continue going around in like fashion until the first block is in the corner alcove. Now go to the second block and pull it twice. Go around it into the revealed passage and pick up the explosive arrows for SECRET #1. Reverse roll, loop around right and follow the outer walls until you come to a closed gate for later. Go back and around the corner, take the first left, go to the far wall, turn right and follow your nose to the entrance opening.
Exit to the beginning intersecting passages, dogleg a bit to your left and continue straight to the far wall. Turn right and continue all the way to the next wall. You may meet up with another bat along the way. Turn left and follow around to an opening that leads into a new area. Prepare to do battle with four ninjas and two assassins. Pick 2 x shotgun ammo and a small medipack left behind after the carnage is complete. From the entrance, go forward a bit and to your right toward a pagoda-like structure. Hop up onto two blocks sheltered by the roof and push the button for some on-screen information that's not very helpful at the moment.
Hop to the floor and find the pushblock underneath the pagoda. Pull the block and move it past the column behind you (as you make the first pull). Get it as close to the marked tile (one square away) as you can, in preparation for a timed run much later, then go past the second column toward the dark wall. Turn right to find an opening and shoot the large jar that hides shotgun ammo. There's a wall switch in an alcove in the back wall, but it's for the later timed run. Go back the way you came, and directly opposite the entrance, beyond the row of blocks, is an opened gate.
There's a ladder ahead which you'll use later to get back up, but for now, jump into the water below, swim left (the door closes behind you) and open the underwater door in the far wall. Don't enter yet. Instead, reverse roll, loop around right and follow the passage in a counterclockwise direction until you reach an underwater lever. Pull it, reverse roll and swim back the way you came, go through the opened door and find an air hole. You can't continue profitably through the passage right now (it needs to be drained first), so return to the previous underwater room.
Swim to the far wall, turn left past the opened gate and swim past a saw blade trap to another underwater lever. Pull it, swim back and turn right into the previously opened gate for air. Go back, loop around right into the corner passage and find another opened door to your right. Enter a new open area and swim under the floor crack in the far right corner for grenade gun ammo. Swim up to find an underwater lever. Pull it and, since you don't have time to do anything else, beat a hasty retreat to the air hole in the previous area.
With your lungs refilled, return to the previous room, swim to the far wall and turn left to find a large medipack in plain sight on a pile of sand in the corner. This registers as SECRET #2. Swim up and over the roof of the nearby structure to find a hole containing an underwater lever. Pull it and go back for air. Return to the previous room, swim under the crack ahead and to your right, swim up past the first underwater lever and an opened trap door to find a second underwater lever up there, pull it and go back for air. Yes, I know this is getting monotonous, but relief is on the way.
This time, after emerging in the open area, turn left and swim through the new opened doorway, time your way past the spikes and pull another underwater lever at the end of the passage. Return to the air hole and find a new opening to your left. Follow the passage past a closed door (a gate then closes behind you), turn the corner and time your way past two saw blades and a spike trap, continue forward past another closed door into an area with two of those pagoda-like buildings.
Swim straight forward over the roof of the larger building and find the AQUA LUNG no longer needed by the poor fellow hovering over it. Nearby is grenade gun ammo. Now that finding air is no longer a concern, further exploration of this area will lead you to flares on a block. Swim toward the smaller building and open the underwater door in the wall opposite it. Follow the passage until you face a sliding pole with multiple spinning blades. When it starts going away from you, swim forward and left into the alcove with a closed door. Wait for the pole to go by to your right, then swim out and turn left at the wall to find the GRENADE GUN for SECRET #3.
Swim over the large jar blocking your way, continue over a saw blade and go around the corner to pull an underwater lever. Note for later the closed gate and wall switch. Continue around the corner past two more saw blades, turn right at the wall and use the alcove to get past the sliding pole once more. Back in the pagoda room, go through the entrance and find an opened door immediately to your left. Enter and pull the underwater lever. This opens a door in the passage with the sliding pole, so return there and take the first left. Get past the spikes and pull another underwater lever around the corner, which drains the area and robs you of what little light you had.
Shoot the ninja and get past the spikes. Turn left at the wall, get past the sliding pole, shoot the jar around the corner and pull down the wall switch at the next corner. No, it doesn't open the nearby gate. Return to the pagoda room, run past the entrance and find the opened door at the far right corner. Go on in and push the button. Exit and run along the larger pagoda until you've almost reached the corner. Stand on the higher sand pile and jump up to grab the roof. Pull up and take a rolling back flip to grab the ledge. Pull up, turn right and find the door you opened by pushing the button.
You'll need a flare for this, so go ahead and invest one now. Run straight forward to the wall and pull down the wall switch. Turn 135 degrees to your left and run forward to pull down the wall switch on the raised slab. Hop back, turn right and run down the passage past three opened doors all the way to the far wall. Turn right and pull down the wall switch there. Go back the other way and exit this room to the open area.
Hop down to the ground, reverse roll and enter through what was formerly the underwater door. Get past the sliding pole as before and find that the gate next to the wall switch is now open. The only reward you get for all that trouble is another button to push. Do so and exit to the open area. Turn right, run past the entrance and the opened doorway in the corner you explored earlier and find another opened doorway just to the left of it. Go on in, turn left at the wall, go to the next wall and wait for another sliding pole with revolving blades to go by to your right, turn left and push the button at the end of the passage. You hear the sound of a door opening.
Go back the other way, turn right into the opened doorway and take the next right back to the open area. Turn right once outside and follow the wall around a few corners until you reach a now spikeless opening. Enter and push a button at the end of the passage to raise a block in a previous area, near the pushblock you moved earlier.
To get there, exit to the open area, loop around left to the corner where there are two openings and take the left one. Turn left at the wall, wait at the next wall until the sliding pole goes to your left and turn right. Follow past the opened doorway and continue straight ahead through the next opening, loop around left and climb the ladder you saw earlier. Back flip near the top, turn around and emerge in the previous open area where you have marginally more light to work with.
Go forward and diagonally left toward the raised block. Go past it to the dark wall and into the opening on your right where you shot a jar and got shotgun ammo much earlier. Go to the alcove in the back left corner and pull down the timed wall switch to raise a platform outside and open a door above you. Return and hop quickly onto the pushblock, then onto the raised block, turn left and jump onto the raised platform, and finally jump forward and run into the next room before the timed door closes. It's tight but manageable with a little practice.
Pull down the wall switch in the alcove ahead to lower a rope, then pick up 2 x uzi ammo and drop back down to the ground. Directly opposite the timed wall switch room is a column against the wall with a climbing surface. Climb about three rungs from the top and back flip onto a small pagoda roof. Turn around, locate the rope, jump to grab it, swing forward and jump off onto the next pagoda roof. Go around the column and take a running jump to grab the ledge above a closed gate. Pull up, but don't run forward or you'll be toasted. Crawl past the first pair of lion statues as their flames ignite, stand up and wait for the lower flames on the next statue to ignite and subside (note the closed door), then step forward and crawl underneath the next pair of statues.
Run forward into the alcove before the final pair's flames ignite, climb the wall ladder about three rungs and back flip into an alcove with shotgun ammo. Jump out right onto the first of two sloped trigger tiles, slide and jump to the second one and slide down to the floor. The closed door you passed is now open, so make your way back there and shoot the scorpion before entering. The trigger tile inside opens a trap door in the ladder shaft, so go back there past the flames, climb the ladder to near the top and back flip into an upper area.
Wait for two jackals to arrive, then go to the far left corner of this room and shoot the large jar to get it out of your way. There's a trap door overhead that needs to be opened for later. Light a flare (or use your binoculars), look at the opposite wall and make a note of the symbols you see. From left to right there's (1) a fishhook, (2) a fishhook, (3) a scalpel, (4) a helix, (5) a bird and (6) a helix. Go to the doorway from which the jackals came (the one next to the ladder shaft) and on the first row step on the fishhook tile on the far right. Jump straight forward onto the fishhook tile on the next row. So far so good. Now you need to take a long pixel-perfect running jump to the scalpel tile on the far left of the third row. If you miss you'll catch fire, so save first. Save again when you do it successfully. Next, an easy running jump to the second tile (helix) from the right on the fourth row. Next, a standing jump to the second tile from the left (bird) on the fifth row and finally, a standing jump to the second tile from the right (helix) on the last row.
The doors in front of you open and a jackal comes immediately to the attack. In this new area hop onto the nearby row of blocks, locate the jumpswitch next to an opening with spikes and jump over to activate it. Climb over the blocks and go through those eerie moonlight rays to find a generously timed wall switch in the corner. Pull it down to lower a block beneath those spikes you saw. Go there and the block rises again soon after you enter the dark room. Look around for shotgun ammo and a wall button that opens the double doors to your left.
You get back across the rows of tiles in the opposite sequence from the way you arrived. Step on the helix tile to your left at the entrance, jump diagonally forward to the right onto the bird tile, diagonally forward to the left onto the helix tile, a running jump to the scalpel tile on the far right, save your game and take a running jump to the fishhook tile on the far left, and finally a standing jump straight forward onto the fishhook tile at the exit. Go to the far right corner where you shattered the large jar earlier, turn to face the tile room and jump up to grab the ladder. Climb up past the lowered trap door and pull up into a room with flaming pillars.
Shoot a ninja and an assassin. From the trap door hole, go along the dark wall to find the UZIS in a slight depression near the next column. The large jar across the room hides uzi ammo unless one of the enemies pilfered it before you could kill him. The room beyond the jar is a trapfest that will require the investment of some flares if you wish to navigate it successfully. The builder has provided clues to the correct path, but since this written guide follows the online video walk, those will be revealed later. At the entrance, turn left and stop between the first and second columns. Walk forward onto the square surrounded by four columns and take a running jump forward to land safely between two columns with a floor lever ahead to your left. Don't push it, as it's a fire trap.
Instead, turn right at the floor level and walk toward the far wall. Just before you reach the penultimate pair of columns, stop and take a running jump over two flame tiles into the wall alcove for a small medipack for SECRET #4. The jump back is tricky, requiring a curve in lieu of a straight jump, so save before you try it. Turn right in place when you land (you're surrounded by flame tiles here) and carefully take a curved running jump to land between two columns. You can now run safely to the wall. Turn left, take a running jump over two flame tiles to land just past the trapped floor lever, and run to the corner and push a safe floor lever. A door opens somewhere.
To get back out, turn around and walk back to just before the trapped floor lever, take a running jump over two flame tiles, turn right, walk forward three squares until you're between two columns, take a running jump forward over two flame tiles, hop over the next flame tile, walk forward one square and take a running jump over two flame tiles to the entrance to the pillar room. Turn right to find the open trap door in the corner by which you entered earlier.
Drop down, go diagonally across the lower room to the far opening and go back across the five rows of tiles by following the same sequence described above. When you reach the next room, go through the moonbeams and save your game before you pull down the timed wall switch in the corner. Turn around and go past the lowered block beneath the spikes and find the opened door in the far right corner. There's a gate just around the corner that's also on the timer, so quickly enter and push the button at the end of the passage. There's a dark cut scene that provides no helpful visuals, but you can hear the sound of a door opening.
Exit the passage and run straight across this room toward the open double doors. Get across the five rows using the same sequence described above. Go to the corner of the next room and pull up through the opened trap door into the flaming pillars room. Run to the other end of the room to find a pushblock on one of several connected raised tiles. Two of these have a scarab design. As you face the nearer wall, move the block against the closed gate on your right (the one the scarab's hind legs are pointed at).
The gate opens, so pull the block back, go around it into the next room and enter to engage two jackals. Go to your right from the entrance to find crossbow arrows on the decorative mound. Go back to the entrance, loop left around the pillar and see the jumpswitch high up on the wall. Activate it, reverse roll, hop onto the ledge (note the closed door on your left) and continue along the wall to the far corner. Step on the trigger tile (1 of 4 to open the door you just passed) and go around the dormant lion statue to face a flame-blowing statue.
Take a step back from the edge. When the flames subside, stand jump forward and take another immediate standing jump up to the flat mound. Walk up to the ramp near the next corner, take one step back, wait for the flames to subside and take a running jump up to the trigger tile (2 of 4) and immediately back flip out of harm's way. There are two pushblocks close by. Move the outside block against the wall, then pull back the inside block to reveal a third trigger tile (3 of 4). Slide down, go past the closed door at the bottom of the steps and approach another flame-blowing statue at the corner. Hop forward onto the trigger tile (4 of 4) when the flames subside and take an immediate back flip.
You've made nearly a full circuit around this room, so return to that ledge opposite the jumpswitch near the entrance to find the door is now open. The passages to your right (closed gate) and left (inaccessible jumpswitch) are for later, so continue forward and find a large jar in a corner of the next area. Shoot it for uzi ammo, then enter the opening where a flaming tile guards a closed gate. Scoot around the corner into the opposite alcove for flares, exit and enter the next opening on your right. Step on the trigger to open the gate ahead. Enter but do NOT step on the next trigger tile around the corner (else the previous gate will close). Jump over it onto the next trigger tile and go around the next corner to pull down a timed wall switch (so save first).
Return, jumping over the same tile as before, exit and return to the entrance to this area. Turn left just before exiting, follow the passage and find that a previously closed gate to your left is hopefully now open. If not, reload your save and try again. When you're able to enter the timed passage, approach the flame tile, get past it and crouch in front of the flame-blowing dragon statue. When its flames subside, stand up and pull down the wall switch to open a gate. Exit with equal care and go to that corner where you shot the jar for uzi ammo. In the opposite corner is the opened gateway. Go there, crawl inside and push the wall button that opens the nearby door being guarded by the flaming tile you encountered earlier.
Go there and push the floor lever around the corner to open another nearby door. Reverse roll and loop around left to find it. Enter a small room with a pushblock, a flame-blowing lion statue and assorted pillars. Crawl to the pushblock, and when the flames subside stand up quickly and pull it back three times so that it comes to rest next to a column. Go to the pillars, find the lower one you can pull up onto and do that. Take a rolling back flip to grab the higher slope, pull up onto a second trigger tile and drop back down to the ground.
Pull up onto the pushblock and climb up higher onto the stable pillar. Turn around and take a running jump to the ledge in front of an opening. Go inside and shoot a couple of bats. Turn left from the entrance to find shotgun ammo. Turn right and follow the wall to the next corner. Jump up to grab the crawl space and pull up inside. Drop down the other side, light a flare and shoot two scorpions. Search the area for a large medipack in one corner, a small medipack against the far wall and grenade gun ammo for SECRET #5.
Get back out through the crawl space, look for uzi ammo against the back wall, exit to the ledge and turn right. Run off onto the sloped pillar, slide and jump across to the lower sloped pillar. Slide to the ground and get up onto the pushblock. Jump diagonally onto the next higher slope and back flip onto the highest pillar. The spikes on the raised platform in the room across the way should have retracted, so jump over there and push the floor lever. Again, a dark cut scene is next to useless, but a block has lowered to provide access to that jumpswitch you may have seen earlier.
Exit this room, safety drop from the ledge to the ground and exit through the opened door. Get past the flame tile, continue straight, and just before the entrance turn right into that side passage and find the jumpswitch. Activate it, turn around and pull out of the hole, go back to the area where you shattered the large jar for shotgun ammo and see that the lion statue in the nearby alcove is no longer spewing flames. Step in front of it and pick up the CROWBAR. You're now done here, so exit this area, hop right off of the ledge and go through the opened gateway where you left the pushblock long ago. Move the block along the raised tiles until it comes to rest next to the gate on the other side of the room. The gate opens, so pull the block back, go around it on the left side and enter.
There's a lava room ahead and to your left, but start by looping around right to find a bay of three timed wall switches. Save your game before starting. Looking left to right, pull down all three switches in this order: 3, 1 and 2. Turn left and loop around to another opening to the lava room. Jump to the first raised platform, jump to the slope ahead and jump off two more small slopes, curving your way right each time, slide down a wide slope and jump off curving right onto the next wide slope, back flip and jump off with a sharp right curve to land in an alcove. Pull down the wall switch, hop back and take an angled running jump to the raised platform at the lava's surface between the wider slopes, jump forward to the next raised platform and turn a bit right to hop up around the corner onto a ledge. Line up for a running jump to the final raised platform, run forward and pull up onto the ramped ledge.
Turn left, slide down the slope and jump to the ladder. Climb to the top, turn left and take a running jump to grab the ledge surrounding a column. Pull up, turn left and take a running jump to the next such ledge. Walk around it to the left and save your game in front of the wall switch for another timed run. Pull it, run around the column to the left, jump forward to the ledge surrounding the next column, continue with a running jump forward and just a little to your left to land on a slope, jump off to activate the jumpswitch, fall to the timed platform and side flip right onto a slope before the platform drops you into the lava. Jump off the slope toward the bay of timed wall switches.
Turn right, and near the end of this short passage leading to the exit, there's an unmarked ladder in the wall to your left. Climb it to the higher ledge and push the floor lever for a cut scene in the flaming pillars room. Climb back down, exit this area and turn right. There's a raised block on the spot where you found the uzis long ago (near the corner trap door). Climb up onto the block from the side facing the trap door hole, take a running jump onto the slope ahead and jump off to grab the first flaming pillar. Shimmy around left to the other side and pull up in the corner where you'll be safe from the flames.
You should be facing the pushblock. Take a running jump (no grab) to the left corner of the sloped pillar ahead. Turn right, walk up to the higher side when it's safe to do so and stand jump in front of the lion statue when the flames from its mouth subside. Jump up to grab the ceiling and monkey swing along the track, timing two flame blowers issuing from the pillars below, until you reach the far wall. Release and activate the jumpswitch. You hear what sounds like a gunshot. (According to TombTitan, all this jumpswitch does is open a wall recess near the ceiling that provides the clues for navigating the room with unmarked death floor tiles, which you've already done if you've been following this walkthrough.) Safety drop to the floor and run to the other end of the room.
The gate leading to the lava room is still open, but the other gate is closed, so move the pushblock over there to open that gate again. Pull the block back once, reverse roll and go back into the lava room. You're going to have to do that timed run again, so refer to the sequence described earlier if necessary. When you climb the ladder after the timed run, don't turn left this time but continue forward, slide backwards down the slope, grab and pull up, take a rolling back flip to grab the other side, pull up and run forward to open the crowbar door. Enter, light a flare and save at the wall switch for another timed run.
Pull down the switch, hop back while turning left, jump up to grab the ceiling and monkey swing toward the opening. Release three rungs from the end, turn right and exit to the flaming pillars room, sprint straight across around the right side of the pushblock into the next room, turn right and sprint to the steps leading down to the timed door. When you get through in time an onscreen message appears.
It's dark in this room, so the investment of another flare is advisable. Pull back the skeleton in the corner to reveal the WOOD PIECE, then find the wall switch and pull it down, then back up to open the exit door. Go up the steps to a previously explored room, go forward diagonally to your left and look left for the entrance to the flaming pillars room. Go there, turn left and go to the opened trap door in the far left corner.
Drop down, run to the other side of this room (with the rows of symbol tiles on your left) and jump to grab the ladder at the opening in the wall. Climb down to the bottom, reverse roll and crawl underneath the first two pairs of dragon statues (you've been here before). Time your way past the remaining dragon statues and safety drop from the ledge at the end. Light a flare and go through the gateway in front of you (the gate closes behind you as you enter). Explore this area for uzi ammo and a large medipack, shoot two large jars for shotgun ammo and uzi ammo, and grab some much-needed flares.
Enter a passage with a fixed camera and walk forward until you see an onscreen warning. Turn around at the opening and slide down backwards. Hop back and slide some more, grab the edge where another fixed camera takes over and shimmy left so you can drop down and pick up the shotgun ammo just before a giant scorpion arrives. It's a tough critter to kill. I used up a fair amount of my shotgun and uzi ammo before resorting to steady fire with my pistols for at least a minute. You can jump up onto a sand dune and be safe there, but the scorpion will then skitter away and you'll have to go back down to lure it toward you. Anyway, the scorpion eventually croaked.
After the fact, I explored this vast area and found grenade gun ammo, a small medipack, uzi ammo and two large medipacks, one of which registered as SECRET #6 (on a corner ledge near the place where you dropped down). After you've found these goodies, go back to the wall where you dropped down into this area. Run forward until the fixed camera breaks, then look right to see a wall ladder. Go there and hop up onto the trigger tile at its base. You hear the sound of a door opening. Climb the ladder, pull up into the opening and pick up the METAL PIECE. Combine it with the Wood Piece to form the IMPROVED SHOVEL and climb back down.
Go to the far left corner of this cavernous area where you'll find a column bathed in moonbeams. Go back to the next column, stand a few steps left of it on the barely-discernible shadow line on the ground, with your back to the corner column and directly facing the moonbeams in the distance. Press the action key and you'll be prompted to use the Improved Shovel if you're standing in the correct spot. You'll start digging and then fall into a shallow hole, so pick up the CANOPIC JAR at your feet. The exit door also opens (roughly straight across the room from the ladder you climbed earlier). Climb out of the hole and find the exit doorway. Enter and you'll be carried to the next level.
Level 2: DEEP IN THE RUINS
Click here for DoggettTV's video walk.
As you step forward the door closes behind you, an onscreen message appears and two jackals and two scorpions attack from the room ahead. If you run around a bit you can take them all out with a single grenade. From the entrance, run straight forward and into the passage to a very dark side room. Shoot a large jar for flares, push the floor lever (note the closed doors) and exit to the main room. Go to the far left corner and find an opened door. Shoot the jackal and enter the alcove to pull down a wall switch.
Reverse roll, loop around left to find another opened door and shoot another jackal. Pull down the wall switch in the alcove to raise a block between the two opened doors. Climb up onto the block and pull up onto a higher ledge. Go diagonally left to the other end and take a pixel-perfect running jump to grab the triangular opening in the wall ahead. (For some reason it was easier for me when I was carrying a lighted flare.) Pull up and follow around into a crawlspace where you'll find a large medipack for SECRET #7. Go back, jump to grab the ledge, pull up and go left. From the corner, take a running jump straight forward to grab a thin ledge.
Pull up and follow the ledge to your right, or simply shimmy right to a flat spot near a triangular opening. Enter a dark room, shoot two scorpions and pick up the uzi ammo. Open the crowbar door at the other end, pick up the uzi ammo in the next room and push the floor lever. Go back to the ledge, jump or shimmy to where you pulled up earlier, and continue following the ledge around the corner until you reach the opened door. Shoot the jackal that greets you and enter.
Pick up the small medipack and enter the nearby crawlspace at floor level. Crawl forward, turn left, stand up when you can and turn around to find a wall switch. Pull it down and go back to find that a block has lowered in the previous room, revealing another wall switch that opens doors down below. Exit this room and safety drop from the entrance to face the opened doors at the far end of a room you visited earlier. Go on through, and at the far wall there's a crawlspace in the left corner where you'll find the CROSSBOW. Go down the nearby steps and drop down through the hole at the bottom.
Run forward to an intersection where two ninjas and an assassin come to the attack. One of them drops crossbow arrows. Turn left at the intersection (the area straight ahead is for later), continue forward and when the camera angle changes turn around and climb down the ladder. An assassin and two ninjas meet you at the bottom. Find the opening to the right of the ladder (as you face it) and run toward a hanging brass ball. Get on a higher ledge on either side and use your pistols to shatter the brass ball and open the double doors to your right.
Go there and run along the dark passage to an intersection. You can see an inaccessible jump switch up ahead, but turn left and continue to an area with a central ledge and closed double doors. Turn right in front of the central ledge and loop right around the corner to find a crowbar door in an alcove. Open it and go inside. Pick up the uzi ammo and pull down the wall switch (noting the nearby closed gate). Exit this room, loop around right to find more uzi ammo in the dead end alley, then go back around to that central ledge.
Climb up onto the ledge and go to the end away from the double doors. Stand at the right side and take a running jump with a left curve to grab the crack in the wall. Shimmy right and pull up at the corner. Turn around and stand jump about 45 degrees to your left up into an opening. Pull up into a dark room, pick up the crossbow arrows, pull down the wall switch and open the crowbar door. Don't rush in, or you'll drop down into that dead end alley. Instead, turn around, hop back and grab the edge, and shimmy left along the crack until you can drop down onto a roof. Turn left and walk to the sloped edge. Look down to line yourself up with that jump switch you saw earlier, turn around, slide backwards and activate the switch.
Return to the central ledge around the corner and follow the steps described in the previous paragraph to reach the room with the crowbar door. Shimmy to that higher roof as before, but this time instead of turning left go forward and find the platform that connects to two roofs. Slide down onto it and look left to see a hanging brass ball. Turn right and hop up onto the next roof, then use your pistols or uzis to shatter the brass ball and open the door in a room you visited earlier. Run to the far end on the right side, slide and jump to the ledge, go around the corner and go through the opened gate.
Two ninjas sneak up on you from behind, so dispatch them and pick up the shotgun ammo dropped by one of them. Save your game before pushing the floor lever. The gate behind you opens, releasing a boulder, so run forward and crouch in the corner so you won't be crushed. Jump over the boulder, go up the ramp and crawl under the opened gate. Run down the passage and meet two jackals. Turn left at the corner and push the floor lever to open the door. Follow past a closed door to an opening and drop down onto the roof. Find a convenient spot to safety drop to the ground, shoot a jackal and locate the central ledge that you used to jump to the wall crack.
Run along the right side of the central ledge, away from the closed double doors, loop around right into the crowbar door room and find the opened door in the corner. Enter and pick up the shotgun ammo and large medipack. Find another opened door and enter to push a floor lever. Grab the uzi ammo and exit these rooms. Once outside, use the central ledge one more time to grab the crack in the wall and shimmy to the corner where you can stand up. Jump up to the dark crowbar door room and shimmy to the higher roof. Use the connecting platform to get to the next roof and find the open gateway to your left.
Enter and find a boulder blocking your way. Push it forward, and it will fall to the ground and come to rest on a trigger tile near the jump switch you activated earlier. Follow it down, return to that central ledge and find that the nearby double doors are now open. Go in to shoot a bat and find, wouldn't you know it, another floor lever. Push it to open a gate somewhere. Exit, loop around right and leave this area through the double doors by which you entered.
Go up the steps, turn right to the intersection, turn left to the cave area and loop around right to climb the ladder. Run forward at the top, turn left at the intersection and jump the gap at the end to grab the ladder. Climb down to the bottom, reverse roll and pull down the wall switch to open the door behind you. Step forward while more Khonsu lore appears on your screen.
Run around the left side of the temple structure and climb up onto the ledges between the two cat statutes. Turn around and look up at the wall with your binoculars (use the action key for light) to see a brass ball hanging from the ceiling. Arm your crossbow with explosive arrows, hop down and go to the sand dune near the corner of the room to your right. You don't have the laser sight, so look up in the direction of the hanging ball and let loose an explosive arrow. If the brass ball shatters a block will rise in front of you near the other corner of the room. If it doesn't, either reload or adjust your aim and try again.
Use the raised block to pull up higher, slide down the ramp and jump to grab the ladder. Climb to the top, run to the other end of the ledge and turn right to take a running jump to grab the roof of the temple. Shimmy left and around the corner, and when you get to the pillar and can go no further, pull up and take a rolling back flip to the roof behind you. Shimmy right until you're past the pillar, pull up and take a rolling back flip to the first roof, shimmy left and around the corner a short distance until you can pull up onto a flat spot.
Pull down the wall switch behind the flaming lion statue to lower a rope. Turn around and go past the lion statue on its right side to find an almost invisible rope hanging between the two sloped roofs. Take a running jump to grab it, turn 90 degrees right and swing forward. Jump off at the apex of your swing to land on a ledge. Turn right, slide down the ramp and jump to grab the ladder.
Climb up as necessary to get Lara's feet "set," then shift around two corners to the other side, take a rolling back flip onto the slope behind you, slide ever so slightly and jump to grab the next ladder. Climb up to a ledge and run forward to push a button. Safety drop to the ground and do battle with three ninjas and an assassin. Pick up 2 x uzi ammo and shotgun ammo they leave behind and be aware that the lion statue on the temple roof is now dormant. This means you need to get back up there via the raised block, following the directions given two paragraphs back. Once there, go to the lion statue and pick up the RUSTED KEY on the platform formerly guarded by flames.
Safety drop to the ground (on the side where the wall switch is), reverse roll and exit through the opening by which you got here. Turn around, jump up to grab the ladder, climb up to near the top and take a rolling back flip to the connecting tunnels. Run forward and turn right at the intersection. Go to the end, turn around and climb down the ladder. Enter the tunnels to your right, turn left at the intersection and find a keyhole on your right at the dead end. Use the Rusted Key to open the door and push the button inside.
The whole place becomes flooded, but remember that you're equipped with the aqua lung. So swim back to the intersection, turn right, follow to an underwater cavern and turn right again. Continue to the far wall and pull out onto a block. Jump forward over the water hole and pick up a large medipack. Turn around, jump back into the water and swim toward the far wall. Pull up onto the lone block and jump toward the open gate. Go inside and find a floor lever to your left. Push it to open a trap door in one of two water holes back in the temple area, which haven't yet been mentioned in this walkthrough.
Go back, jump into the water, turn right and swim to the next floating block. Climb up onto it, jump to the opening above the ladder, run forward and turn left at the wall. Go to the far end and jump the gap to grab the ladder as you did before. Climb down to the bottom, enter the temple area and run along the right side of the temple. Find a recessed water hole next to the wall, with an opened trap door at the bottom. There's another water hole nearby with an underwater lever and a closed trap door, both for later. Jump into the hole with the opened trap door and swim down and around into a puzzle area. See this map of the area provided by DoggettTV:
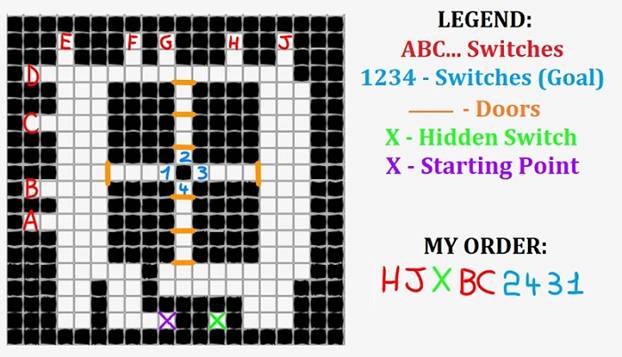
Swim straight forward past a number of closed doors, and turn right at the underwater lever you see in the corner alcove. Turn left into the next-to-last alcove and pull the underwater lever (H on the map). Flip turn, exit and loop around left into the last alcove on this side. Pull the underwater lever (J) and return the way you came to the temple area. Pull out of the water hole, go to the other water hole, jump in and pull the underwater lever (X) to shift the position of the doors in the underwater puzzle area.
Pull out of this water hole, jump into the other water hole and return to the puzzle area. Note that all the doors to your left are now open. Enter the second alcove and pull the underwater lever (B). Flip turn, exit and loop around left into the next alcove to pull the underwater lever (C). Flip turn, exit, turn left, then right and find that the gates on your right are now open. Enter and pull the underwater lever (2). Exit, swim right and around two corners and see that the gates near the dead end are open. Enter and pull the underwater lever (4). Exit, swim left and around the corner to find the next gate is open. Enter and pull the underwater lever (3) to see a screen shot of the temple area. Exit and swim left around two corners to enter the last central gateway. Pull the underwater lever (1) to see gates lift in the temple area.
Exit to the temple area, climb the tall steps and go to the plinth where the gates lifted to find the BLACK LUNAR PEARL. The large double doors down below open. Start up the ramp as the doors close behind you and run right or left to crouch in front of one of the stone barriers as boulders start tumbling down. Continue up the ramp and crouch at the short wall as the next wave of boulders arrives. Continue to the top of the ramp and you'll return to the first level for unfinished business.
Level 1: KHONSU RUINS (revisited)
Click here for DoggettTV's video walk.
The door in front of you opens, so run forward into a familiar room. Run forward and turn right in front of the green cat statue. Enter the tunnel and follow to the crossing. Turn right, run past the next crossing and turn left at the next crossing. Continue past the next crossing and enter the wall opening a little to your left. Turn right into the long passage and go all the way to the wall. Turn left, go to the far wall and if you encounter a pushblock at the end as I did, you'll need to loop right around all corners until you can pull that pushblock once. Then go back, looping around left until you reach the alcove where you can place the Canopic Jar. A gate lifts somewhere.
Exit to the outdoor area, keeping to the outer walls, and once outside run forward and loop around left to the wall with the high opening that's presently out of reach. Go around either right or left, ignoring any side passage, until you reach the back side. There's a hole in the floor and a wall switch at the end of the sidewalk for later. Jump over the hole with grab to land inside another outdoor area. A door closes behind you, so run forward to the far right corner and pick up the shotgun ammo.
Here's a map of this room provided by DoggettTV:
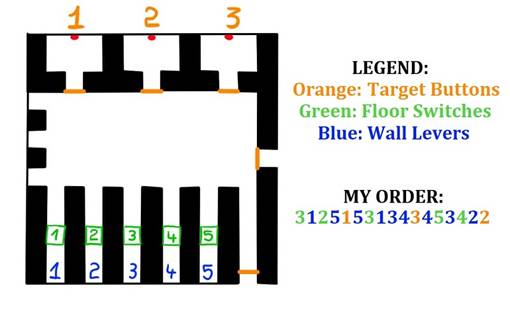
With your back to the closed door, the exit door is immediately to your left. You have three closed gates on your right and five long passages on your left (not counting the exit passage). On the map these are designated in reverse order (5, 4, 3 etc.). Each long passage has a closed door at the end. In four of the five long passages you'll see two floor tiles with a distinctive design. These are trigger tiles. Save your game before you start.
Go into the middle passage on your left (3) until you hear a door opening. Exit and loop around left into the last passage (1). You'll hear a door either opening or closing, but ignore all such sounds from this point on. Pull down the wall switch at the end, exit and loop around right into the adjacent passage (2). Step on the first tile, turn around and go into the first passage (1) to pull down the wall switch.
Exit and go diagonally across the room to find that Gate 1 is open. Push the wall button inside for a dizzying cut scene. Return to the first passage (1) and pull the wall switch back up. Loop around right into passage 3 and step on the trigger tile. Loop around left into passage 1 and pull the wall switch back up. Loop around right into passage 3 and pull down the wall switch. Loop around right into passage 4 and pull down the wall switch.
Run across the room diagonally right into Gate 3 and push the wall button for a similar cut scene. Run across into passage 4 and pull the wall switch back up. Loop around right into passage 5 and step on the trigger tile. Loop around left into passage 3 and pull the wall switch back up. Loop around right into passage 4 and step on the trigger tile. Loop around left into passage 2 and pull down the wall switch. Run across into Gate 2 and push the wall button. No cut scene this time, but the exit door should now be open.
Run down the dark passage until you come to a pushblock on your left. Ignore it and turn the corner. Take the first left and follow the outer walls to exit this area. Go straight and loop around left to return to that wall with the inaccessible high opening. Go around either side to the back, and now pull down that wall switch that was noted earlier. A block rises at the entrance for later. Go back around either side and this time enter the side passage. Climb the ladder to an upper area and look to your right and left. The raised block is at one end of the passage and a pushblock at the other. Move the pushblock onto the raised block (you'll have to squeeze past a corner of the pushblock to get to the other side of it when you reach the large intersection).
Go back to the large intersection and loop around right past the opened gate to find a wall switch in the far alcove. Pull it down and grab the uzi ammo in the corner on your way out. There's a similar room with a wall switch at the other end of this passage, but that's for later. Drop down either opening to the lower level, go around and pull the wall switch back up to lower the block. Note that a block has been raised to fill the hole in front of the closed door. Go to the pushblock and painstakingly move it all the way around onto that raised block. You can "cheat" by squeezing past the corners or do it the hard way by going all the way around or by using the side passages to go up and over to reach the other side of the block.
Use one of the side passages to get back up to the upper level. Go to the large intersection and push the wall switch in the first room back up, then go to the opposite room mentioned earlier and pull that wall switch down. Return to the lower level to find that the pushblock has dropped down into a basement of sorts. Hop down there and move the pushblock onto the rising block tile in the far corner. Climb back out of the hole and use a side passage to get back up to the upper level. Go to the side room where the wall switch is in the down position and pull it back up. Return to the basement to find that the block has been lowered still further.
Hop down after it and move it onto a trigger tile in the far corner. A door opens outside to reveal a floor lever, so climb out of both holes and exit this area to find three ninjas and two assassins waiting for you outside. When peace has been restored, go out from the entrance and loop around right. Turn left at the opening to the tunnel area and continue straight to the opened door. Push the floor lever to raise a block.
Reverse roll, run to the intersection and turn right. Go through the opened door and turn right at the wall. Turn left at the next wall and continue around to the open area you visited much earlier. Find the raised block ahead and to your left. Use the adjacent to get up on it, pull up to the ledge surrounding the pillar, turn left and find the hanging brass ball in the alcove. You can try shattering it with pistols or uzis, but I found it easiest to launch an explosive arrow in its general vicinity. Jump across two similar pillar ledges and take a running jump toward the closed door. Grab the edge and shimmy left all the way to the end and around the corner. Pull up and run forward into the opened doorway.
Shoot two scorpions and shatter the large jar for uzi ammo. Of course there's a floor lever to push, so do so. Repeat the frustratingly long shimmy back to the other corner, then pull up to find the door ahead open. Shoot the large jar for a small medipack, then turn left and face what was probably intended to be active cigar cutter traps. They're dormant, however, so simply jump past both sets. Oops, maybe I spoke too soon. When you step on the trigger tile in the far right corner and pick up the TORCH, the traps activate and you have to get back through them while carrying the torch. The easiest way is to side flip through the first set when the blades retract. Light the torch on the flame and get past the next set.
Go to the exit, throw the torch down to the sandy floor below and safety drop from the ledge and retrieve your torch. Find a nearby tile on a raised mound and light it with the torch. A cut scene shows a closed door. Explore this area for another such tile not far away and light it for a similar cut scene. Now run to the other side of this outside area and look for another such tile. Light it, and the door in the cut scene opens.
Go back the other way, turn left at the green cat statue into the tunnel opening, follow to the intersection and turn right, take the first left and go through the opened door, turn right at the intersection and go right at the wall, then turn left and go straight forward through the opened door toward the ladder for a level change.
Level 3: THE LUNAR PEARL
Click here for DoggettTV's video walk.
You may still be carrying the torch. If so, you can toss it aside unless you should need it for light. You're in a new outdoor area with a pushpiece puzzle, a simple but tedious exercise that will occupy more than half the time you spend in this level. The tiles with the little stars on them are spike-trapped. You can stand on them safely, but a stationary globe will trigger the spikes, so be sure not to pause on any of them.
Start by moving the nearest globe all the way from the right end onto the distinctive tile at the left end. Run across the room and move the second globe onto a similar distinctive tile not far from the first globe. This one's a little trickier, because if you take the shortest possible path you'll be spiked when you have stop on that star tile. The remedy is to loop around to the right so you won't have to pause at that (or any other similar) tile.
Go across the room to the third globe and move it across to the distinctive tile on the left. Now move the final globe onto the final tile and the iris door behind you opens silently. The tunnel ahead is quite dark, so retrieve your torch and run up the ramp while a fixed camera accompanies you. Before reaching the top, save your game in case you encounter the situation described in the next paragraph. Jump over the gap at the top, whereupon gates close behind you to prevent escape.
The demigod inside is a tough critter to kill, even more so than the giant scorpion you encountered earlier. I had conserved my ammo throughout the game and thus had plenty, but it still took quite a long time. When the demigod dies, the gate behind which the plinth on which the eponymous pearl rests is supposed to open, but according to TombTitan this doesn't always happen. If the gate doesn't open for you, you'll have to reload your savegame and kill the demigod again. In my case, the gate would open and close again in quick succession, possibly because I killed the demigod with an explosive round, but I was able to squeeze inside and pick up THE LUNAR PEARL (wonder why we never used the Black Lunar Pearl already in our inventory). When you pick it up, you're transported outside to an expanse of desert. Run toward the Jeep to end the level.