THE COASTAL TOWN
Level by BlackWolfTR
Walkthrough by Treeble
Follow the path towards the town, retrieving some shotgun shells along the way.
You'll notice a crawlspace to your right, but that's for much later. The
deserted town has been completely taken over by a number of wild boars, three
of which rush towards you as you cross the town threshold.
There are several small houses in this town. You can explore all of them for
some additional supplies, but what you are looking for is the house on the
right end of the second row. Shoot the barricades to get inside, retrieve the
CROSSBOW from the corner and drop down through the hole in the floor.
Run to the other end of this underground cave and, just before the bend, light
up a flare to spot an angled crawlspace on a dark corner. Crawl in for SECRET #1,
the SHOTGUN and some arrows. Crawl back outside and head to the next room, with
several burning pillars over water.
To open the gate on the other side, first dive into the water and swim through
the opening right beneath it, then climb out and step on the carved face tile.
Don't worry, the gate is not timed. On your way back, collect some more ammo
underwater and swim towards the ledge you came from.
Now, as you hoist yourself up you'll see another carved face tile right in
front of you. This disables the flame emitters for a short amount of time.
Quickly sprint to the other end of the ledge and negotiate the series of
running jumps before the flames are ignited again. Go through the open gate and
lay your hands on the CHURCH KEY. Head all the way back into town—we will be
back later for the closed black gate in the cave.
A few more boars have been made aware of your presence, so deal with them
before moving on. If you explore the interiors and surroundings of the next row
of houses you will find some more supplies. When you're done, use the key on
the gate of the big central building.
Take the flares behind the basket, noticing a closed trapdoor nearby, and climb
up the wall ladder to the rooftops. Hop to the rooftop right ahead of you to
claim a CRYSTAL, then keep leaping across rooftops in a clockwise order to
eventually find a carved face tile on one of them. This drops the trapdoor we
saw earlier, in the church, so safely drop to the floor and get back there.
Blow the skeleton that rises up near a closed black gate and head further in.
We're looking for a puzzle piece to use on the ledge above, so go through the
opening surrounded by two wall torches to enter a room with many columns.
Collect the medipack on the right side and head to the NW corner for a lower
column you can climb up on.
We need to work our way to the top, but don't be so hasty as only the columns
with the face tile are safe to stand upon, so carefully jump over to the next
ladder. Climb up past the wall ribbed panels and backflip to the upper row of
blocks. Again, stick to face tiles as you jump across towards the ledge with
the PHAROS KNOT and some ammo. You can drop from the ledge to a safe column on
the lower row at the cost of some health, or you can work your way back to the
ladder.
Another skeleton shows up on the ground floor, dispatch him and, in the room
with the wall torches, climb up the blocks to place the Knot on the receptacle.
Save your game. Go through the newly opened black gate, shimmy all the way to
the opposite end of the slope over the pit, then jump steering towards the flat
upper block on the side. (If you overshoot the jump, you'll land on an illegal
slope.)
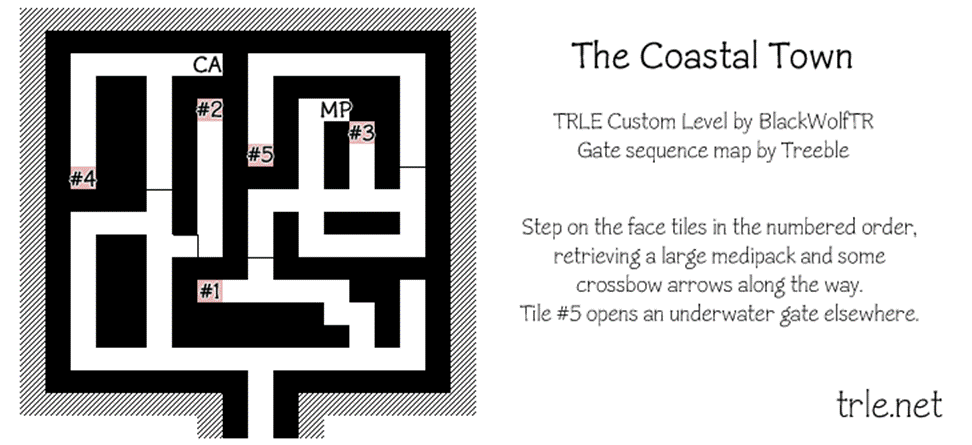
Head inside for a small "maze" with two branches. There are some
supplies here, but your goal is to step on the face tiles to open remote doors
a handful times until you eventually step on a tile which opens a gate back in
the beach. Each tile opens a door further in the opposite branch.
Shimmy back past the pit to another anxious skeleton, then head back up through
the trapdoor to the West. Head towards the beach, through an opening on the NW
side of the town walls. Kill the two eager crocodiles on the shore and notice a
gate which requires two crystals on the end. Collect the shotgun shells and
dive into the sea.
Collect the flares behind the algae. The gate we've just opened is on the W
side, but stick close to the E wall to find a narrow underwater passage close
to the edge of the map. Swim inside for SECRET #2
(some supplies) and quickly swim back as a crocodile is now on the hunt. It
would be a good idea to swim back to shore to clear the water.
Behind the open underwater gate W is a small cave housing the CROWBAR. A camera
hint will remind you of the gate in the underground cave, so let's head back
there. Another crocodile should be swimming. Neither can get out of the water,
and as we're done here, you can leave them be if you like.
Back into town, run all the way down to the last house on the left side of this
row and climb down through the hole to the underground cave. Use the crowbar on
the black gate and monkey swing across the deep pit. A skeleton is guarding the
second CRYSTAL, blow him to pieces and crawl to a ladder behind the wall. The
passage ultimately leads you back to the town entrance, through that crawlspace
we spotted near the start, with more boars running around.
With both Crystals in your inventory, head to the beach and open the gate there.
At the back end of the dark hallway is a slope and an obvious boulder trap:
sprint down the slope turning right at the end to dodge it. You'll find
yourself in a room with a deadly burning board.
You need to do slightly curved running jumps to land only beneath the carved
face tiles on the ceiling, as merely touching any other tiles will set Lara
ablaze. Once you reach the opposite wall, you'll notice the next gate is open,
and from there you can just jump back to the safe area off the board and head
inside.
Two skeletons rise from the ground on a last attempt to prevent you from prying
the HOLY STAR off the wall. Turn around and head back to hit the finish
trigger.