Dreamland 1 - Dreamlike Sounds in Egypt
By Haiozy
This walkthrough is meant as a general guide only. It
may not include every pickup or secret. There may also be alternative ways of
approaching situations within the game.
- Pickups and Items
- Enemies
- Secrets
= 0 (as per Author's readme)
WALKTHROUGH by Lizard Queen
Slope and Upper Alcove #1
Get ready because this level begins
with Lara sliding down a slope with a spiked boulder in fast pursuit. As you
are sliding, jump and curve to the right so that you land sliding at the
rightmost part of the slope. [tip: you may have to "jump and
curve" a couple of times to get to the rightmost side of the chute.]
At the end of the slope, take one last jump, curving to the right to land in
the alcove on the right. Turn right and take a few steps into the alcove to
avoid the backlash from the rolling boulder (but not too far as there is a fire
tile at the end of the alcove). Facing west, take a standing jump over the fire
tile and grab the block hidden in the darkness. Pull up, light a flare (or
shoot pistols to save on flares) and drop into the corridor below. Turn right
and right again into another alcove and pickup three
Grenade Gun Ammo and Grenade Gun. Reverse roll, turn right and climb the
block. Drop down and push the floor lever on the right. [Note: This lever
opens a gate to the pink corridor in the Labyrinth Maze (Area 4)] Turn right, climb the block, drop and head to the end of the corridor.
Turn left, climb the block and take a standing jump over the fire tile. Face
the pole (east) and take a standing jump over the hole to the alcove on the
other side.
Upper Alcove #2 and Red
Room
Jump up and grab the edge of the
crawlspace and pull up. Immediately crawl to the left, light a flare and pickup
the Hand of Sirius in the alcove. Crawl
backwards, continue east, then north through the semi-lit crawlspace. Reverse,
crawl out, reverse roll and immediately arm weapons. Shoot the ninja in the room and pickup the Crossbow he leaves behind. Head to the back of the
room (north) and pickup three Crossbow Ammo, Revolver
and Revolver Ammo. [Note: At this point, you could bypass the Lower Egyptian Room (Area 3) by dropping into a waterhole situated on the south side of the room.
However, you would miss a pickup, enemy and that part of the level.] Turn around and head back through the crawlspace in the south wall.
Climb out, reverse roll and walk to face the pole.
Lower Egyptian Room
Take a standing jump and grab the pole.
Slide down, backflip and arm weapons. Shoot the ninja
in the room. Pickup the large medipack in the
south/east corner. Place the Hand of Sirius in the wall receptacle in
south/west corner, opening the first gate with the green corridor.
Push the floor lever located in north/east corner,
opening a second gate in the green corridor.
[Note: There are actually two routes that can be taken to complete the
next two areas, one through the green corridor and one through the pink. If
choosing the green corridor, you will go through the next two levels in reverse
order and enter the maze through the EXIT, instead of the Pool at the start (see maze map). IF YOU ENTER THE MAZE FROM THE BACK (EXIT), DO NOT PUSH
THE TWO LEVERS INSIDE the Labyrinth Maze (Area 4). Doing so will CLOSE (NOT
OPEN) the gates and permanently lock you in the maze, forcing you to reload a
savegame to continue. The walkthrough is written taking the pink corridor
route.]
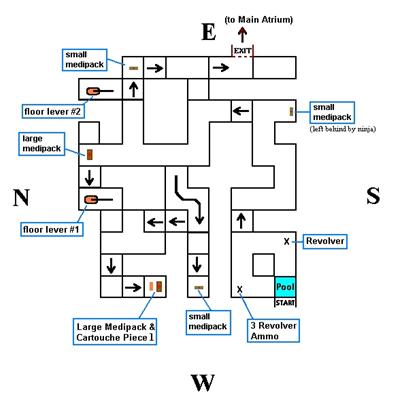
Labyrinth Maze
Facing the east wall, head through
the gate on the left with the pink corridor. Drop into the water, swim through
the corridor and surface. Pickup the Revolver
and three Revolver Ammo in the room. Climb the block into the
opening in the east wall and drop down the other side. Follow the corridor
around, arm weapons and shoot the ninja in the
corridor. Pickup the small
medipack he leaves behind. Turn to face north, climb the block and
arm weapons. Shoot the ninja appearing in the
corridor below. Drop to the other side and follow the corridor around. Pickup
the large medipack at
the end of the corridor. Turn left (west) and climb the block. Drop
down the other side and push floor lever #1, opening the first of
two exit gates in the maze. Climb back out, drop into the corridor and turn
right (south). Head straight down the corridor, turn right just before the wall
and climb the block on the right (west). Follow the small corridor as it curves
left. Take a running jump and grab (to change trajectory) over the small pit,
drop down at the end and pickup the small medipack. Reverse roll, climb out and take another
running jump and grab over the pit. Immediately turn left (north) and climb the
block. Drop down two blocks and head left around to the opening in the
north/west corner. Climb the block, walk to the edge, angle left and take a
standing jump and grab (to change trajectory) over the pit to the next block.
Drop down and pickup a large
medipack and Cartouche Piece 1. Reverse roll and climb the block.
Walk to the edge, angle right and take a standing jump and grab (to change
trajectory) to the next block. Drop down and turn right. Climb two blocks south
and turn left (east). Drop down two blocks and turn left (north) down the
corridor. Turn right (east) down the first corridor and climb the block ahead. Angle left, drop down and push floor lever #2. Reverse
roll, climb out and turn left (east). Drop down and arm weapons. Shoot the ninja appearing from the south and pickup the small medipack in the pit.
Face south and climb the block. Drop down and climb the block ahead. Turn left
(east) and exit the maze.

Main Atrium/Toxic Water
Room
Head into the Main Atrium, turn
right and enter the alcove on the right (south/west corner). Angle left and
take a standing jump and grab the block. Pull up, face west and take a running
jump and grab the ledge on the column ahead. Shimmy right and grab the ladder
on the column. Climb down to the bottom and walk around the column to the
corner of the south/west tile (see screenshot), taking note of the toxic water
beyond the tiles. Angle left and take a running jump to the safe tile in the
far south/west corner within the toxic water. Turn right and take a running
jump to the safe tile behind the column. Pickup the Hand
of Orion. Turn around and take a running jump back to the safe tile in
the water. Angle left and take a running jump back to the safe tiles around the
central column. Go around the column and climb back up the ladder to the top.
Turn around, angle right and take a running jump to the block ahead. Turn left
and take a standing jump to the entrance into the main atrium. Turn left and
enter the second alcove on the left. Place the Hand of Orion into the wall
receptacle and enter through the newly opened gate.
White/Red Rooms/Brown Atrium
Climb the ladder until you reach the
dark green patterned tiles on the wall. Backflip to the ledge behind. Turn
around and run straight forward to the end of the room. Boulders will fall to
either side but if you run straight and stay on the path with the dark green
tiles, you will avoid them. Turn right and head around the boulder, into the
next room. Drop down 3 rows of blocks and turn left. Drop down 3 more rows and
enter the next room. Turn right, head around the ledge and climb into the
entrance on the right (south). Pickup the Uzis
in the south/east corner. Reverse roll, exit the room and turn right. Head
around the perimeter of the room to the north/east corner. Go down the stairs
and turn left to face the entrance to a red room.
Take a running jump over the toxic
water and pickup the Ba Cartouche at the end of
the ledge. Reverse roll, walk to the middle of the ledge and turn right
(south). Take a running jump over the water to the ledge ahead. Turn left, jump
up and grab the climbable block above. Shift to the left, around the block and
drop to the ledge with the lever. Push the floor lever, reverse roll and return
to grab the climbable block. Shift right around the block and drop to the ledge
on the other side. Turn left (north) and take a running jump back over the
water. Turn right, take a running jump and grab (to change trajectory) over the
water and through the door to exit.
Head forward and climb the three
blocks ahead into a large brown atrium. Climb the ledges on the central
structure and head to the back. Turn around (face west) and place the Ba
Cartouche in the wall receptacle. Head back around to the other side and enter
the newly opened gate. Climb the block and pickup the Eye
Piece in the alcove. Reverse roll, drop down and exit through the
corridor ahead (west wall).
Water Pools Atrium
Turn left (south), climb the block
and head up through the mauve corridor. Climb the last block and run to the end
of the room. Turn right and climb into the room on the right (south). Turn
right (west) and head down through a corridor with "eyes". Into the
next room, make a hairpin turn left and climb into a new area (east). Turn
right (south) and head down the corridor with many pillars to a pool area. Head
straight, past the first pool to the back of the second pool and turn left
(east). Walk onto the tile in front of the wall receptacle opening a gate in
the room. Turn left (north) and head down the perimeter in between the two
pools. Turn right (east) and climb into the opening to the next room.
[Note: DO NOT drop into the small pool in this room without having BOTH
Cartouche pieces in inventory. Otherwise, you will have to reload a savegame,
as there is no way out of the pool without them.]
Head to the north/east corner of the
central structure and take a standing jump to the upper block. Climb the next
block and turn around. Angle to face north/west and take a standing jump up to
the top. Pickup Cartouche Piece 2 and climb
back down. Drop into the small pool in the east side of the room and swim north
through the opening into another room. Reverse roll, surface and climb out.
Climb to the next ledge, and head north to the back of the room. Combine the
two Cartouche Pieces to create a Ba Cartouche and place into the wall receptacle,
opening both the gate on the central structure and an underwater gate below.
Reverse roll and take a running jump to the central structure. Pickup the
second Eye Piece, reverse roll and drop into
the water. Swim through the gate and surface at the end. Turn left (west) and
pull up out of the water. Take a standing jump over the slope. Approach the
gate and it will open automatically. Head back through the corridor with the
"eyes", turn right at the second last block and climb two blocks up
the structure ahead. Turn right, drop down and push the floor lever. Turn left,
climb out and drop down to the floor. Exit through the door in the west wall
back into the Main Atrium.
Water Maze
Head to the north/west corner of the
Main Atrium and climb the ledge. Push the floor lever, opening two gates in the
next area. Turn left, drop down and enter the room on the right (west). Combine
the two Eye Pieces to create the Eye of Horus and place into the door
receptacle ahead. Climb the block and the pink and white stairway and turn
left. Drop into the water and swim left. Swim down to the north/east corner
into an underwater corridor. Swim north and surface at the end. Swim right
(east) and pull out of the water. Head around the perimeter of the pool into
the room to the west. Pickup 3 sets of Uzi ammo
on the left side of the room and 2 sets of Uzi ammo
on the right. Arm weapons and run west to the back of the room to the Lara
photo/mural at the end. Reverse roll and take out 15
ninjas appearing from the left and right of the room. Push the two floor
levers, reverse roll and head east, back to the pool in the previous area.
Face north and get ready for a tight
swim. Dive down and swim through the brown underwater corridor and turn right.
Once in the checkered room, swim up and slightly to the left there is an
entrance to a set of underwater corridors. Swim through, follow the corridor
around and when it branches into 3 routes, take the middle route, slightly to
the right and to the back of the alcove. Turn left and swim to the end. Pickup
the Hand of Sirius, reverse roll and swim
forward. Swim right, then left and out of the small room. Angle left and exit
the checkered area. Swim through the brown corridor, turn left and surface for
air. Pull out of the water on the east side of the pool and re-enter the large
room to the west. In a small alcove on the south wall, is a wall receptacle.
Place the Hand of Sirius in the receptacle, reverse roll and exit the alcove.
Turn right (east), exit the large room and drop back into the pool. Swim north
through the brown underwater corridor to the end and surface. Pull out of the
water on the east side of the pool and enter the large room to the west. Look
familiar? Yeah, messed me up for a second there, too. :) Head west towards the
"other" Lara photo/mural and the level ends.
The End.