The
Experiment
Levels by Bojrkraider
Rewritten Walkthrough by manarch2
Excavation Site
Turn E and step in front of the door that then opens. Enter the building and
run into the elevator up the stairs. Push the button and you get to the top
floor. Run upstairs and go into the left door to find a bureau. Talk to the man
who tells you where to go now, then pick up the Mine Key from his desk and the
Ignition Key from the desk on the far right wall of the room. Exit through the
second door and get back to the elevator, drive down and run outside. Go to the
jeep and use the key to get into it.
Drive up the hill and you soon arrive in the mountains. When driving over the
river you will loose the Mine Key. It will drop down the waterfall. Park the
jeep NE in front of the crates and get out of it. Run W, to the hole Lara
fixes. Find Five Old Matches hidden in a little plant. Go out of the hole and
go N up to the hut. Approach the door and pick up the Doormat and – under it –
the Forest Hut Key. Use this key to open the door and run inside. First of all,
open the NW trapdoor to the little cellar where you can find 3x Shotgun Ammo
and the Shotgun. Climb back out and pick up the Empty Chain Saw from the table.
Run up the two stairs and spot a trapdoor to the roof. Climb up and pick up a
Can of Oil you can combine with the Chain Saw.
Climb out of the roof and get outside again. Run all the way NE to the jeep and
jump over the crates. Go to the left side of the fallen tree and use the Chain
Saw to create a pushable. Pull it out and to the right. Go in the passage
behind it and left, then again left to a hidden tunnel. Get down in the grotto
and find an Old Newspaper right of the crate. Combine it with the Matches. Get
out again and return all the way to the forest hut again. On the way, go into
the N forest with unpassable trees. Find a Torch here. Use the Matches and
Paperball to make fire in the hut’s fireplace, light the Torch and go back all
the way to the grotto, where you have to flame the rope to lower the crate.
Push the floor lever that lowers the crates in front of the jeep.
Get back there and into the jeep. Drive up the ramp and another ramp to make
the level change again. Afterwards follow the long passage until you can’t drive
any longer. Climb out and open the door. Don’t jump into the river, as you
can’t get out then. Go across the bridge and turn right to see three toilet
doors. Open the middle one to get some Flares. Go N behind the huts and to the
opening in the fence. Follow the passage NE, there Lara looks up on the brown
hill. Jump to the slope and turn in mid-air. Jump to and fro holding right to
let Lara curve onto the hill. Jump W to the blocks and find a hidden
crawlspace. Follow the passage until you can slide down, head left and follow
the triangular corridor to its end, then jump up to the block ahead of you,
over the spike pit.
SECRET 1: Turn right and jump to the ledge with
a little right curve, then shoot the wall and jump on the slopes. Follow the
slopes and jump over the pits. In the next room jump down and go right, Lara
says “I can climb up this wall.” Head right and climb the ladder, then backflip
with mid-air turn to hang on the ledge and climb up. Turn and shoot the rock in
the SE corner, jump there and follow the passage, jumping over the deadly pit.
Get on the slope and do a left curved jump around the spikes. Pick up the
Crowbar which is the secret. Get out where the plants are. Return to where you
started this long detour.
Go outside, jumping over the pit. Jump to the tree and then to the roof of the
first house. Open the trapdoor where you can find the long lost Mine Key. Get
out again and jump down.
SECRET 2: Use the Crowbar to open the doors of
the other two huts. The NE one hides a Large Medikit, the S one a Treasure Room
Key. Use this key somewhere E of the excavation site, on the first E door
looking from S, and pick up the first Golden Rose. Get out.
Use the Mine Key on the second E door looking from S, to get to the second
level.
The Lost Mine
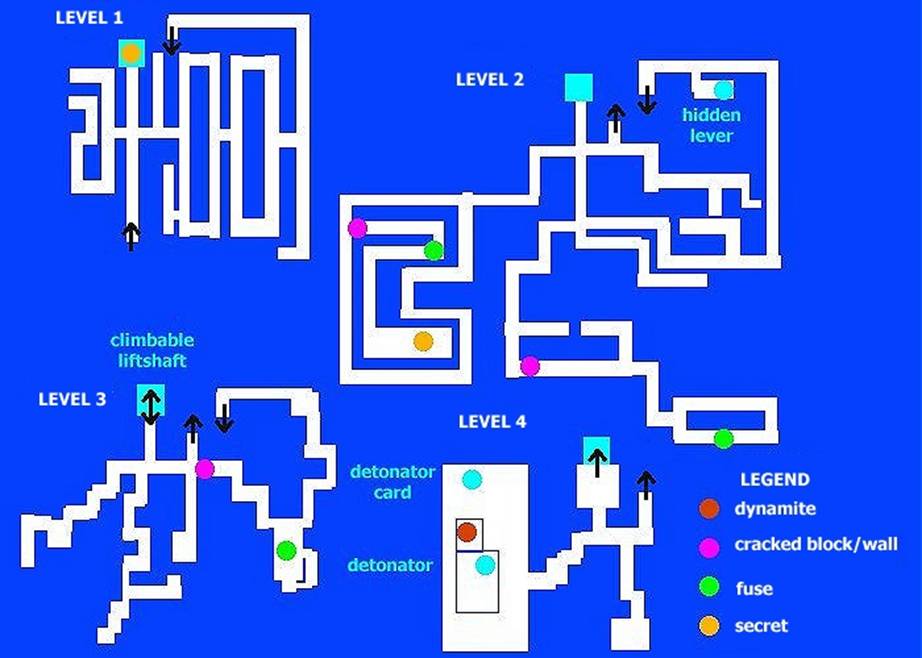
Follow the rails and push the floor lever to open the door. Now, you get into a
big maze, with four different stages. This map from the original walkthrough
should help you:

(at the top is W)
Your first task is to get access to the third stage. Therefore use the exit of
the first maze and then the exit of the second. The arrows on the map shows the
way deeper and higher. The blue square marks the passage combining all stages,
but spikes prohibit you to go down there. After exiting the second stage you
have to jump over a pit. Use the slope as a boost therefore and run to the
crates when you see some spikes lowering. Go back to the pit and jump down,
shoot the grating to get to a hidden lever. Push the floor lever that lowers
the cages you saw moments ago. Get up again and you arrive at the third stage.
Now, go to the combining elevator hole and jump down to level four (some block is blocking the normal way to it now). Go to the end of the room and follow the right passage to the building where you can find the Detonator. Go out of the building for now and jump up to the left ledges, using a slope. Jump to the SE slope so that you slide backwards, then jump and grab a ladder, on top get around the left corner. Jump in the hole in the NW corner, where you have to shoot a box. Pick up the Detonator Card, you can access the door in the elevator control now so get back there but don’t shoot the box, the fires will kill you. Pick up 3x Dynamite left of the deadly box and get out again.
There are three cracked blocks throughout the whole maze you have to use to get
three fuses. Get back to the elevator shaft and climb up the ladder to stage
three. Now go left and find the first cracked block. Use the first Dynamite,
Lara automatically jumps away, and approach the block once more to let it
burst. Go into the passage behind and right to find a spiked pit. Turn around
and drop to the ledge, then let yourself fall a bit and immediately hold
Action, Lara will be still alive. Climb into the crawlspace and find a Fuse at
the end in a box, shoot it therefore. Drop in the hole to get back to stage
three. Go back up and jump over the pit to stage two. When searching the maze
you will find an E fixed camera around a corner. You can find the second
burstable block here, behave like bursting the first one and find a box with a
fuse at the end. Now go back to the beginning of stage 2, the elevator shaft,
and then S (SW) to find another fixed camera with a burstable block, burst it
and find the box with fuse behind it.
SECRET 3: Follow the corridor to the end and
find a pushable. Push it in to find the secret and get back.
Now that you have all fuses, return all the way down to the elevator control in
stage four and place all fuses in the boxes. The last door opens. Push the
floor lever at the end that raises the elevator. Return to the elevator shaft.
SECRET 4: If you want the last secret, get up
again to stage one. It’s very easy to find as you have made this route already.
Go to the elevator shaft in stage one and find the second Golden Rose on the
elevator, near a skeleton, this is the last secret. For a secret room, get back
to the exit of this maze and to Excavation Site.
Excavation Site (2)
Go W jumping over the blocks and to the site where you can find some right
stairways down to two pedestals. Place the two Golden Roses to open the door.
See the runes in this room, the original walkthrough claims this to be a hint
for another secret, which I couldn’t find anywhere. Drop in the hole and get
back to The Lost Mine.
The Lost Mine (2)
Slide down and get the secret pickups, a Large Medikit and Flares. Drop in the
hole to get to the maze again you should be in stage four again. Go to the
elevator shaft, the elevator is of course not there anymore, and drop in the
hole. Drop down the stairs here to the end. You will arrive in another grotto,
drop down even more stairs. Go to the right part of the other side of the room
and find a hole, before that, notice the yellowish pillar. You have to get back
here later, drop in the hole now and follow the blue water passage to the
stalactite cave. Go right to the little maze and find a left crawlspace, light
a flare to spot it. There is yet another floor lever to push behind that lowers
a block near the yellowish pillar you saw earlier, so get back all the way
there and climb the ladder. Step on the right sign and look left. There are
three tiles; the left one will flood the room; if you did so you have to find a
passage and throw another lever in the high up room to make the room dry again.
When stepping on the middle tile Lara will die of flames unless she steps on
the left tile (you know what to do). The right tile however is the tile that
will let you have access to the last part of the room. Stepping on it will
lower down a block in a hole in the stalactite cave, in the deepest corner in
the little maze with the lever crawlspace. Return all the way there and drop
into the hole. Jump down the big stairs and the level ends.
THE END
THE EXPERIMENT
Level by Bojrkraider
Walkthrough posted on the author's website: http://www.geocities.com/bojrkraider
Italian Alps - Level 1 Part 1
Excavation Site
Lara stands in front of a big building. Enter, use the elevator and
enter the office. You can listen to the archaeologist or just pick the mine key
from the desk and the ignition key from the bookshelf. The exit door will now
open and Lara can use the vehicle.
Drive against the forest and watch out for the boulders. When crossing
the river, the key will be lost (nothing to do here). In the forest go into the
hut (the hut key is under door-mat, so pick it up). In the hut pick up
chain-saw and can of oil. You can find also a shotgun and some ammos. Combine
chain-saw and can of oil, search for the tree that is blocking the path and use
the saw on the left side. Go through the opening, find a cave on the left and
pick up old newspaper and go into the forest. There search for matches and a
torch. Go back into the hut. Use old newspaper with matches and light a fire.
When you lit the torch return to the cave and burn the rope. Finally the path
is free and Lara ready to go on.
Soon there will be a river and some excavators' huts. Lara must find a
way in. Go and check out the excavation site. Lara will sometimes look up. It
is possible to jump up to the first hill of soil but only in the front right
side (where Lara looks up). When on the hill, two more jumps must be made to
reach the opening, hidden behind a bush. The cave is very simple, When the
light again could be seen, there are two possibilites: 1. go out, jump on the
tree and on the hut, open a trapdoor and pick up the mine key or go to the
right and shoot the wall where you can see some rocks. This is the path to
secret 1. There will be some really hard jumps, especially the first one, which
at first seems unpossible. There will be also a little climbing to do and one
rock is going to be shot. When you'll see the red light, save. There are some
deadly spikes at the end of the slide. The best way to get away from the teeth
spikes is to run, jump, press action and then jump to the left just before fall
onto the spikes. Don't forget to search for the crowbar in the red room,
because this is the secret! Now go back to the huts, use the crowbar, pick some
medipacks and a treasure room key. Now the treasure room can be opened. There
is one golden rose - secret 2. Now go open the mine. And now... there will be
no more nows, I hope
The Lost Mine
This place is a maze. You must find a hidden lever to acess the lower
levels. The lever is hidden in a spiked pit. When you'll hear some noises, the
spikes will go down. But be carefull, they can easy go out from the ground again.
(There is also a hard alternative way through the spikes, but not recommended,
because a lot of health is lost and a reward is nothing special. Well, it's a
crossbow in one of the spiked pits - look for the hidden ladder at the bottom,
but you can get it later in one of the next levels.) Lara must searches for the
elevator control, at the same place the detonator and detonator card must be
found. The door to the dynamite room will now open. Pick up 3 dynamites. Go
back to the mine (climb up the elevator shaft). Search for three cracked rocky
walls and blow them up (one of the discovered places is hiding secret 3 behind
a pushable block). There will be three fuses. For one the spiked pit must be
searched.
Go back to the elevator control and use the fuses. The door for the
elevator lever will open up. Be sure that you blew up all three cracked walls,
or you'll be unable to get the fourth secret and see the secret room. Push the
lever and go all the way back up to the first level. Go to the elevator and search
for golden rose 2 - secret 4 in the sceleton's chest. Go out to the opening. At
the excavation site search for stairs that leads to two pedestals. Use two
golden roses and enter a secret room. Write down those signs from the walls and
remember their positions. You'll need them later for another secret!
Return down to the deepest level of the mine and fall down through the
opening, that was before hidden under the elevator. Find the stalactite cave
and search for the crowlspace. Another lever is there. Now search for yellow
pillar, climb it and step on the right sign, which means movements. The first
one from the left means water and the middle one death. You can try them also
but Lara won't survive then. The earthquake will lower the pillar in the stalactite
cave.
Deep in the caves of Italian Alps - Level 1 Part 2
Forgotten Cave
Walkthrough by Obig. Thanks. It's written much better then I would do
it.
Here is some more help on climbing through fires in small spiders area:
(Lara must be always hanging only on her hands or she'll get burned) start on
the right side, with Lara's back facing to the opened trapdoor; safely climb
down into the opening only by hands - make sure Lara is in the right corner;
climb down on hands four or five times; now shimmy into the left corner; climb
down a little more; wait for the last fire to stop for a few seconds and drop.
You must do this without Lara get burned or she'll die.
There is one difference between demo and final version: 1st proteus
secret was exchanged for shotgun ammo.
Crystal Caverns (hints)
1. there are three different paths you can choose - you'll always be
able to go back at some point
2. nine switches room: In this room there is a projector, but its lens are
blocked - find the other part of the pipe and shoot the wooden plug - now you
are able to see what the switches do - there may be more then one code
3. the golden block near cog wheels after crossing the lava: it is blocking the
access to the switch. Near it, is a small blue statue of an angel. Have you
alredy finished blue crystal statue puzzle? If not, find it and complete it
first.
4. Dwarves' village area: missing a crystal?
green part1 - in a cave from where you can access the roofs of the huts
green part2 - it broke when you pulled it from the wall - it felt down through
the wires
white - go to the Temple level
blue - in the underground lake
red - in the area which is accessible after catching a dwarf
Basically you need to catch a dwarf here - before you do - have you found the
second cog wheel and cooked a meal and got the lasersight?
The Temple (hints)
1. Switches under the angel may be used more then once.
2. Water room - You'd better pull each switch only once, because - one pull:
the switch is on - second pull: the switch is off - third pull: the switch is
on again - and so on... Since they are all the same it is hard to remember which
one must be turned on again so use some tactics here.
3. Fire spirit: Well, if one water won't destroy him, the other one will for
sure.
4. What's with that 10 switches room? - codes for switches under golden angel
are there, but to open secret golden proteus door, you have to pull the right
switch combination - I know it is hard an only a mindreader could do it. But
there was a code somewhere in Crystal caverns and there is also a hint in the
Temple level.
Premonition (hints)
1. Some strange things will happen here: If something looks very
familiar, also the puzzles are familiar.
2. Having troubles with that big worm? There is a hint - Lara is looking at
what? What to do with that?
3. To lower the cage find three switches with angellike creature on it.
4. There is an underwater door that needs 4 golden proteus secrets to open
them.
5. You found a hidden switch (using crowbar) and sow an underwater door to
open. If you don't have all 4 golden proteuses, you won't be able to see what's
behind them. Sorry.
It's a secret.