The Forgotten Valley of Anubis:
The Lord of Life and Death
by Nadine (Horus)
Walkthrough written by the author
Walk in the cave to the left and shoot the vases to get the shotgun and
some flares. At the left of the waterfall where you came from is some shotgun
ammo. Climb on the platform at the small waterfall to get a secret. Run to the
bigger waterfall at the other end of the oasis and crawl in the little tunnel
in the dark. At the end turn left and climb up the block. Then jump at the
right over the lava and turn the switch. This switch opens a door in the
underwater-tunnel.
Now jump again over the lava and turn right. Slide over the slope:
you're back at the oasis. Now walk through the waterfall and swim left to get
some ammo. Take a breath at the entrance and swim in the right tunnel. Turn
left and collect secret 2. After that open the underwater door and swim to the
surface at the other side. Climb on the block and jump up to get on the ladder.
At the end make a back flip and kill the harpy. Then continue to climb up. Go
through the gate and run to the small medipack. A flyby sequence will show the
huge lava lake and some ropes to cross it. Also there will be two harpies
triggered.
Jump on the waterfall and grab the edge. Let Lara fall a bit down and
grab the edge of the metal part underneath. Crawl to the staff and pick it up.
Now jump to the rope and swing to the next one. Turn 90° right and jump to the
next rope. Then turn 95° left and jump on the metal part at the wall. Climb on
the slope and slide down in the water and kill the crocodiles. Pick up a big
medipack and the head of the statue. Combine it with the staff and run over the
wall to the hole for the guardian. Now a flyby sequence will show you that the
metal thing has been taken down and the sand, which has been in the way for the
waterfall, is now in the hole. The water filled the lake and you can reach the
entrance of Anubis temple behind the waterfall.
Open the two doors and pick up the medipack. In the right room you have
to jump over the blocks with the blue light, otherwise Lara will die. Pick up
secret 3. Turn on the two jumpswitches and pass through the door and kill the
harpies. Run up the ramp and turn in the huge hall to the right and press CTRL
in front of the hole in the wall to get a secret. After that slide down the
rope and monkey swing at the ceiling to the open door. Pass the tunnel and let
Lara fall on the slope after the spikes came out of the ceiling. Jump quickly
over the little lava trap. It will be better doing this as left on the slope as
possible because some spikes will come out of the wall. Run through the next
spike trap and pass the tunnel.
At the field with the stars at the floor you will notice two fields on
which the stars are rotated. Jump over these fields and get safely to the other
side. In the next tunnel Lara has to crawl under the spikes. Then climb up the
ladder and you'll stand in front of a lava field with some blocks and jackals
on it. Don't shoot the jackals yet: only on the fields where jackals can
survive, Lara can stand without being scorched. So kill a jackal, jump on its
field. Fight your way to the ladder on the other side and run through the next
tunnel.
In the following room kill the harpies and press CTRL in front of every
hole in the wall (there are three) in order to get a small medipack and the key
to the cistern. This key has to be inserted in a hole, which you can reach
through an underwater tunnel. Now the cistern is opened and you can enter it.
Kill all the jackals, which are attacking you (well, all jackals will attack
you, so kill all... ;-). Then dive into the left pool and swim through the
underwater tunnel. At the other end look in the dark for some medipacks and
ammo and then climb up the ladder. Kill the attacking harpies and swing with
the rope, which you can reach over the platform to the other site.
Let Lara grab the edge where a little hole in the wall is and get her to
the chamber key piece and the ammo. Then you can leave that room through the
dark tunnel and turn a switch, which will open the gates to the cistern. Now
dive into the next pool and swim through the tunnel. In the next passage you
have to be very quick because the gate to the underwater area will close when
Lara entered. First pull the switch to the left, which will open a gate to a
room with a place to get some air. Then you can to pull all the switches in the
first room and in the room underneath to open another gate with another switch,
which will finally open the last gate.
Behind that gate to the left of the entrance you have to pull another
switch and then you can get out of the water and climb up the rope. In the
upper room make a back flip from the rope and light a flare to see the door in
the dark, which can be opened by Lara. Behind the door is the other piece of
the chamber key and a switch that will open the gate through which you entered
the underwater tunnel system. Now go and swim back to the cistern and combine
the two pieces of the chamber key. Before you insert it in the hole at the end
of the cistern you have to jump on one of the blocks to get into the ceiling to
pick up a secret. Now you can enter Anubis chamber.
The Holy Light
First pick up the stolen heart of Anubis at the skeleton, and then slide
down the holy light beam. Enter the door between the two Anubis statues and
pick up the medipack. Then take the right passage and run down the ramp. From
now on, a ghost will hunt you, so keep Lara running and take the right tunnel
and climb up the holy light beam. Make a back flip to get to the upper area and
enter the labyrinth (not the entrance which has a deep hole - the other one!). Here is a map of the
labyrinth:
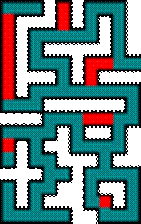
The red marked places are lava-pools. At the upper right corner is the
entrance. So you have to go right, middle, right and monkey swing over the
large lava-pool (upper left corner). Turn the switch on and monkey swing back.
Now run right sprint the large way to the other side and follow the way to a
lava-pool. You can make a running jump over it and then run left and then right
and then turn another switch on. This will open a gate to the room with the
holy light where the ghost will be destroyed. Pick up the statue and the
crowbar and run back to the light beam.
Now climb down the ladder and get the star using the crowbar. Now return
to the little water pool where the ghost appeared. Take the way on the other
side and pass through the water and some traps to put the star in the hole. Now
a door will be opened. Run up the ramp where once was a small medipack and take
the left ramp. When the camera gets back to the normal mode let the rolling
ball pass and slowly enter the hall turn on the two switches: after the second
one the rolling balls will come down, so you have to duck.
Enter the next room and take the right way and monkey swing to the other
end where you can pick up a torch. Slide down with it and light it at one of
the flares. With the torch you can enter the next room where some mystic
platform are floating in the air. You can see them by passing with the torch.
At the end you can throw the torch wherever you want, you won't need it
anymore. Jump in the hole and jump over the lava-pools and kill a harpy. Pass
the next rooms and turn the switch on which will open a door. Go through it and
run through the chains and jump over the pit.
In the next room you have to pass the blade-traps. After the first one
is a secret. In the lava-room a harpy will attack you. Lara can only stand on
the platforms with an eye on it so jump over these at the left to a secret. Now
jump over the other platforms at the right to get onto the large platform with
a medipack on it. Jump to the platform at the center and pick up the golden
stone. Combine it with the statue and return through the violet tunnel.
Now run all the way back to the first light beam and take the way on the
opposite site. Run up the stairs and put the statue on that spike-thing. Now it
will fly to the air and make the sky blue again. Jump to the Anubis statue on
the other site and insert there the heart of Anubis. Leave the level through
the dark tunnel.
The Revenge of the Gods
Take the right way over the field and kill the wild boars. Now go to the
lake and wade through the water to the hole in the wall. On the other side of
the pillar is a demigod waiting, but if you are quick enough, he wont hurt you.
Turn the switch and run around the pillar to get into the next room, where you
pull another switch that opens a door in the cistern. Run out quickly and wade
through the lake. Now enter the temple ruin and dive in the water hole.
Manage yourself through the strong currents and climb out the water at
the other end. The door will close behind you and trap you in a room with
another demigod. Run quickly towards him taking your pistols out and crouch in
front of him. He won't hurt you this way, but thus you can shoot and kill him.
When he's dead take his crystal and pull the 4 lever-switches in the corners of
the rooms and pick up the crossbow and pull the other lever-switch behind the
opened gate.
Now put the crystal in the hole and run to the hole in the wall where
you can pull a piece of wall out to continue through a tunnel that leads you to
two other pieces of wall. Push the first one in the tunnel to the right and
pull the other one out to get a secret. Now pull out the block in the tunnel to
the right and see that another demigod is waiting for you. Rush to the ammo and
pick it up quickly, when you're done, get the hell out of there.
Now leave the tunnel and go up the stairs at the right to enter the
cistern. Take the third tunnel to the left and pull the switch that opens a door.
A fire wraith will attack you so back flip into the pool. Now go into the
opened room and pick up the ammo. Walk back to the cistern and pass it until
you enter another room with some ammo. I recommend you to pick it up ;) Now
leave the cistern through the huge tunnel and get into the next level.
The Guardians of the Holy Light
Kill the crocodile. Well, to the left and to the right there are two
halls. Every time you walk through two pillars in one of them, another
crocodile will appear. In one of the halls you have to pull a switch and pull
out the piece of wall to get a key. Put it into the keyhole in the other hall.
Now pass through the next room and get into the fighting area. You'll see that
this room has special colored light in its corners.
In every corner is a little room with a keyhole, a closed gate and a
switch behind it. These switches open the three doors in the green room. So you
will have to get some keys, what? Climb on the block in the center of the area,
which is surrounded by some strange liquids (as seen in Kaliya Caves ;)
You will hear a huge scorpion on the platform over you. Now, get on
there and kill it. Hint: best thing would be to use the crossbow and poison
ammo, shoot one bolt at him and wait on the block for a little while. When it
suffered long enough from the poison, get up again and kill him with one shot
of your pistols. I don't recommend climbing up when it's just waiting for you
at the edge. The scorpion can also poison you. Pick up the key at the green
light and put it in one of the holes in the corners. That will open the gate
beneath and you can pull the switch. Now there's another scorpion up in the
ring. Kill it, get a key, open the door with it and pull the switch.
Repeat this until you've opened all doors in the green room. Now kill
the last scorpion and get the key. Climb up the ladder behind the doors and
pull the switch, use the last key in the keyhole and rush into the light.
You've just finished my second level, please make your review at
trle.net or laraslevelbase.org ! ;)