Mongolian
Adventures.
Debut Levels by Rudolf.
Walkthrough by D&G Productions.
1 - The
Mountains I.
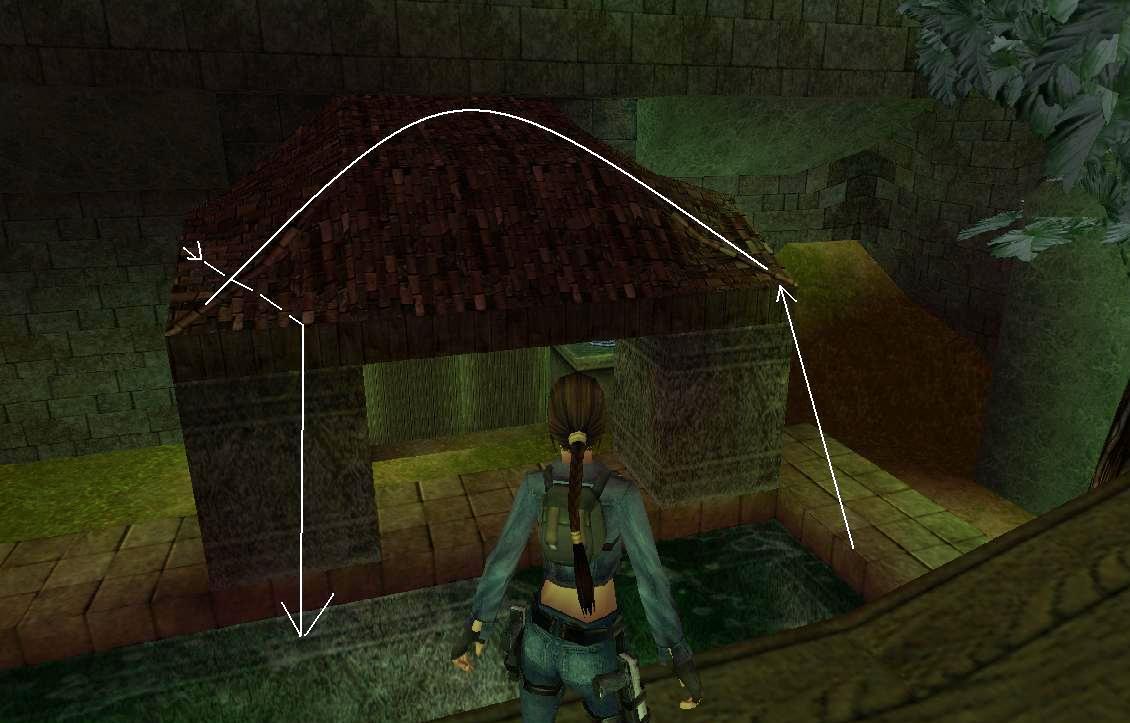
Raise some Blocks.
Face E, jump in the water and swim down E
through the crack to the end. On the E wall is an underwater lever to raise a
block under the house. Swim back and get out of the water. Go to the S and jump
to island in the middle of the central pool. Climb the pillar there and onto
the block that appeared on top. From there jump to the waterfall. Climb up and
follow through the blades and go immediately right around the corner, there is
a jump lever to raise another block (for later). Go N and to the end climb to
the ladder W.
A Crowbar.
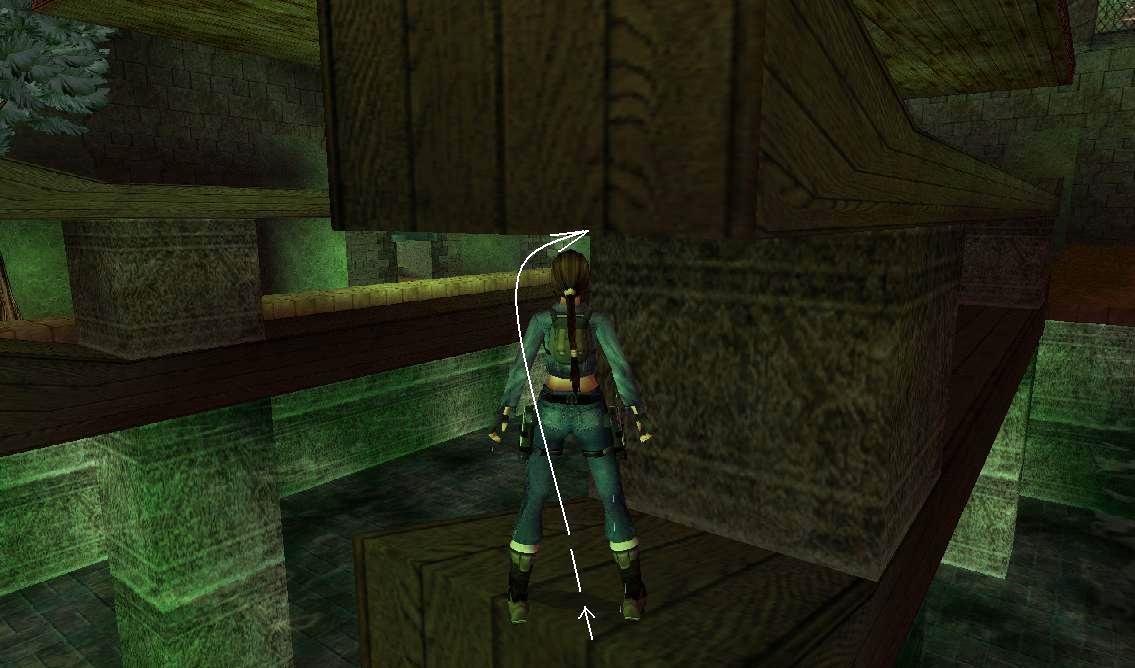
Face NE and jump up to grab the ledge and hoist
up. Get to the end where you can pick up a Crowbar with a camera shot of
a cross. Get back to the waterfall under the house.
Lower the Wall.
Dive into the pool below and swim to the SW
corner through the crawlspace. Swim SE and there is an underwater lever if you
look W.
Swim back a bit and find a Medipack on
the bottom near the N wall.
Open the gate to the Cross.
Go back to the central pool, in the N end a wall
went down. Swim in and you could decide to go back and shoot that nasty fish or
just go on to the next room and climb out, get a large Medipack and some
Flares in the corners. Use the jump lever on the N wall then back into
the water, a gate NW opened. Swim in and follow through and when you see N a
place you can get out the water, turn around and use the underwater lever S.
This raises a block in the room ahead, so turn around again and now swim out.
Climb out, kill the two tigers and climb the
block and use the lever. You’ll see a gate opening up.
The First Cross.
Back into the water and swim all the way back to
the central pool. Climb out N, go to the first pool and climb out on the left hand side (SW), there is a long ladder you have to climb, go to the end and get the First Cross
(a door to the valley will open).
Open the gate in the valley.
Back down the ladder, head E and climb up to the
low E wall and jump down into the water there. There is a crawlspace E near the
second wooden bridge. In this passage and to the right (S) is an underwater
lever to open a gate behind the door that opened when you took the Cross. On
the other side of this passage is a Medipack.
The Valley, open the gate of the house.
Swim out this passage and go left (S), swim to
the middle and climb out. The door you saw is there. Into the water and swim
through the open gate and to the other side so you can climb out and shoot the
fish (from near the Flares N). Get the Flares from the pedestal and jump
back in to find an underwater lever on the back of that lonely pillar in the
water (NE). Get back out and E is the gate you just opened.
Go up the stairs, use the lever at the end and
see an underwater gate going up. So back down, into the water swim out W, climb
up NW and go to the left into the water. At the end again left into that open
gate. Swim to the left (N) and use the underwater lever to open a gate in the
house. Swim back out and to the end (N) to get out on the last wooden bridge
and climb back W over to the first pool.
To the Second Cross.
Go N to the island
under the house and climb up to the block, jump onto the waterfall and get into
the house again, go N through the blades and follow to the next blades, go in
there and come to where that gate opened. Jump on the block on top of that
pillar S (jump lever in the house) and then jump into the building S, push the
ornament block on the left all the way to the E so it is underneath that
pillar. The gate in the middle opens up.
Grinder Cave.
From the entrance go up to the higher rocks W,
go S and mind that grinder! The path is straight S passing 2 Grinders. Then at
the high rock; go over that slanted block left (E) and just slide onto a flat
ledge. Stand jump right around the corner to a ledge you can barely see.
Careful as you are close to another Grinder. Face SW and jump to the wide ledge
there and go to the opening SE.
Go to the left and at the fence up the rocks N
so you can shoot a fish in the water. Find a lever on the S wall to open a gate
and then quickly get out onto the ledge in the middle. Another fish appeared, you can shoot it if you like. Go through the
passage E and follow to the end, go through a gate that opens
up and get the Medipack on the steps. Jump down around the corner
and the level will change.
2 - The
Mountains II.
A Blue Gem and the Second Cross.
You are on a balcony overlooking a place you’ve
visited before; go to the crates at the other end. You need to get to the back
of the second on the left (SW), so push one aside and pull back the other;
there is a lever behind it. The wall in the middle opens up,
go into a large hall. You need to open a gate in the pool.
Go to the E wall, crawl in at the waterfall and
climb on the ledge. At the end is a Blue Gem (a glass panel opens up). Go back out to the hall, to the W wall and in
another crawlspace at the waterfall. You can jump in the water and swim around
the fire or jump over the fire, catching fire and into the water to survive.
Get out and go through the passage where you opened that panel to get the Second
Cross from the wall.
Go back out and place the two Crosses N. Jump
into the pool and the gate E is open, get the Medipack and Uzi ammo
from the bottom, go through that gate and the level will change.
3 - The Tower
- Part I.
The First Red Gem.
An earthquake starts; turn around, swim back and
spot a crawlspace on the left (E). Swim through and almost to the end, then to
the left and then a right and get some air a bit further. Pick up the Medipack
on the right.
Climb out and jump to the N side and climb up.
Around the corner there NE is a lever.
Jump back in the water and up on dry land E, a
block left (N) went down. Follow this passage in and around the corner pull the
block once. This drops another block so out we go back to the upstairs to the
SW corner. Crawl in and go to the far away NE corner. In the next room there is
another crawlspace in the W wall. Lower yourself down and crawl again into
another crawlspace.
Use the lever to lower the next block, crawl
back and jump backwards on the slope. Jump and grab the edge of the crawlspace
and make your way back to the first cave area. Jump down in the water and back
on dry land but now go right (S).
At the end push the block on the right (E) once
and go around the corner to room where there is a lever (E wall) lowering
another block in the cave. You can pull the block in the corner away, creating
a small shortcut (you’re not coming back here…). Go back to the pool and climb
up on the right again.
Now walk a few paces W and find an opening on
the right (N) get in and through a new opening. Run over spikes. Follow though
this next passage and jump in the somewhat deadly water.
Swim S and climb up as soon as possible on a
ledge. Jump to the W and avoid that swinging bag, get the First Red
Gem. Swim back (N wall) and climb the ladder, over the spikes to the pool
area.
Lower the Block, the Guardian Key.
Jump in the water and swim back W. Swim further
and when you are back at the start passage, go left (S) and at the end climb
out of the water to use the lever there and lower a block.
Back in the water and now swim to the pool, be
careful getting out of the water as debris is flying.
The W wall has opened, go in and kill the Ahmet
inside. Pick up the Guardian Key and use it at the N wall outside.
Labyrinth, the Second Red Gem.
The right hand side of
the picture N is a walkthrough wall. Keep going to the right all the time and
you end up at a glass wall with some openings in it and some water down below.
Go left there and to the opening in the glass wall, jump over the freezing
water and grab the crack in the opposite wall. Shimmy left around and drop on
the ledge.
You could also get on the submerged block below,
jump up to grab the ledge there. Follow through and get a Medipack in
the end. Go NW around the back and turn left in the end; use the jump lever
there to open a gate under water. Go back to where the Medipack was, climb up S
and dive into the water there, swim left into the gate NE, left again. In the
end you can get the Second Red Gem (screen of a trapdoor).
Go back to the pool, swim SW from the gate and
climb out on the block there. Get back through the labyrinth by going left all
the time and when you pass through the walkthrough wall again, go to the W
wall. There is a push block, push it in once and find that trapdoor, it will open up. Get the Arrows before going down.
Go down and place one of the Red Gems, go in and
follow through to the second Red Gem receptacle. A block lowers next to you, go
in and use the lever to open the door.
Deadly Pool, the Blue Gem Doors.
Dive into the deadly water and climb onto the
large block left to get the Medipack (you can also make use of the
alcoves in the E and W wall to run to the other side). Look down E and on the
right side of that pillar is an underwater lever.
You can (if you want) place one of the Blue Gems
at the gate N and we’ll be back when we have the second one.
Go back to the S side of the pool, climb up the
wall there the gate you just opened is on the right (SW). Jump down and get the
Gate Keys. Get back out to the pool and make your way to the N and left
(NW)
Open the gate with the Keys and go to the gate
that will open for you to enter the Castle.
4 - The
Castle.
The First Red Gem from the Pagoda.
You can see the Red Gem in the top of the
pagoda. Dive into the pool and find an underwater door NE, hit Ctrl to open it
and swim through, in the last room right around the corner and use the
underwater lever there to open a gate in the pagoda.
Swim back and then to the NW corner of the pool,
climb out. Go to the small building there and jump to the roof, to the other
corner and from the roof to the wooden beam of the pagoda:
Or take this route, jump around the corner and
grab the upper floor.
Jump inside the opened gate to get the Red
Gem. Two gates opened while doing this.
To the Staircase.
Jump back down in the pool, get air and swim
into the NE gate again, this time go to the end and left through the newly
opened gate. Go up a bit further and climb out in the Staircase (you’ll be back
here a few times).
Climb up S and go up the stairs, all the way up
and just before you go out N is an opening to the right where that gate opened
before.
Sandy Valley, kill the flames.
Go down the ladder and get up onto that wall
with the fence N, jump over to the N side and go down NE to the building there.
From the NE corner of the building you can jump inside when the spikes are down
(will cost you some health though). Use the Jump lever NE to kill some flames
in the window where we go now. Climb back up and go back to the wall S. Look
down and to the W is where you have to go.
The First Guardian Key.
Drop from the wall onto the sloped floor below
and start jumping to and fro to the W end where you
end up on top of a sewer drain. Jump onto that sewer pipe below and climb the
long ladder to the window where you killed the flame.
Inside and up left in the alcove opposite the
fire bowl are Flares. Follow through W and up the steps SW, just right
around the corner of the next room you can use the Red Gem. Go W to the
trapdoor you opened, down to the end and out to the First Guardian Key.
A gate opens at the bridge; go back and through a door S that now opened.
The Second Red Gem.
Walk along the ledge and where the fence ends is
a ladder down, climb down to the yard. In the building NE of the ladder is an
open door. (Kill the two tigers that might roam around and) enter, it is the
staircase you visited before, go up again and to the S side.
Hang from the edge of the floor and drop to grab
the crawlspace. Go through, over a bridge and get a Second Red Gem in
the next room (a small gate opens).
Go back out onto the bridge and climb up the
left side (W)
The Second Guardian Key.
Take a running jump to the ledge you see SW and
pick up some Flares. Turn around and spot a jump lever, use that to open
a wooden door on the same balcony where the small gate opened when you took the
Red Gem. Jump back to the bridge.
Go back through the crawlspace (N), drop and up
the stairs again, look for the first opening E and follow the ledge. You’ll end
up in a familiar room (a screenshot; yes we already
pulled that jump lever), place the Red Gem S, go through the trapdoor N and get
the Second Guardian Key. In the SE is a small gate we’ll come to later.
The Third Red Gem.
Get back through the tunnel and head SW, in the
second part of that long passage and right around the corner is a Medipack. Go S again and look for an opening on the right near
some spikes that will pop up.
Carefully climb up in the corner next to the
spikes and turn right, jump into the windowsill, the fire will stop. From there
take a running jump to grab up to the opening in the wall above the fire bowl.
Get down at the other side and to the N to get some Flares and then go
to the S end to end up at the Third Red Gem. A door opens when
you pick it up.
The Third Guardian Key.
Go back to the passage with the fire bowls and
head S, in the far right hand corner is a small
opening. Notice the opening in the SE corner (leading back to the pagoda,
later) and head to the W. Pick up the Medipack and enter W through the
door opened by picking up the latest Red Gem. Use the Gem W and go through the
trapdoor E, you know the drill by now. Pick up the Third Guardian Key.
Use the Keys, to the Castle.
Go out E and follow the fire bowl passage back
to that opening we saw SE, climb down and find an open door leading to the
pagoda. Head W to the receptacles for the Guardian Keys. Go N and find the
doors you opened to the left.
Castle Square, the Corridor Key.
Get in and go to the back and to the right wall,
you can climb up there. Jump in the water and into the hole to pick up the Corridor
Key (another underwater gate opens up).
Into the Castle.
Get out of the water and go E to the pagoda,
dive in the water there, to the NE corner and swim into the door again. Go
straight and at the end left (W), through a gate and a bit further you can get
some air. Keep swimming through a second gate (W) again at the end left (S) and
get out at the end at the foot of a staircase.
The Crossbow.
Go up the stairs, also the stairs on the left.
Enter the attic N and in the NW corner is a push block, pull it out twice and
you’ll see a glass panel going down. Go back to the stairs, face N and climb up
one more floor. Shoot the 2 vases there and get a Medipack and Explosive
arrows.
Get down the stairs to the ground floor then
around the staircase to the left and behind the staircase is that glass panel
where you can pick up the Crossbow.
Pushblock Maze, the First Golden Star.
Go back towards the water (N) and before you go
down those steps, look up and climb up to the rafter there.
Go to the opening left (W) and a skeleton
appears, shoot him. Push the block there as far as it will go, turn to the left
(S) and there is another push block. Push that one twice and go into the
passage and at the end (W) is another push block. Push that twice, turn right
and spot another push block in the N wall push it twice too and get the First
Golden Star from the left. Camera shot of a gate opening. Go back and
around the corner (right) go diagonal to the next passage SE and enter a maze.
Go always to the left and at the end grab a Medipack
from a pedestal.
Go back (taking a right everywhere) until you
are out of this maze area and back on the attic.
The Second Golden Star.
Jump down, up the stairs S and at the wooden
floor climb up (N). Turn to the S and jump over to the next rafter and from
there into the opening in the S wall.
Walk to the Monks Knot and a glass cover won’t
let you take it, turn around and try that jump lever on the left of the
entrance and when you get there another glass cover appears. Instead
you’ll get a camera shot of a trapdoor opening in some water. So back out and
go down to the ground floor.
Into the water N, swim straight and at the end a
bit to the left is that trapdoor. Push the pawn to the middle and see the glass
cover from the jump lever going down again.
Back to the water, get out S, up the stairs and
up the rafters, turn around into the opening there and use the jump lever
around the corner on the right.
Go back out of the room and jump the rafters to
the other side (N) and into the open gate there. At the end is a window, safety
drop to the sand and go to the NW corner to pry the Second Golden Star
from the wall. A screenshot of double doors at the pagoda, when you go to the
ladder E, a small gate opens up somewhere.
Climb the ladder and first jump to the balcony
SE to get the Medipack there. Go back and go down the ladder to the yard
again. Go to the NE into the building (you’ve been here before) and up the
stairs. On top take the first on the right (E) and go into the open gate at the
end.
The Mirror Room, the Third Golden Star.
You’ve been here before too, go left down the
trapdoor to the room behind the fences, into the small open gate E.
Look in the mirror and pick up the Medipack
and Revolver ammo, then go get the Third Golden Star from the E
wall.
The exit, a ladder to a crawlspace is located in the NW corner. Follow through to a wooden
button; it will open a trapdoor on top of a ladder in the mirror room, so go
back there. Climb the ladder on the W side pillar (face E) up to a room with a
Fire Dragon. Shoot it and go to the opening in the floor and down the ladder as
far as possible to safety drop into one of the corridors.
Head S, at the familiar spikes you can jump into
the window again and then down to the S side, follow through to that opening in
the floor SE. Go down and come to the pool with the pagoda building again. The
open double door you saw before is N.
Use the Stars.
When you place the Stars around the central
floor, puzzle pieces will come up from below. Place them on the coloured tiles
and a trapdoor will open up inside the Castle.
The Reservoirs, the First Eye Piece.
Go out of the room to the pagoda (S) and head W
to the Castle Square, a gate opened up W, so enter the
Castle. Go left into the open gate and up the stairs and climb up to the top
floor (the attic). Jump to the rafter S and into the opening there, go into the
first left. Watch out for the spikes and in the end is the open trapdoor (the
door NE leads to the corridors). Climb down a bit and to the right onto the
rafter to get the Red Gem there.
Go all the way down in this room. In the far
corner is a crawlspace, get through and go use that Gem to open the gate in the
back.
Follow de steps down to the Underground
Reservoirs. There are rats here.
Head right (E) and find a building left in the
end (Lara will look). Facing N you can spot a crack, jump up and grab it and
follow right around the corner to another Red Gem (screen of a dark door
on the yard). Drop down and go to the far N wall, left and somewhere at the
middle of the room is a hole in the floor. Get through and in the room with the
Gem is a dark line on the floor. It will raise a cage on the Gem if you step on
it. The only safe spot is the marked tile at the W wall. Go get the Red Gem
and shoot the vases to get a Small Medipack and the Revolver.
Use the Gems, the First Eye Piece.
Get out and go SE to the buildings, open both
with the Gems and inside one of them is an Eye Piece, the other houses
some Arrows. Get out and climb the ladder on the pillar between the two
buildings, the trapdoor on top opened up. You’ll end
up in the yard where the tigers were before, or still
are. Go to the far NE corner where that dark door opened up.
The China Room Challenge, the Second Eye Piece.
Go either left or right to the back and find a
closed glass door, hop to one of the corners NE or NW and use the lever after
you saved the game, a boulder comes down, so side flip/back flip immediately.
Do the other side too and the door will open.
Save!!
There are three trapdoors you have
to jump, on the entrance ledge, left and right are triggers opening the
trapdoors, so stay in the entrance where you also find the reset trigger for
the trapdoors in case you need it. Run and jump to the trapdoor left of Lara
(right for the viewers), a right curved running jump without touching the
wooden ledges to the next trapdoor and a running jump to the other side (Video).
Go get the Second Eye Piece and you’ll
see that glass cage at the Monks Pillar go down.
The Monks Pillar, use the Eye of the Buddha.
Stand on the W side steps and grab up to a crack
in the W wall, shimmy left and drop on the wooden ledge, jump back to the
entrance and leave to the yard. The door in the staircase building has been
closed, so go SE and find the door to the puzzle room has been opened.
Go through, out S to the pagoda and W to the
Castle Square. Into the Castle and up the stairs S, to the attic and jump S to
the rafter and onwards into the opening S. Straight S you can now get the Monks
Pillar.
Go out, jump over the rafter and drop one floor
down. Go into the room behind that push block NW, place the pillar and a gate
opens near by.
To the Eye Door, the Second Blue Gem.
The open gate SE is where you have
to go, jump over to the next part of the bridge and use the lever there.
Two ropes appear, use those to get to the bridge in the S. From there you have to take a running jump onto the central structure at
the big door.
Combine the two eye pieces to get the Eye of
the Buddha and use it on the door. Get down left and grab the Second
Blue Gem, the gate opens so you can get the Uzis. Well
that’s what you think…
3 - Back in
Tower Part I.
Follow the passage and you are back at the Cold
Pool where you can now use those Blue Gems (or the last one) to open the gates.
Go in and turn around, look up and use the jump lever there to open a gate a
bit further into this place. Go W and left around the corner are some Flares.
Go N and take either side to get to circular
knives, pass those and come to the gate you opened with that jump lever.
For the Gate Key.
Go up the stairs and left onto the wall, jump
onto the waterfall and then onto the W side of it, when you slide down
backwards, you can grab the jump lever to open a gate. Go S and right around
the corners through the water and come to a dark corridor.
Up that ladder E is a Medipack. Through
the gate N is a lever, throw it to raise a block at the lava pool. Head back S
and left to the lava pool E, go left and to that big block standing in the
middle, jump to grab it and pull up left. Jump onto the slanted block NE and
slide/jump twice to get to the raised block. Grab up to the burning floor and
shimmy left around to the opposite corner, jump into the opening and get the Gate
Key.
Hang out of the opening and shimmy left along
the crack so you can drop to the floor below. Jump to the same big block again
and shimmy right around the corner, pull up between the two flames and turn S,
jump to the pillar and then grab the left side of the pillar S to get the Medipack
there. Turn around and jump back down to the pillar and then back to the floor
W. Then leave and go up the stairs to the gates, grab the Small Medipack
to the right and Flares to the left and then open the gates.
Head down the stairs and take a right (E),
there’s a receptacle for a Red Gem, jump over lava to the ledge S and watch out
for the darts. In the water is a deep hole, on the bottom you’ll find the Red
Gem. Get back up and climb a corner of the burning block S, stand jump and grab
back to the beam, jump towards the gate and open it. Go inside and the room
will change.
3 - The Tower
Part II.
The Four Monks Pillars.
You can shoot the vases, nothing in them… To the
far W is another vase which will not break, it’s a hint for something in the
wall there (later) Shoot those wooden benches W and the one in the middle will
reveal a crowbar lever. Use it (face N) to raise a couple of blocks at that
vase N, climb up those blocks and push the block into a room. Grab the First
Monks Pillar there and a door opens in the Tower in the big room.
The Tower.
Get out, dive down next to the tower (there’s a ladder in one of the corners in case you want
to go back up) and climb out on the ledge. Go E for a Medipack
and then dive in again, swim to the W side and swim into the open door.
Climb out and grab that ladder, go up to the
first floor of the hall, turn around and climb up again, this time to the top
of this ladder where you’ll come to a Large Hall (there’s
one more ladder up, that’s for later). Go around to the E side of the
tower and look for a jump lever on the tower. Jump to use it and land one floor
down. (The lever created a safe bridge over spikes
in the E room of the Hall). Go W if you want another Medipack.
Then back up the ladder to the Large Hall.
In the shallow pool N are the four receptacles
for the Monks pillars, there’s also an opening in the wall.
Hazard Rooms, a Lasersight.
Run in fast as a block will drop down when you
enter. Go either right or left (takes you to the same place) and get through
the circular blades, N again and more blades. Go left to the next set of blades
and come to a room with moving pillars. Hop left around the pillar to a safe
ledge. Look SW and run into that corner where you’ll find a lever.
It will open a gate in the opposite corner of
the room.
Run back to the ledge you came from and face N,
in the far N is the ledge you have to get to, I walked close to the pillars,
did a stand jump to the empty spot when the pillar on the left is moving
towards the lever and then a run or jump to the safe ledge in the back.
Face E and run jump over the pit when the pillar
is in front of you, so it will be gone when you land there, run into the safety
of the water (Savegame).
Climb out at the opening E and follow through to get Revolver ammo to
the right, proceed and end up at the gate you opened.
In the fountain of this Tomb is the Lasersight, a trapdoor opens (did you save some
explosive arrows?).
The Revolver.
Go up the ladder S and use the lever there to
open doors downstairs E. Go down and through the doors, jump through the window
S and get the Revolver down to the right. Hop over the fence into that
pool S to use the underwater lever NE, swim back through the crack up N. To the
W is a Small Medipack and to the E nothing, so climb out of the water
there. The door E opened up, go to the next room.
The Second Monk Pillar, a Red Key.
To the N in the next room is the Second Monk
Pillar, to the right of it a wooden bench with a Medipack, the other
bench holds some Revolver ammo.
Go to the fountains S and look up W, shoot the
Gem in the lion’s head, a block goes up under a ladder NE. Climb up and down
some steps inside, at the end is a Red Key. Get back out, shoot the vase
W at the pool and use the Key in the lock to open a gate in the pool with the 4
fountains.
Dive in, SW is a tunnel, follow through,
carefully time the spikes and in the end go right (W) to climb up into the
Large Hall again.
Spikes, the Third Monk Pillar.
Enter the opening in the E side of the Hall, go
back to the far N of this room. Up the long stairs and shoot a tiger, then go
get the Third Monk Pillar all the way N. Going back you’ll have to time
the spikes and shoot another tiger. Back down the stairs and go S to find one
of the columns there is out of place, push it back to where it belongs (once E)
and a block goes up NW. Now you can reach the lever there to open a gate in the
S side of the Hall. Go back W to the Hall.
Deadly Pool, the Fourth Monk Pillar.
Enter the open gate S, you’ll have to get to a
push column in the far SW corner, the only way is the long way around. Jump S,
then E, SE and to those ladders E. Climb to the next ledge and make your way W,
more ladders S and then from the next ledge you could better go to the SW
corner ledge first. A button there will turn the water safe.
Now go to the column, push it under the block,
rubble will fall.
Now you have to get
back to the E side of the room where a gate opened up,
peace of cake now the water is safe.
Climb up into that passage and go left, left
again and save, a danger sound alerts you when you go down the steps, jump
around the corner over the pit. Go get the Fourth Monk Pillar at the end
of this passage and get back to the pool, go N to the
Hall and to the Receptacles N.
Place the Pillars, Top of the Tower.
Put the pillars in the receptacles and a door
opens at the top of the Tower, enter the Tower again (W side) and go up to the
very top. Step out and go NW where you can finally make use of that Corridor
Key you’ve been carrying around.
The Helmet Puzzle, the Samurai Helmet.
All the way at the end you will enter a square,
when you walk down to the pool a big Helmet will move to the gate left. Apparently it wants to go inside there. Go up to the SE
corner balcony, left to those spiked levers. Just step onto the spike trap in
the middle, hop back and then walk through the now harmless spikes to the right
hand (S) lever. Use it to open the gate S and go there to pull/push the Helmet
inside and against the back wall. It will then move into place. The gate N will
close, the second Helmet will move over there.
The gate in the NE corner of the square is now
also open; go there and to the levers. Do the same, step on the one in the
middle; hop back and walk to the right hand lever to
use it to open the N gate back up. Go place the Helmet inside and a trapdoor
will open on top of the ladder next to you in that N room. Go up to about 4
bars from the top and back flip with roll to grab another ladder. Go up and use
the lever to open an underwater gate. Go down on the ladder a bit and back flip
roll again, to get to the floor below.
Dive into the pool, W side and swim through the
spikes in the central structure. Use the lever there to open the last gate W of
the square, watch how the Helmet will be placed on the pedestal. Get out and go
in W to get the Samurai Helmet.
The door in the back opens up,
so step out W and go to your Jeep.
The level will end after the title roll.
11-12-2011.