TOMB RAIDER 1 REIMAGINED
TR1 Levelset by JaayStation
Walkthrough by Treeble
For the first eight levels in this massive level set, please refer to José's walkthrough for the Part 1 release. There are some differences, such as extra secrets and a couple of new areas which have been added since and thus are not documented, but the walkthrough will still bring you up to this point.
The level author has provided a complete video walkthrough through his YouTube channel. It was not used as reference for any part of this written guide. Some minor pickups and enemies might have been overlooked in the following walkthrough.
[ * * * ]
LEVEL 9: TOMB OF TIHOCAN
Lara falls into a deep water pit. You need to operate five underwater levers quickly before running out of air, so quickly swim to the far right corner to find the first one. Each lever opens a gate in order, so just follow the newly opened doors until you eventually open the exit gate where you can finally breathe again.
When you climb out of the water, prepare for battle as a gorilla and a lion await in the next room. From the entrance, loop around to the right and into an alcove with a switch which opens a door for a maze.
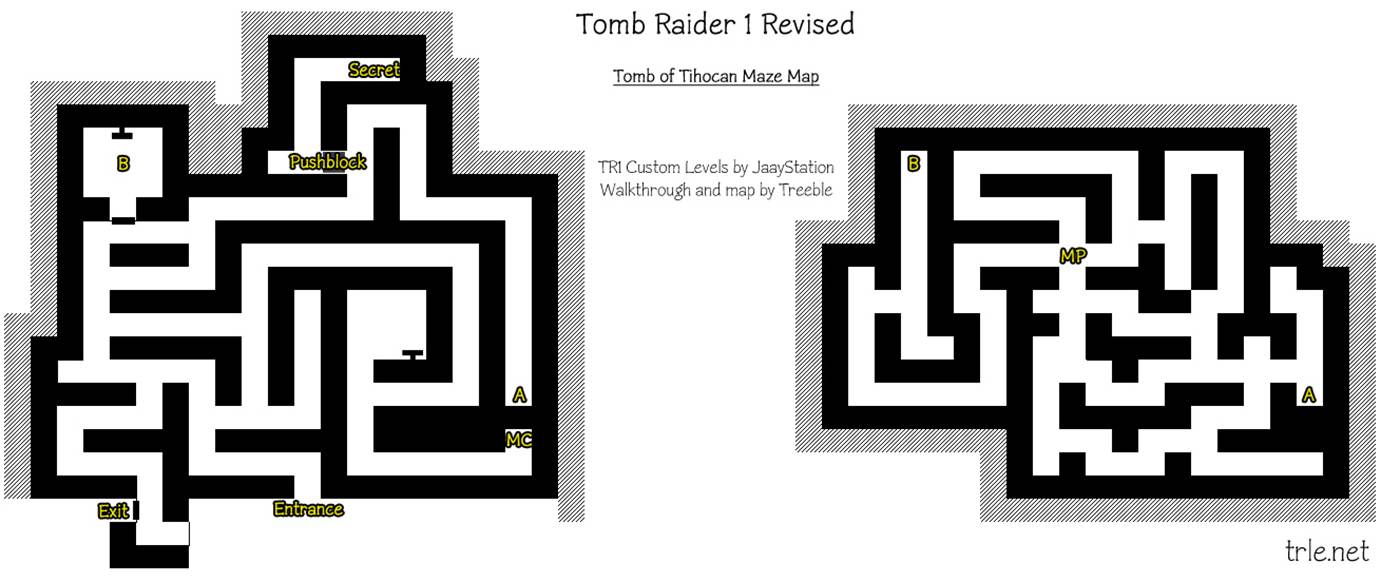
Inside this maze, there's a switch guarded by three rats, next to a corner with magnum clips. This switch opens a door back in the entrance area, so head back there and find an alcove mirroring the one you previously climbed into for another switch, this one lowers a trapdoor in the far end of the maze ("A").
So, back into the maze you go. You'll spot two closed doors as you explore, one of which requires a key we're yet to obtain. Along the way, there's a segment of the wall with a slightly different shade of color: it's movable, so push it in twice to reveal a corridor leading to SECRET #1: a small medipack and two uzi clips. Proceed further towards the open trapdoor, dealing with a quick visit by Pierre along the way, and then climb to the upper floor of the maze.
As you explore, you'll eventually run into a couple of gorillas and another brief encounter with Pierre. Take the small medipack from the crossing and drop through a manhole in the other end ("B") to find yourself in a locked chamber of the lower floor where you'll find another switch, again unlocking a door in the entrance area. Take the newly opened door, opposite the switch, for a shortcut and go fetch the RUSTY KEY back at the entrance. Our stalker Pierre shows up again when you take it.
The key goes into that lock you had spotted earlier in the maze, so get in there one last time to unlock the exit of the maze. Cross the room with the swinging axes by carefully navigating the breakaway tiles. You're not out of the woods yet as there's a series of slope jumps and more breakaway tiles to navigate as you loop around the grey stone wall to your right. Once you pull up, take a breather and save your game.
Jump at an angle to grab the crack on the wall from the other side and shimmy all the way left until you're over the next breakaway tile, the first of a handful. Safety drop and back flip twice, then sideflip right twice and quickly jump at an angle to the next tile. Quickly adjust to face the wall and sideflip right once more towards a slope to bounce off to the entrance of the cistern system.
Kill two rats below as well as the two crocodiles in the water pit. Dive into the water and swim into the higher of two underwater openings and through the tunnel, outsmarting another crocodile on your path, as you pull out of the water in the other end. Push that grated block in the end to reveal a side path, but don't slide all the way down. From the entrance, take a running jump to grab the central pillar and climb up to take the SILVER KEY. You can't reach the upper ledges nor can you throw the underwater lever behind this pillar, so retrace your steps and strokes back to the cistern pool.
Make a short stop for air and save your game, then swim through the lower opening, opposite the one you came from, and stay close to the ceiling as the slopes in the end denote the path of boulder traps. Get out of the water and take out two gorillas in a room with lots of closed gates barring flames and switches. Behind the far gargoyle statue you can find a small medipack.
From the doorway in the corner, hop to the ledge ahead and use the broken column to reach the higher beams of the room. Drop on the other side and jump to the door to unlock it with the silver key in your possession. Somehow, the better adventurer was already locked in, so shoo Pierre away again before you retrieve two magnum clips behind the door, and then climb into the gap in the wall.
You're now on the spiked ledges you had seen from below earlier. Carefully run off at an angle to grab the edge of the spiked side walks and slowly pull up. You're safe from harm as long as you don't make abrupt moves, so walk around the perimeter to throw the switch in the back, then return the same way.
Back in the cistern, again climb to the beams at the top and drop on the other side as the door which we've just opened is straight opposite the one we'd just left. Kill three gorillas inside and find a wall switch on the ground floor to raise the water level in the cistern. And guess who decides to show up? Yes, indeed, Pierre. You could climb the stone structures for a small medipack now, but a door up there is currently closed.
To open it, take a dip and swim to the opposite ledge again, and squeeze between the wall to find an underwater lever to open the door. Swim back there and reach the top of the stone ledges in order to drop to a switch just above the entrance doorway. A cryptic camera clue shows the entrance to the cistern with the gargoyle statues, nothing changes so there's still more to do.
Remember that pillar where we'd gotten the key? Swim back across the cistern again and go through the unlocked door, then drop in and pull the underwater lever in the back of the pillar. Follow the underwater tunnels to emerge back in the cistern. The door you've just opened happens to be on the only ledge you cannot climb straight from the water, so you have to climb to the upper beams, circle around the thick central pillar (stop for a bundle of magnum and uzi clips), and then jump down to land on this specific ledge. Look for an orange wall just inside the doorway if you're in doubt.
As you step in, you alert two gorillas. Walk through the spike field to find a large medipack behind the pillar on the left, then move the cage to reach a gap in the orange wall. Shimmy left, and hop over the pillars towards a switch. We can now explore that gargoyle chamber, so swim to the far right corner of the cistern and jump from the ledge towards the higher, slightly mossy, doorway.
You find yourself with another series of switches. They're timed however, and each alcove houses a switch to open the next gate as well as putting out the flames within, so make quick saves as you work your way. In the last alcove, instead of a switch you'll find the GOLD KEY.
Back to the cistern, swim straight to the far ledge far ahead and through the lower opening in the wall. Jump right to find the lock for this newly-acquired key. Two doors are opened, the one right next to you provides quick access to the water level switch, so go throw it as we need to drain the place in order to throw a switch in the pit just past the other door in this hallway.
This switch opens the nearby tall blue door, but, wouldn't you know it, you now need a flooded pit to climb out on the other side. Quite fortunate we have a handy shortcut, isn't it? Follow the water stream to the top, killing five rats along the way, and jump through the opening by the waterfall for some magnum clips. Retrace your steps back a bit and jump into the side opening about halfway through.
Climb up the rocks to reach the upper level where three rats have been loudly expecting you. Grab a large medipack and shimmy towards the waterfall, then climb up and bounce back and forth as you swerve to land on top of it. Jump over the slope then negotiate a simple series of jumps to get to the top of the rocks, better save your game as you cross the doorway.
A row of boulders will roll down the slope straight ahead, you need to run back through the doorway and hop to that rocky ledge to get out of their way. Now run back in, without worrying about the last two boulders for the moment, and hop left over the slope. From the grated alcove (on the other side is the shaft the level started at), backflip to the slope and bounce off to grab an invisible crack on the wall. Shimmy all the way left and Lara's attention will be drawn to the ceiling...
As you jump across the golden beams, make a quick stop for a small medipack before throwing the switch. As you do so, that flock of bats swarm you. The remaining two boulders have rolled down, so hop back across the golden beams and stay close to the right hand wall to jump on the flatter surfaces on the slope as you work your way to the opposite end of the room.
Again, use the flatter spots of the slope to work your way upwards, minding a boulder close to the entrance point (also make a short stop in the alcove up there for uzi clips), then hop across to that flat block sticking out of the slope and jump across to the opening. Climb upwards and take a long running jump over the spike pit, then grab a large medipack and five uzi clips before sliding down the next slope. If you slide backwards, you can safety drop at the bottom through the collapsed roof of the previous level, where two lions are now roaming free.
Beyond the open doors is a time shift, so go in and marvel at the rows of golden centaurs. You're not wrong, a massive showdown is on its way. Before doing anything else, let's slowly work our way towards the back of the room, trying to awaken each of them in turn. On this first run through, the second statue on the left and the third one on the right come to life. Approach the doors and, on your way back, the third statue from the left (which is now your right) attacks.
Near the time shift portal, look left to spot a missing piece of balustrade and a stone slope just below the bridge level. Hang from the bridge there and drop to grab a platform just underneath. Hop across the floating tiles to a switch in the back to open the doors at the end of the bridge, then jump all the way back. Save your game just before bouncing off the stone slope you saw earlier on, because when you get back to the bridge at least two more centaurs statues wake up.
As you side flip fighting them off, you're likely to bring another one to life. Don't side flip too far, so that you can single out the final two centaur encounters later. Once all is said and done, head through the open doors. Somehow, Pierre beat you to the prize, but how long can he hold on to it? Pry the second piece of the SCION from his dead hands, along with his MAGNUMS and a GOLD KEY. Use the key to open the tomb proper at the far end of the hallway to wrap things up here.
[ * * * ]
LEVEL 10: THE LOST CITY
Go through the opening on the right side of the room to face a small underwater lake, but, before dropping in, loop around the central sand pillar for a small medipack. Swim through the collapsed underwater passage and through a narrow opening right opposite the second door. Inside, you'll find an underwater lever to open this door, so swim in and climb out.
Climb to the top of the small building and leap to the roof of the central building, underneath the blue sky. Go to the leftmost side and hang from the edge to spot two open windows: drop to grab the edge of either and climb into the building to find a switch. Safety drop back to the bottom of the outside area and deal with two panthers.
You can enter the building through a doorway on the ground to dispatch a third panther on the staircase. Right in front of this doorway is the door you've just opened, go in and pull the golden block once to reach the top of the wall. Turn around and climb higher still. You have two paths to follow from here, first go straight ahead (west) and negotiate a series of jumps around the perimeter, stopping by an alcove for two magnum clips, until you come to a switch.
It opens the door to the second small building, so climb back down to ground level, go up the sandy dunes and, between the two small buildings, you can find uzi clips before going around the building and through the open door. Drop into the water pit inside and get the first SAPPHIRE KEY. The door opens and you find yourself in that cramped underwater tunnel again, swim out and left to go through the other door and back to the previous area.
Run across the room to that open door with the golden block and climb up again. This time around, you want to follow the perimeter to the east, so shimmy closer to the wall to be able to pull up and take a running jump with late grab. Find the second SAPPHIRE KEY in an alcove over the brown rocks, safety drop to the ground and use both keys to open a door nearby.
Save your game. There's a missable secret just below the concealed trapdoors ahead of you. You can walk up to the second tile safely, but when you touch the third one, the floor gives way and drops you to a chute leading straight to a lava pit. So, from the second tile, roll or hop backwards in order to grab the edge of the tile you're on as the floor gives in. Climb back up, turn around and look down: along the right hand wall there's a flat opening.
It's a tricky spot to jump into; what worked for me was to run at an angle against the wall holding grab, so I would slide (facing downwards) from the very top, and almost immediately jump swerving right to bump into the wall of that alcove. Once you land the jump, follow the corridor for SECRET #2: a large medipack and two uzi clips. Return to the slope and save your game.
You still want to slide as close to the right wall as possible for the following slope jumps, minding the lava and swinging axe. At the end of this first series of slopes, shimmy to the right and pull up to another slope from which you reach a safe spot for a quick breather. Line up diagonally to the breakaway tile and take a standing jump, so that you can keep your momentum and take a running jump towards the next one as well as the tall block in the corner in one single motion.
The switch in the far corner lowers the ornate bridges for a short time, so quickly take a running jump across. Just past the threshold of that corridor ahead a boulder awaits, so trigger it and immediately grab a side edge to allow it to roll off into the lava. Enter the next room for a pushblock puzzle.
I'll give directions considering the entrance as a starting point. First, go left and take a small medipack from within the sarcophagus and then approach the central glowing white tile. With the entrance behind your back, inspect the block and take notice of the placement of the different glyphs: that's where the respective blocks need to go. Place a mental 3x3 tile grid over it to visualize what you need to do.
So, owl goes top right corner, hand goes left, snake goes bottom left corner, wave goes bottom (very archaeology). The far left block is the wave, so push it once towards the entrance. Far right block is the snake, so push it towards the elevated corner with the central white tile. Near right block is the owl, which goes towards the corner by the closest sarcophagus. And finally, the near left block is the hand, just push it once towards the wall. The trapdoor above the central tile opens, climb to the upper level for stage two of the puzzle.
Same logic applies, but this time the hint is on the ceiling. Standing above the entrance point of the room below, the hint reads: snake at the top center, hand on the left, owl on the bottom left, and wave on the bottom right. The far left block is the snake, just push it once towards the far wall. Far left block is the hand, push it once left towards the snake block. The final two blocks are wave and owl, push them towards the bright corners with the empty pedestals.
When all blocks are in position, four walls covered in hieroglyphs slide away revealing passages. Find four uzi clips in mirroring niches and ignore the opening leading to a cat statue for now, going through the opposite pathway instead. You come to another crossing: the path left has collapsed, leaving us with two independent paths, each housing a key.
Straight ahead, first take out a crocodile in the water and then pull the colorful block next to the entrance once. There was a large medipack hidden beneath it, but most importantly you can now use it to reach a ledge above. Move the next block four times around the ledge to reach a still higher level. The mummy will attack once you throw that timed switch; do so and hop down to the previous ledge from where you have room to sideflip while shooting the cryptid.
Climb back up to the switch. Unnecessary advice, but it's a good idea to save before throwing it a second time as you need to quickly perform a series of jumps over trapdoors until you get to a safe ledge high up on the wall where a SAPPHIRE KEY lies. One down, one to go. Take a glorious somersaulting dive into the pool below and return to the crossing.
Now go through the pathway where a mummy lies still way in the back. Examine the room, there are raised bridges atop the columns and a golden block you cannot move right next to the entrance. By the mummy you will find a timed switch to lower the bridges above. Quickly take running jumps towards the golden block, jump onto the nearby bridge and hop all the way to the end. You can save precious seconds should you need to grab a ledge after a jump by letting go of the Action button and immediately pressing it again to "reset" Lara's animation.
From the last bridge, the alcove with the moth motif right in front of you houses the second SAPPHIRE KEY you need. When you pick it up, the mummy below finally comes to life. Don't drop down just yet: hang from the edge and shimmy across an invisible crack to the right to pull up into a niche in the corner with SECRET #3: a small medipack and two magnum clips. When it's safe, return to the room with the pushblock puzzles and now enter that corridor with the cat statue.
As you run in, a panther phases out of the statue. Find a small medipack in the corner opposite the locked door, then proceed to slot your keys in. As you do so, a second panther spawns from the other statue. Drop into the next room and collect a large medipack from the nearby sarcophagus, then proceed to find a switch behind the second one. As you well suspected, that mummy will immediately strike once you throw it.
Through the door, save your game after the grated pit as there's a nasty gauntlet of traps. Past the gnashing teeth doors, going down and up the slopes, there's a swinging axe just outside the doorway. That small medipack right in front of you is a lure: when you step next to it, boulders will run down. If you get back to the tile with the medipack before they fall into the pit at the end, you can safely grab the item, otherwise boulders just keep looping back into existence.
At any rate, in the next room approach the flying mummy to wake it up. There are four receptacles in the wall, but that's a fetch quest for the next level. For now, loop into the long hallway, guns at the ready because two mummies will storm out of the room in the back. Inside that room, step on the central plate to shift things around: when you go back to the room with the receptacles, your entry point is locked off, but you can now approach a set of doors between the receptacles at which point this level ends.
[ * * * ]
LEVEL 11: OBELISK OF KHAMOON
Leave the area with the receptacles for now and go on; the double doors open upon approach. Jump through the gap on the wall and gun down two crocodiles in the water as Lara's theme plays. The titular obelisk stands tall above you. From this first ledge, head clockwise around the perimeter and jump off the slope supporting the obelisk to reach a high ledge with a small medipack.
Drop into the water and find an opening in the corner beneath this ledge to pull an underwater lever just above the opening. Swim back to the center of the obelisk room and pull up on the next ledge in a clockwise direction. Ignore the high switches for now and jump through the gap on your left to find the doors you've just opened.
There are no less than seven dormant mummies in the next room. Scary, huh? The catch is that they'll all wake up at the same time whenever you go over the bright (non deadly) glowing floor. So, play it safe: walk towards the steps in the back, pull up onto the hanging block and jump to the corner, then to the flat platform above the previous block and finally onto the tall pillar in the center of the room. You get a musical cue, draw your weapons and clean house. If the mummies run into the obelisk room, hang off the ledge to lure them back to you.
From the taller pillar, jump towards the statue and walk right past it. Save your game. Before climbing up the wall just behind the statue, jump to fall right into the ornate glass "basket" hanging off the outer wall, but keep in mind that you will land on a breakaway floor tile, so as soon as you touch it, start turning Lara around and tap the roll button to inch to safety. Inside you'll find SECRET #4: a large medipack and three shotgun shells.
You need to climb back up to the top again, but before doing so, throw a switch in the corner of the room with the glowing floor to shift a block for later. Climb into the opening behind the statue at the top and follow back to the obelisk room. Stop at the opposite doorway and save your game. You need to grab the edge of the slopes on your left (sliding down towards the obelisk pool), so back up against the wall and take an angled standing jump to grab the edge. Once you get it right, shimmy all the way to the flat spot on the other side. Jump to the top of the slope using the flat tiles and throw a switch at the top. A bridge lowers behind you, jump across and take the SEAL OF ANUBIS.
Dispatch the flying mummy, drop down into the water at the bottom and climb out where you were before. Resuming our clockwise motion around the perimeter, next up are two switches high up on the wall. Climb the block farther away from the wall and jump at an angle to the one past the fence. Save your game. For a brief time, the blocks will shift their positions, so you must be quick to climb back up on the block and jump to the next switch before the blocks return to their original positions.
The doors on the ledges above the entrance open, but before going back there keep going clockwise around the room. Behind the next gap are two panthers, which you can shoot safely from the wall, before dropping into their den for a small medipack. Now go back to the starting position (SW), and from the jade wall you can backflip to a block above.
Go through the door to wake the mummy up, gun it down and step into the window. Slide down and jump to a platform at the bottom of the obelisk, where the EYE OF HORUS awaits. Run off straight ahead to fall into the water and climb up the ledge to your right. Time to resume that clockwise routine.
Beyond the nearby gap, climb the block which slid under an open trapdoor and pull up to the floor above. Cross the two open doors for a small medipack and uzi clips, then save your game before going through the passage in the middle chamber.
As you cross the doorway threshold, a gnashing teeth door operates. The tile immediately in front of you is a disguised trapdoor which drops you back into the obelisk water pit. Like you've done before, you can hop backwards to grab the edge and disarm it. Jump across to the trap, and the tile just beyond it is also a trapdoor. Hop backwards to grab the edge, and this time shimmy until you're touching the left wall, then let go to safely drop in a scarce safe spot in the spike pit below and grab a small medipack and magnum clips for SECRET #5. Walk through the spikes and pull up on the other side, clear another gnashing teeth trap and go up through an opening in the ceiling.
Shoot the flying mummy and the swimming crocodile. Next up is a timed run starting with an underwater lever: at the bottom of the dry staircase, find it in an alcove in the back, then quickly climb back out of the water and run to the first wall at the top of the steps. Don't go around the bend, but instead take a running jump to grab the trapdoor on the left (use the let go-regrab trick to cut Lara's dangling animation short) and quickly jump to the switch in the corner.
Another timed run, this time you'll go around the room jumping over a string of trapdoors, so make quicksaves if you feel you're making good time. When you get to the trapdoor by the waterfall, take a running jump holding down Action to glide into the opening ahead. Walk the golden catwalk to the end. That switch is for much later, but for now you can hop onto a newly lowered bridge and find the ANKH ready for the taking, disturbing a flying mummy in the process.
Drop back into the water and now let's enter that last passage next to the entrance of this level (ie. west). Two mummies and two crocodiles later, drop into the water and locate five underwater levers to open the exit door. You can also find a large medipack and uzi clips on the bottom. Pull up into the spiked steps from the corners next to the wall to avoid damage, then slide and jump to the central platform. On the mirroring hanging ledges there are shotgun shells and a large medipack, and finally, through the other end of the room, cross a bridge to take the SCARAB.
With all four items in your possession, you can now slide down any of the nearby slopes, go through the SW gap back to the entrance of the level and place the items into their respective receptacles. The obelisk gets activated somehow and even the skies are affected.
Go back to the obelisk and work your way to the very top using the newly spawned floating tiles, backflipping off the sloped jade wall when needed while also taking care of a flying mummy. At the top, throw that switch you'd seen earlier on to open the trapdoors in the area with the receptacles. Safety drop to the lowered bridge below and graciously dive into the water at the bottom, then retrace your steps back to the beginning of the level and drop through the central trapdoors.
At the end of the hallway is a mysterious device: step in to be teleported elsewhere. Approach the mystical doorway to finish this level.
[ * * * ]
LEVEL 12: SANCTUARY OF THE SCION
Cross the mystical barrier to end up in a floating islands style of sanctuary. As you approach the edge, a flying mummy takes notice of you. Use the flat block ahead to reach the grassy ledge on the left, then go around to the back and shimmy along the crack for a switch. There's a total of five switches we need to locate before that shown door finally opens.
Go back and cross the bridge. The door we're trying to open is straight ahead, between the legs of the massive statue of Horus, but we're not quite ready yet. Instead, save your game and jump at an angle towards the ramp on the right side at the end of the bridge. A boulder rolls down immediately so make sure you're safely positioned to backflip off its path. Climb to the upper ramp and a second boulder gets thrown right at your face; hop back and grab the ledge to dodge it in the nick of time.
Jump over the two flat blocks and then to the top of the stone structure on your right (above the grassy ledge) to find the second switch. Back to the second flat block, line up to the center of the slope ahead and take a straight running jump, then hold the jump button to bounce off once and then hold down the right arrow key to grab the edge of the third slope. Pull up, jump off to the larger grassy area ahead and draw weapons to engage another flying mummy.
Another flying mummy wakes up when you step on the stone at the end of this platform, take it out but before moving on jump into that floating water bubble. Swim towards the opposite corner and save your game. Next to the right supporting pillar in the back is a slope leading underneath this floating bubble: just swim out in a straight line and you'll land next to the third switch.
To get back, take an angled jump to a lower ledge just beyond the switch and pull up to the bubble above. Climb out through the opening in the center of the ceiling and deal with an atlantean panther. The trapdoor beneath the switch is lowered, so let's raise it. From the edge you came from, take a running jump to the partially fenced off tall pillar in the grass. An angled jump towards the next pillar and then one last jump before you can climb to the top where the switch is. Dispatch the flying mummy before working your way (through the water bubble) back to the fourth switch.
Now drop to the grassy ledge below and follow the stone platforms back to the bridge. This time around, leap across to the feet of the statues and find the fifth and final switch between the feet of Seth. With all five switches activated, the door at Horus' feet opens. Save your game because a couple of gnashing teeth traps might get the best of you before you get to the atlantean panther.
In the next room, flick the switch and immediately jump backwards to avoid a boulder. Use the newly raised trapdoor to reach a corner column and take a running jump to the opening on the right. You come out between the statues arms, and you can then find another switch on Seth's lap. Dispatch the two flying mummies then retreat back inside to find the open door across the gap.
The switch within activates a string of yellow floating blocks throughout the level, so safety drop down and return through the gnashing teeth door tunnel. Take a running jump back to the bridge and go up the boulder ramps, disarming the second one again.
When you line up to that slope jump again, notice there's one newly-spawned yellow floating block just beyond it: you want to backflip off the second slope veering left to land on it. Walk to the edge and jump to the top of the entrance building to find the first unnamed ANKH. Now retrace your steps into the bubble and climb out of the water. Facing the switch, look right to spot another floating block leading to a taller grassy ledge where you'll find the second and final ANKH.
The yellow blocks lead you all the way to the top of the statue of Horus, so work your way to the top of the central stone pillar like you'd done before to negotiate that string of jumps. Place both ankhs on the receptacles over the statues and the door between them opens. Go in.
Save your game and equip your uzis. When you drop back to reality through the mystic portal, you're ambushed by four mummies. There's an alcove in the back of the room, you could try running around the right side and hop there while the mummies madly knock you around for some relative safety. Once the dust settles, throw the switches in the mirroring alcoves in order to disable the barrier protecting the third and final piece of the SCION.
[ * * * ]
LEVEL 13: NATLA'S MINES
As the current stops dragging you further into the mines, loop around the rocks to your right to find a large medipack before swimming through an opening in the ceiling where the cave is slightly brighter. There's nothing of interest in the water, so climb out whenever you can.
Go up the steps in the NE corner to the catwalks and in alcove you'll find some uzi clips. Follow the catwalk until you can jump to the top of that waterfall and follow the water stream for a small medipack, then jump to a ledge to the left where you'll spot a switch. The door shown doesn't open yet. Safety drop to the ground and go up the NE steps again, this time jump to the flat corner of the sloped roof over the tracks and shimmy all the way to the left side, where the second switch is located. The door over the tracks opens, so drop down and go inside.
Throw the first switch to open a door in the passageway. Another door bars your way further, so push a crate on the right twice, hop over it to find a small medipack, then push this crate against the wall to throw a high switch. It opens the trapdoor in the previous room, so go back there and reset the first switch to close the door. Get back inside through the open trapdoor above.
Pull a second block from behind the door three times so you can use it to climb back to the trapdoor corridor above, and go throw the first switch again. Go through the door and push the second crate one last time against the other crate, then return to reset the first switch again and climb through the trapdoor corridor. You now have access to the corridor that was behind the door and crate, at the end of which is yet another switch, allowing you to proceed deeper into the excavation site.
Dive into the water below and find uzi clips in the far NE corner, then pull up to the lower tracks. Go into the bright opening below the entrance and dodge two rats the best you can until we can get our hands on some weapons. Inside, throw the switch and quickly head back to the small house in the middle of the area. Jump to the windowsill and climb back up to the upper walkways to find the open door at the end of the tracks.
Mind another couple of rats and save before rushing in as gnashing teeth doors and a boulder await you. Safety drop to the slope below and backflip to avoid the deadly barbed wire on the ground, then slowly walk through it.
Jump the blocks over lava and to a row of TNT crates (which we'll be eventually blowing up, yes). From the top of the crates, you can jump to an alcove with a switch to open the door of that small building in the previous area. Now return to the blocks over lava and use the tall slope to bounce off to that small ramp with the obvious boulder: immediately run off to a lower ledge straight ahead, only then go back for the uzi clips.
You might have noticed some weapons in the lava, we'll get to that much later on. For now, focus on climbing the flat spots of the pyramid, saving at every jump as the slopes are tricky. From the last flat spot, jump to the slopes against the wall in order to grab the edge and shimmy all the way right until you can pull up. Now you can take a running jump to the rooftop of the small building there. Backflip off the black slope to grab the edge of the tracks above and pull up. Behind the barricade you can get a small medipack and shotgun shells.
Run down the track and the door opens up. Go back to the previous room (mind the boulder and gnashing teeth door) and enter the house in the lower level to finally reclaim your PISTOLS, plus a bonus RUSTY KEY. Dispatch those pesky rats and use the windowsill to reach the upper catwalk again.
On the upper tracks, just behind that mine cart blocking your path, there's an alcove in the far wall with a keyhole. Unlock that door and save before going in. It's a double-sided boulder trap, so take a few running jumps all the way to the other side and don't stop until you reach the far wall, that way the opposite boulder soars above your head without a scratch.
At the end of the narrow path is a breakaway floor tile leading you down to a slope over lava. Jump at the bottom to the pillar and then to the farther one. Now, assess the situation: you have more breakaway tiles interspaced with swinging axes, and at the top there's a V-shaped ledge (where not one, but two boulders will roll through the middle lane). Get the timing down and negotiate the simple jumps, despite the unavoidable pressure, and then bounce back and forth until you're clear of both boulders.
Only to find plenty more boulders in the sloped hallway you come to. Again you'll want to use walls as cover for the long row of boulders. When it's safe, step on the two ornate tiles to open the exit door. Gun Larson down and pull up into the opening in the wall, but turn around and line up for an angled running jump to grab a ledge above the entrance. Shimmy all the way to the other end for SECRET #6: magnum clips and a small medipack. Safety drop and now proceed through that opening in the wall.
Take a similar angled running jump over the lava. Pull up and immediately back off to grab the ledge and dodge the incoming boulder. Drop to the bottom of the lined up blocks to find a FUSE which must have just fallen off its receptacle. Then climb to the open gate at the top and slide back into the tracks by the small house where you'd gotten your pistols earlier on. From the upper catwalk, follow the tracks back west to the initial area, using the crates to fall through the open trapdoor.
Go through the oval tunnel to the open door in the back. Inside, kill the Cowboy and relieve him from his MAGNUMS (if he dies over a fire, reload). Enter the building on the right side and throw the switch to slide one of the blocks, revealing a receptacle, and then push a block in the opposite corner once. Go back outside and loop around the wall, then use the block you've just pushed to reach the top of this building and find two uzi clips and a large medipack for SECRET #7.
From the entrance of this building, jump to the block which slid away from the wall and then to the top of the doorway. Go around to the left side and use the unburnt blocks to reach a PYRAMID KEY. Once you grab it, the Bald Man announces his arrival. Once he's done for, you can take his SHOTGUN from his hands.
Now go to the opposite building for a pushblock puzzle. Those TNT crates will progressively light up until they explode. Push the cracked block twice, hop over it and push it back once towards the entrance. In the back, push a second block twice to reveal a third block, which you must push once. Climb up, take uzi clips and go stand on that block near the entrance: you can now push the upper block over the last block you've just moved. Throw the newly revealed switch to open a door underwater (in a room which was previously ruled by lava, no longer the case since the TNT exploded the dam), and clear the entrance by pulling that block out of your way.
Outside, go through the oval tunnel and again through the trapdoor and tracks to the next half of the mines. Dive into the water and swim south through the massive hole the explosion created on the wall. Among the TNT panels on the floor, you can find the UZIS you had spotted on lava much earlier on, then swim to the back and through an open door to find the second PYRAMID KEY inside a small underwater shack.
Get back to the upper catwalk to go through the trapdoor over tracks and back to the oval tunnel. Insert the two keys to open the pyramid proper and walk into the darkness...
[ * * * ]
LEVEL 14: ATLANTIS
As the lights come on, run into the next chamber and approach each of the eggs in turn to avoid being overwhelmed by two flying atlanteans and the crawling atlantean in the opposite doorway. By the hatched eggs, you can find some uzi clips and a small medipack.
Safety drop to the main shaft and have a look around. Before anything else, let's fetch our secrets. Facing the central pillar, go right and hang from the edge, then let go to grab a rock just below. Pull up and jump to a lower rock at lava level for SECRET #8: a large medipack and two uzi clips. Climb back up using the tall rock and grab the ledge above. Don't jump towards the door, but instead hop back to the larger ledge and take a leap of faith straight to the bottom of that mystical purple energy pillar. Water — or something similar. Swim through the passage and pull up into a curious room housing SECRET #9, in the shape of three uzi clips, a large and a small medipack scattered around. Go through the opening and you're back at the main shaft.
We need two keys to unlock the door on the right, so let's work the room in a clockwise direction, start by going left and enter the first opening you come to. The room filled with ramps going in different directions belongs to the Skateboard Kid, who leaves his own UZIS behind. From the entrance, follow the path left to hatch a flying atlantean as you work your way to the top, and jump onto the doorway for uzi clips. Use the nearby block to reach a switch in the end. Another flying atlantean spawns.
Take a running jump to the lower path of the skating ramps and follow in a straight line to the opposite wall to find the trapdoor you've just lowered, beneath which you'll find the first PYRAMID KEY. As you work your way back to the main shaft, another flying atlantean might hatch if you get too close.
Back at the shaft, follow the perimeter clockwise and around the corner enter the first opening. Slide down to a ledge at lava level then use the nearby block bursting lava bubbles to reach the taller block, minding the darts as well. Grab the wall and shimmy right until you can pull up at the second PYRAMID KEY. Roll off the edge to land on the lower block in the lava and negotiate running jumps over the other two lava bursting platforms to reach an opening in the corner that takes you right back to the main shaft.
Run around the perimeter again and use your keys to unlock that door. Save your game as you slide into a most curious den with an atlantean tyrannosaur and two atlantean raptors, plus a mime in the shape of atlantean Lara to spice things up (don't shoot at her!). When the beasts have fallen, time to handle your double.
From the center of the mirroring room, start your ascent by using the NE slope (the one closest to your entrance point) and jumping over the tall blocks to a switch. It opens a nearby trapdoor for a brief moment. Safety drop and now repeat the jumping routine to reach the landing on the other end and run through the central tile to force atlantean Lara to fall into a lava pit. Her demise raises trapdoors which enable you to reach the exit, so jump back over the tall blocks you've just used to get to the raised trapdoor and take an angled jump into the exit.
Save your game. As soon as you step into the central tile ahead, a boulder immediately rolls down the corridor, so hop back to safety. Minding the constant barrage of 3x3-dart traps, loop around the wall to the left and jump over the boulder in the lava pit for a small medipack. You now need to work your way towards the arrow emitters by using the several alcoves in the corridor, one of which requires you to jump as it's not on ground level, and that's when the second boulder comes towards you as well.
When you approach the dart throwers, they stop, and at first one crawling atlantean comes from the back. Move further along to wake up another two crawling atlanteans. The fourth crawling atlantean comes to life when you're going up that trapped ramp, but it seems unable to track you far.
Save often as you move up. Choose either side and move up slowly. Before the first burning pillar, a boulder rolls down, sideflip to the opposite side to trigger the mirroring boulder and sideflip back. Just beyond the gnashing teeth door you'll trigger boulders on both lanes simultaneously, so backflip over the trap and take a running jump at an angle to land in between lanes where it's safe (careful with that atlantean crawler down there, if you let it live). Resume your ascent and as you approach the second burning pillar, another set of boulders are triggered; disarm them like you did the first time around by sideflipping, then go through the doorway.
Mind the atlantean raptor and approach the egg inside to hatch a crawling atlantean. When all is quiet, loop around the room finding a switch in each of the supporting columns. In one of them, you need to grab a crack and shimmy to the right. The door is still closed, so climb into a SW opening and drop onto a ledge outside, at which point two flying atlanteans will hatch. The final switch is on the block, and just to its side is a small medipack. Go back in and through the now open door in the next corner.
From the doorway, gun down the newly hatched flying atlantean, then take a jump to the ledge to your right to reach the catwalk by the wall. Take the large medipack and save your game before navigating the trap gauntlet ahead. There will be a constant barrage of arrows on the lower ledges, and the flames above never go out. For the first platform, pull up on the rightmost corner (away from the axe). Don't stand still for too long as the heat is hurting you.
Take an angled jump over the fire aiming to grab the left corner of the next tile as darts tear your dangling legs. Pull up, heal and save. Now, again, aim for the right corner of the third tile. There is a small medipack between these two tiles if you're bold enough. When you pull up onto the third tile, carefully walk as close to the right hand wall as possible to avoid going up in flames (watching your health bar at all times) so you have a proper angle to jump around the corner to the taller ledge.
Jump to the next ledge and quickly dispatch the two crawling atlanteans as well as a flying atlantean, then jump to the ledge they were on and turn around to spot another flying atlantean coming over from the burning traps you just went through. Jump to the narrow niche on the wall and follow it to the end, taking an angled jump to the next niche. Pull up near the edge, face the slope just outside and jump with a midair flip to bounce off and grab a platform in the corner.
Take a running jump to a flat spot just past the slope and another flying atlantean will come to life. When it's safe, grab the crack on the wall and shimmy all the way left and follow to the next doorway. Save before crossing the threshold however, as a flaming boulder coming in from above you will set the central lane on the fire as two crawling atlanteans move to strike.
Just around the bend, pull up through the opening on the wall to an ominous room. Before doing anything else, drop into the space among the switches for a small medipack and uzi clips. Apparently, Qualopec has left a message on how to disable this cloning facility... In non-cardinal terms, turn your back to the notice on the wall and throw the middle and right switches, then go over the blocks and when facing the wall notice again, throw only the switch on the right. None of the eight crawling atlanteans will come to life but the barrier goes down, so you can throw the switch which was housed within that potential nightmare (any other switch will wake them up; they can't reach you if you stand on the switch blocks so use that to your advantage to save up on ammo). Go back through the opening on the wall and the newly opened door to your left.
Take a continuous series of jumps back and forth as you veer upwards over the lava gap. At the top, a crawling atlantean is expecting you. The switch opens the door and lets a centaur atlantean right in. Go through the door and use the blocks over lava to reach the opening on the other side of the room. It's another trapped corridor, with gnashing teeth doors and a switch at the end.
Flick the switch to morph the blocks over lava. As you climb them upwards, you'll see two ledges against the wall, one with a switch. It's for a timed door nearby: after throwing it, roll and take a running jump veering slightly left to grab the edge of the final raised block and quickly jump through the open door before it slams shut.
In the following corridor, just around the bend a boulder will roll towards you, keep running forth and in the nick of time find shelter in an alcove to the right. Follow the path to the end to drop into a bloody water stream, go left whenever possible for an underwater lever first and then through the exit, but keeping in mind there will be a couple of gnashing teeth traps when the underwater tunnel bends right.
As you climb out of the water, immediately draw your weapons to fend off that centaur atlantean. Enter the throne room and two crawling atlanteans will be alerted: you can use the tall step on the entrance to lure them towards you and shoot from relative safety of the room the centaur used to live in. Just inside, pull up onto the block to your right for a large medipack.
Walk down the glass platform towards the thrones to the end. There's a tricky jump here, you need to reach the alcove on the left hand side of the room. Grab the edge and roll for the optimal line up, then take a standing jump upwards to move but an inch forward, and then take a running jump slightly adjusting to the right before taking off with a late grab. The three crawling atlanteans in front of the thrones open fire. When it's safe, jump towards that ledge.
Each throne base is actually a movable block. So pull all of them once to find switches behind them: Tihocan's is quite obvious, Natla's is on the side, but also go through that hidden passage to pull another block twice to reveal Qualopec's switch behind it (go through the thrones to get to it). All three switches open the double doors, you can push the block by Tihocan's seat to the edge and take a running jump there, but mind the ceiling.
A crawling atlantean and a centaur atlantean were standing guard. Enter the next room and take a look behind the column to your left for three uzi clips and a large medipack before touching the Scion on the ancient device...
[ * * * ]
LEVEL 15: THE GREAT PYRAMID
Prepare to face Natla's abomination, but the rules of the game have changed: the platform is now full of spike and flame traps, and there will be a constant arrival of flying atlanteans to support the beast. Save often, just in case any mishap takes place. When things go silent, find two uzi clips near the edge before going through the open doors.
Inside, use the two switches up on the shelf before using the one on the ground floor: this one raises trapdoors for a brief amount of time, so immediately roll and run to the opposite corner and climb up near the left-hand wall where the crevice is lower, and quickly shimmy all the way to the right while taking potshots from behind. Pull up to the upper platforms and kill the two crawling atlanteans that once had the upper hand. Find a switch in the center of the room to raise a trapdoor in the lower area, go all the way to the end and safety drop on said trapdoor to throw the topmost of the switches in that wall. Two doors rise on the opposite end, but go back through the upper room to drop on top of the doors to find a small medipack before going in.
Save your game. Next up is a nasty corridor. There are spikes, lava pits, and two boulders will be hot on your heels as you run down, but what's worse: you need to take a running jump from the edge of the breakaway floor tiles at the last moment, and more often than not the boulders will block your view. Take a running jump over the first set and run straight through the next spikes, sacrificing health to have enough momentum for the running jump. It might take a few tries, but you'll eventually land this jump.
Up the tall steps, you come to a row of several gnashing teeth doors, but the spacing between them is minimal so be extra careful. In the end, pull up to battle a centaur atlantean who was protecting the SELF-DESTRUCT KEY (also check out the note on the wall). Go back down the way you came and find an open door leading to the top of the nightmare ramp you have just overcome.
In the previous room, use the trapdoor over the switches to reach the top of the room and find the open door in the opposite corner. Go up the ramps and save at the top as the gnashing teeth doors are positioned in tricky spots in the slopes. Time your moves past them and slide down backwards to safety drop back in the Scion chamber. You cannot shoot the device, so use the key the gods have favored you in the back to shut it down. Time to make haste. Save often as the falling debris might surprise you now and then.
Follow the path back to the throne room. You can ignore the centaur atlantean by the thrones, just take a leap of faith into the chasm which has appeared in the middle of the room to land into water far below. Swim west towards an A-shaped structure, you need to pull up on both sides and backflip to a higher ledge to find a switch. When both switches are down, a door opens on the east side. The narrow corridor is guarded by a crawling atlantean. In the end, pull up on the left.
Save your game. Two scorching boulders will roll over the lateral lava lanes, while they don't threaten you directly you still need to reach the opening in the end before they do, otherwise it's bye bye Lara. Go through the dark rocks on the right and find some uzi clips in an alcove before moving upwards. There are three crawling atlanteans patrolling this room.
Before moving on, use the block to reach the upper walkways where once you had thrown four switches. Go all the way around the ledges to find that high switch you needed to shimmy to using a crevice on the wall: it's now been replaced with SECRET #10, the last one in the game, three uzi clips and a large medipack on top of Lara's "Made in Derby" star.
Safety drop down to the floor (mind the lava pits) and run out of the pyramid. Two centaur atlanteans are roaming by to provide cover for Natla herself. When she's finally done for, climb to the top of the building on the left and jump across the safe spots on the pyramid and around the perimeter to an opening in the rocky ceiling above the other building. As you climb up, more crawling atlanteans show up at the pyramid's door, but you should just make a run for it. Bounce off the top slope to reach the ledge above as a never-ending barrage of projectiles is flung your way.
Just around the bend comes another nasty boulder trap. Save your game and run down close to the right of the doorway. Almost in a straight line, when Lara begins to slide, jump veering left, and immediately bounce veering back to the right. Wait for a second and half before jumping to the next slope which bounces you to the side. Wait a bit again before taking a sliding jump to that flat spot dangerously close to lava.
Save your game, then jump to the rocks next to the wall. If you look down, you'll see a spike pit at the bottom of the ramp — which means another boulder, indeed — and just to the right of it is a crevice on the wall. Take a running jump over the spikes and angling left so you can grab the crevice while steering clear from the boulder. Shimmy all the way to the left and let go in the very corner: you'll suffer some damage from the fire, but you won't go up in flames, so quickly turn and pull up on the left wall.
Take a running jump over the fallen debris and save your game. Lava will flow from the right as you make your final desperate move to that horizon, doing your best to dodge the falling debris just as well...
Congratulations, you've reached the end!